TechEd 2011 had some great PowerShell Sessions…

If you couldn’t make it to TechEd 2011 this year then you just missed two great PowerShell Sessions.  But, don’t worry, check out this link: (download and watch)

Advanced Automation Using Windows PowerShell 2.0

http://channel9.msdn.com/Events/TechEd/NorthAmerica/2011/WSV406

Windows PowerShell Remoting: Definitely NOT Just for Servers

  • Date: May 18, 2011 from 1:30PM to 2:45PM
  • Day 3
  • WCL321
  • Speakers: Don Jones

http://channel9.msdn.com/Events/TechEd/NorthAmerica/2011/WCL321

To check out TechEd 2011 other recorded sessions on many topics, such as: Azure, Hyper-V, Visual Studio, SQL Denali, Lync…  many more.  Click on this link: http://channel9.msdn.com/Events/TechEd/NorthAmerica/2011

Two new PowerShell functions for SQL Server

I just uploaded to new functions to the Microsoft Script Center:
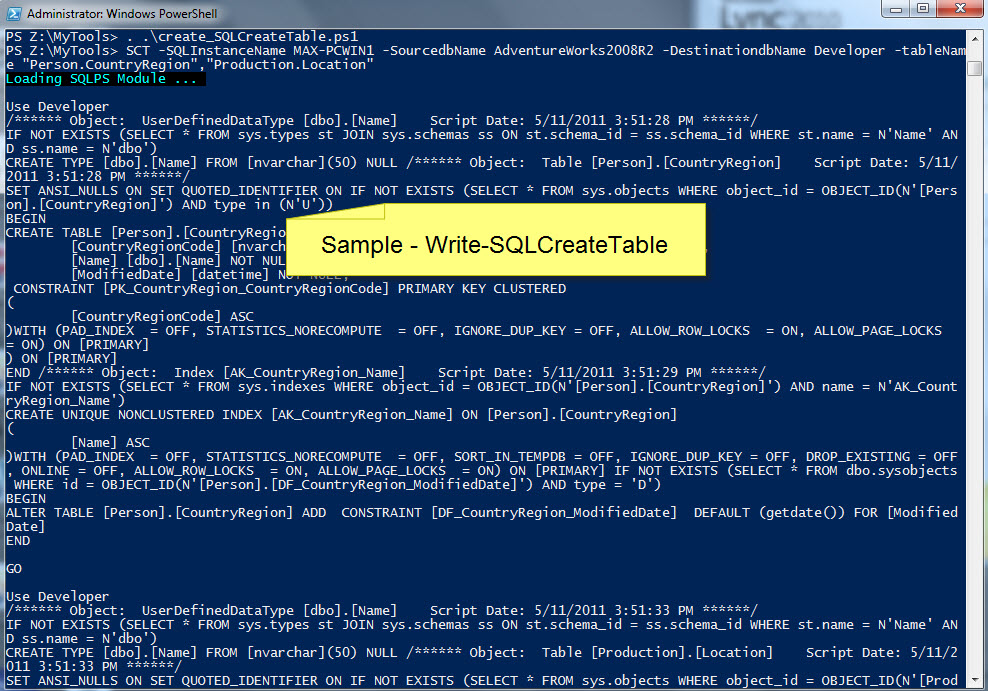
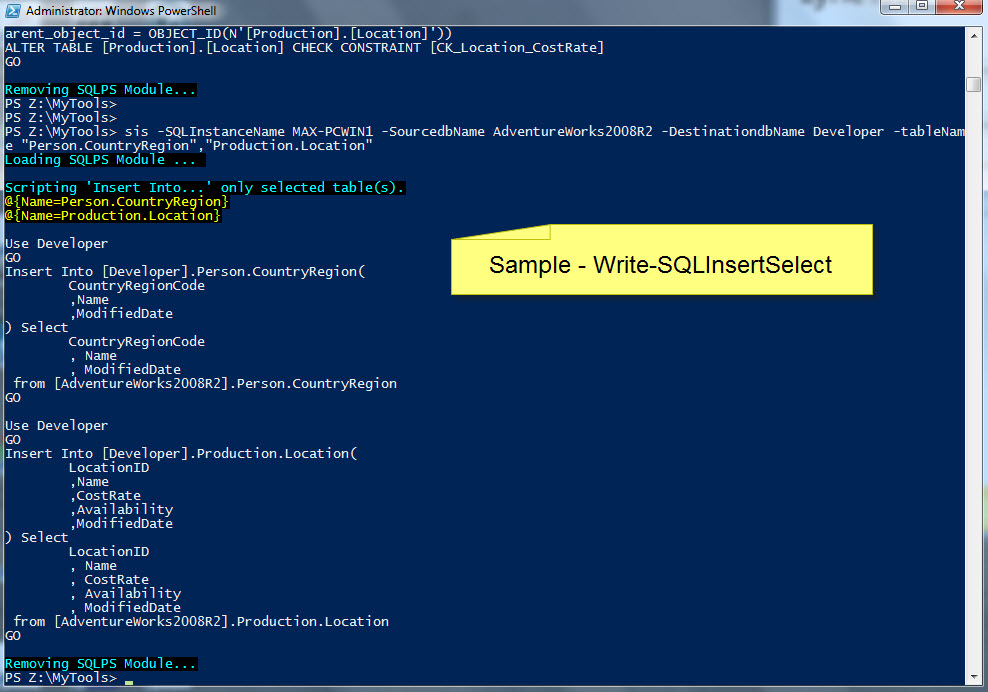
The first will script out your table(s) structure, adn the second one will build your “insert into… Select…” script so you can populate the data of the empty table(s).  I included some documentation so is accessible using the get-help or help commands.
In the “Write-SQLCreateTable” function, I use some pre-defined scripting options but you may add/removed and only use the ones you need.  Here’s the ones I use:
[sourcecode language=”powershell”]
$scrp = New-Object -TypeName Microsoft.SqlServer.Management.SMO.Scripter $SQLInstanceName
$scrp.Options.DriAll = $True
$scrp.Options.ClusteredIndexes = $True
$scrp.Options.IncludeIfNotExists = $True
$scrp.Options.IncludeHeaders = $True
$scrp.Options.Indexes = $True
$scrp.Options.WithDependencies = $True
$scrp.Options.AnsiPadding = $True
$scrp.Options.NoIdentities = $True
[/sourcecode]

For now, you need to provide the table schema, and the name of the tables will rename the same.  I will be updating this function to later allow to include a prefix to change the destination table name, and maybe include change the schema.

Keep in mind,  both functions will display the results on screen.  You can save the resutls to an PS Object and the use the “Invoke-SQLcmd” the  “-query” parameter to execute the scripts.

[string] $sqlquery = Write-SQLCreateTable …
Invoke-SQLCmd -ServerInstance MySQLServer -query $sqlquery

Sample pics

Function Write-SQLCreateTable
Function Write-SQLInsertSelect
Happy PowerShelling!!

Getting Started with Office 365 PowerShell

I have to admit that having setup Office 365 was a breeze.  Just make sure you have a reliable fast internet connection, and you are good to go. By the way… no servers equipment is needed.

and

Well, since I got Office 365 Beta setup in my computer I’ve been looking for information about how to use PowerShell.  Now, thanks to one of my PowerShell MVP
college (Sean Kearney) mention about this information been well documented in
Office 365 Beta.  I found it, and I couldn’t believe it was that SIMPLE!!!  YES,
SIMPLE!!

My computer environment is very basic.  I have no Exchange, Linc, or Sharepoint.  So now I’m part of the cloud experience with Office 365, and my answer of using PowerShell was at my fingertip.

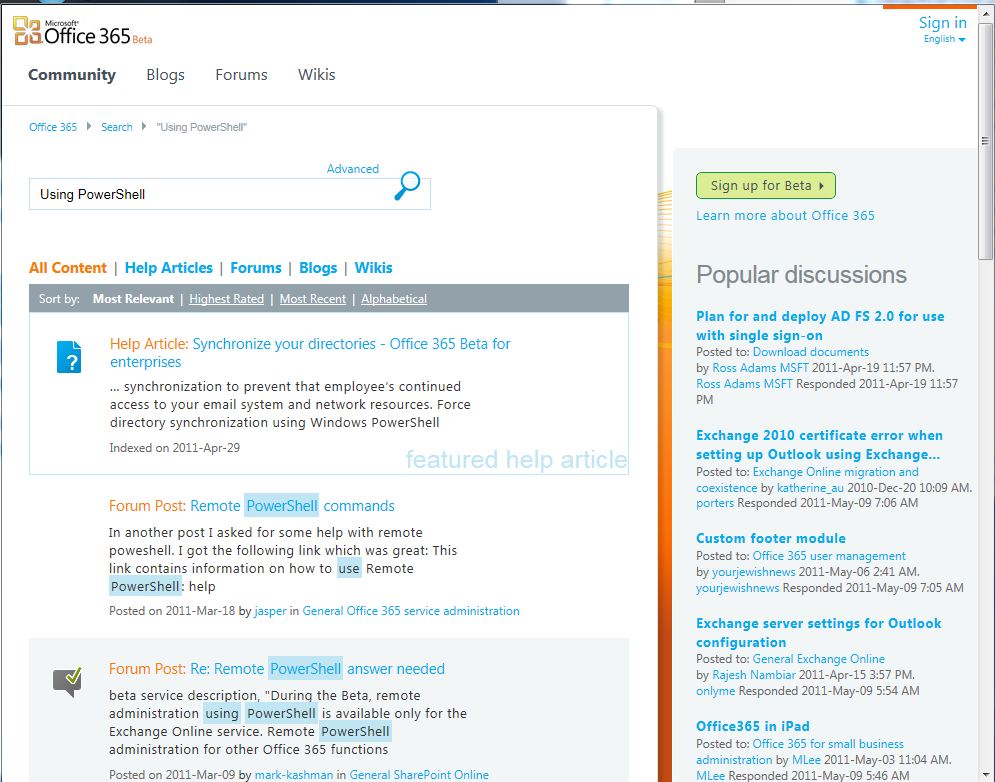
Search for "Using PowerShell"

If you want to try it, then check out the links below, and copy/paste the code.  Make sure you meet all the requirements needed so you can experience using PowerShell with Office 365.  By the way, It’s highly recommended by our PowerShell MVP’s colleges to set your Execution Policy to “ RemoteSigned” and not “unrestrincted”.  Using “unrestricted” will still give you some security warning.

Office 365 – PowerShell – Resource Information Currently
available under: “Outlook Web App Help”

Install and Configure Windows PowerShell: http://help.outlook.com/en-us/140/cc952756.aspx

Reference to Available PowerShell Cmdlets: http://help.outlook.com/en-us/140/dd575549.aspx

Use Windows PowerShell in Exchange Online: http://help.outlook.com/en-us/140/cc546278.aspx

**Control Users’ Access to Windows Remote
Management:
http://help.outlook.com/en-us/140/Dd256962.aspx

Connect Windows PowerShell to the Service: http://help.outlook.com/en-us/140/cc952755.aspx

**You need to understand one thing, and quote this from the
help “… By default, all new user accounts are allowed to use Windows
Remote Management (WinRM) to access the cloud-based organization with Windows
PowerShell …”.  But, the help documentation gives you the
code to prevent users to access remoting with Office 365. (read the help documentation)

By the way, there’s a recent change to the connection URI:

… -ConnectionUri “https://pod51011psh.outlook.com/PowerShell-LiveID?PSVersion=2.0

I love our PowerShell MVP Community.  Here’s an observation from Aleksandar Nikolic:  “… i think you should use generic Connectionuri(https://ps.outlook.com/powershell) and not specific server. you’ll be redirected  … office365 will redirect you to closest, the least busy server  …”.   Thanks Alek.:)

This is totally true, and the only reason I included the change was to avoid the redirection warning message.  So you can still use what’s documented:

-ConnectionUri https://ps.outlook.com/powershell/

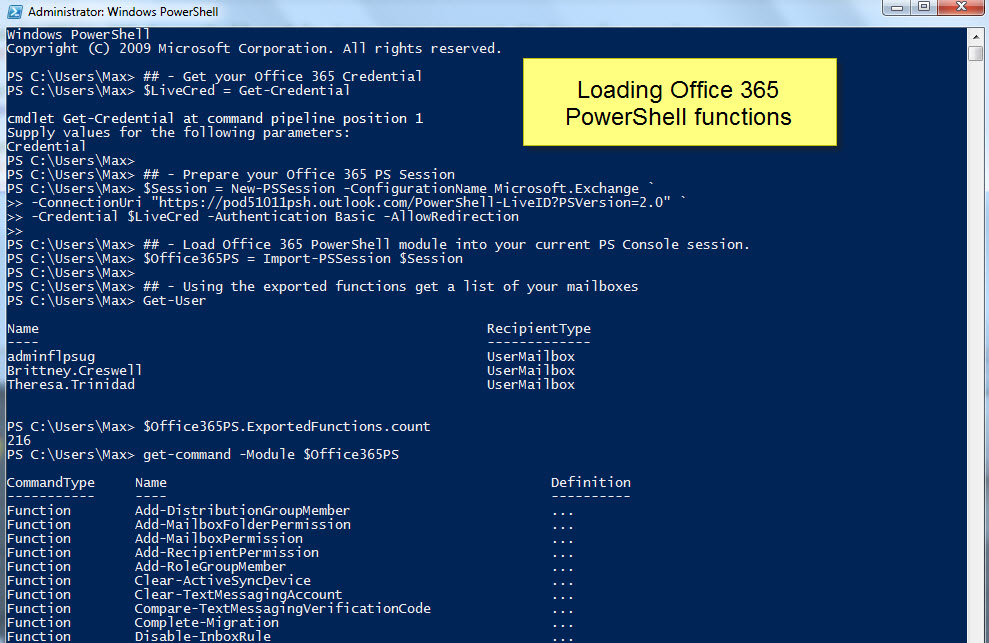
Sample PS Console creating a Office 365 PS Session

Sample Script:

[sourcecode language=”powershell”]
##—- Getting Started with Office 365 PowerShell —-##

## – Get your Office 365 Credential
$LiveCred = Get-Credential

## – Prepare your Office 365 PS Session
$Session = New-PSSession -ConfigurationName Microsoft.Exchange `
-ConnectionUri "https://pod51011psh.outlook.com/PowerShell-LiveID?PSVersion=2.0" `
-Credential $LiveCred -Authentication Basic -AllowRedirection

## – Load Office 365 PowerShell module into your current PS Console session.
$Office365PS = Import-PSSession $Session

## – Using the exported functions get a list of your mailboxes
Get-User

## – Get command information, count and list names.
$Office365PS.ExportedFunctions.count
get-command -Module $Office365PS | more
[/sourcecode]

In my case, I got a total of 216 more PowerShell commands to manage and/or automate my Office 365 cloud application: (listed below)
Add-DistributionGroupMember
Add-MailboxFolderPermission
Add-MailboxPermission
Add-RecipientPermission
Add-RoleGroupMember
Clear-ActiveSyncDevice
Clear-TextMessagingAccount
Compare-TextMessagingVerificationC
Complete-Migration
Disable-InboxRule
Disable-Mailbox
Enable-InboxRule
Enable-Mailbox
Enable-OrganizationCustomization
Export-MigrationReport
Get-AcceptedDomain
Get-ActiveSyncDevice
Get-ActiveSyncDeviceAccessRule
Get-ActiveSyncDeviceClass
Get-ActiveSyncDeviceStatistics
Get-ActiveSyncMailboxPolicy
Get-ActiveSyncOrganizationSettings
Get-AdminAuditLogConfig
Get-CalendarNotification
Get-CalendarProcessing
Get-CASMailbox
Get-CASMailboxPlan
Get-Contact
Get-DistributionGroup
Get-DistributionGroupMember
Get-DynamicDistributionGroup
Get-FailedContentIndexDocuments
Get-FederatedOrganizationIdentifie
Get-FederationInformation
Get-FederationTrust
Get-Group
Get-HotmailSubscription
Get-ImapSubscription
Get-InboxRule
Get-IRMConfiguration
Get-LinkedUser
Get-LogonStatistics
Get-Mailbox
Get-MailboxAuditBypassAssociation
Get-MailboxAutoReplyConfiguration
Get-MailboxCalendarConfiguration
Get-MailboxCalendarFolder
Get-MailboxFolder
Get-MailboxFolderPermission
Get-MailboxFolderStatistics
Get-MailboxJunkEmailConfiguration
Get-MailboxMessageConfiguration
Get-MailboxPermission
Get-MailboxPlan
Get-MailboxRegionalConfiguration
Get-MailboxSpellingConfiguration
Get-MailboxStatistics
Get-MailContact
Get-MailUser
Get-ManagementRole
Get-ManagementRoleAssignment
Get-ManagementRoleEntry
Get-ManagementScope
Get-MessageCategory
Get-MessageClassification
Get-MessageTrackingReport
Get-MigrationBatch
Get-MigrationStatus
Get-MigrationUser
Get-MoveRequest
Get-MoveRequestStatistics
Get-OrganizationalUnit
Get-OrganizationRelationship
Get-OwaMailboxPolicy
Get-PerimeterConfig
Get-PopSubscription
Get-ProvisioningRequest
Get-Recipient
Get-RecipientPermission
Get-RecipientStatisticsReport
Get-RemoteDomain
Get-RemovedMailbox
Get-RetentionPolicy
Get-RetentionPolicyTag
Get-RMSTemplate
Get-RMSTrustedPublishingDomain
Get-RoleAssignmentPolicy
Get-RoleGroup
Get-RoleGroupMember
Get-SecurityPrincipal
Get-SendAddress
Get-ServiceStatus
Get-SharingPolicy
Get-Subscription
Get-SyncConfig
Get-TextMessagingAccount
Get-ThrottlingPolicy
Get-ThrottlingPolicyAssociation
Get-ToolInformation
Get-TransportConfig
Get-User
Import-ContactList
New-ActiveSyncDeviceAccessRule
New-ActiveSyncMailboxPolicy
New-AdminAuditLogSearch
New-DistributionGroup
New-DynamicDistributionGroup
New-HotmailSubscription
New-ImapSubscription
New-InboxRule
New-Mailbox
New-MailboxAuditLogSearch
New-MailboxFolder
New-MailContact
New-MailMessage
New-MailUser
New-MessageClassification
New-MigrationBatch
New-MoveRequest
New-OrganizationRelationship
New-OwaMailboxPolicy
New-PopSubscription
New-ProvisioningRequest
New-RemoteDomain
New-RetentionPolicy
New-RetentionPolicyTag
New-SharingPolicy
New-Subscription
Remove-ActiveSyncDevice
Remove-ActiveSyncDeviceAccessRule
Remove-ActiveSyncMailboxPolicy
Remove-DistributionGroup
Remove-DistributionGroupMember
Remove-DynamicDistributionGroup
Remove-InboxRule
Remove-Mailbox
Remove-MailboxFolderPermission
Remove-MailboxPermission
Remove-MailContact
Remove-MailUser
Remove-MessageClassification
Remove-MoveRequest
Remove-OrganizationRelationship
Remove-OwaMailboxPolicy
Remove-ProvisioningRequest
Remove-RecipientPermission
Remove-RemoteDomain
Remove-RetentionPolicy
Remove-RetentionPolicyTag
Remove-RoleGroupMember
Remove-SharingPolicy
Remove-Subscription
Resume-MoveRequest
Search-AdminAuditLog
Search-Mailbox
Search-MailboxAuditLog
Search-MessageTrackingReport
Send-TextMessagingVerificationCode
Set-AcceptedDomain
Set-ActiveSyncDeviceAccessRule
Set-ActiveSyncMailboxPolicy
Set-ActiveSyncOrganizationSettings
Set-CalendarNotification
Set-CalendarProcessing
Set-CASMailbox
Set-Contact
Set-DistributionGroup
Set-DynamicDistributionGroup
Set-FederatedOrganizationIdentifie
Set-Group
Set-HotmailSubscription
Set-ImapSubscription
Set-InboxRule
Set-LinkedUser
Set-Mailbox
Set-MailboxAuditBypassAssociation
Set-MailboxAutoReplyConfiguration
Set-MailboxCalendarConfiguration
Set-MailboxCalendarFolder
Set-MailboxFolderPermission
Set-MailboxJunkEmailConfiguration
Set-MailboxMessageConfiguration
Set-MailboxPlan
Set-MailboxRegionalConfiguration
Set-MailboxSpellingConfiguration
Set-MailContact
Set-MailUser
Set-MessageClassification
Set-MoveRequest
Set-OrganizationConfig
Set-OrganizationRelationship
Set-OwaMailboxPolicy
Set-PerimeterConfig
Set-PopSubscription
Set-RemoteDomain
Set-RetentionPolicy
Set-RetentionPolicyTag
Set-RoleGroup
Set-SharingPolicy
Set-TextMessagingAccount
Set-TransportConfig
Set-UMMailbox
Set-UMMailboxPIN
Set-User
Start-ManagedFolderAssistant
Start-MigrationBatch
Start-ProvisioningRequest
Start-RetentionAutoTagLearning
Stop-MigrationBatch
Suspend-MoveRequest
Test-MAPIConnectivity
Test-MigrationServerAvailability
Test-OrganizationRelationship
Update-DistributionGroupMember
Update-RoleGroupMember
Write-AdminAuditLog

As you can see, there’s plenty of commands to learn.  So, let’s get busy.

Happy PowerShelling!!

South Florida IT Camp Saturday 2011 on July 23rd

We are pleased to announce the first South Florida IT Camp on Saturday, July 23rd 2011 from 8:00 am to 5:00 pm at Nova Southeastern in Fort Lauderdale.

Parking and admittance to this event is free.  Lunch will provided. Please Register now. Let your friends and colleagues know about this event.

Join system administrators IT professionals and database professionals in addition to managers at all levels in Florida that work with Microsoft technologies for a “IT Camp Saturday”. IT Camps are a free, one day learning event for anyone seeking professional development. This event serves IT professionals and students with a focus on IT Pro related technologies. IT Camps offer a conference style learning environment free of charge to attendees and is open to presenters of
all backgrounds and expertise.

Have questions? Comment or Contact Us.

Call for Speakers is Open

The call for speakers is open until 6/11. Topics can be anything applicable to System admins, and/or IT Pros including SharePoint, System Center, SQL Server, PowerShell, Active Directory, or Windows 2008 R2 and Windows 7.

To submit your session, please Click Here, or if you have questions? Comment or contact us.

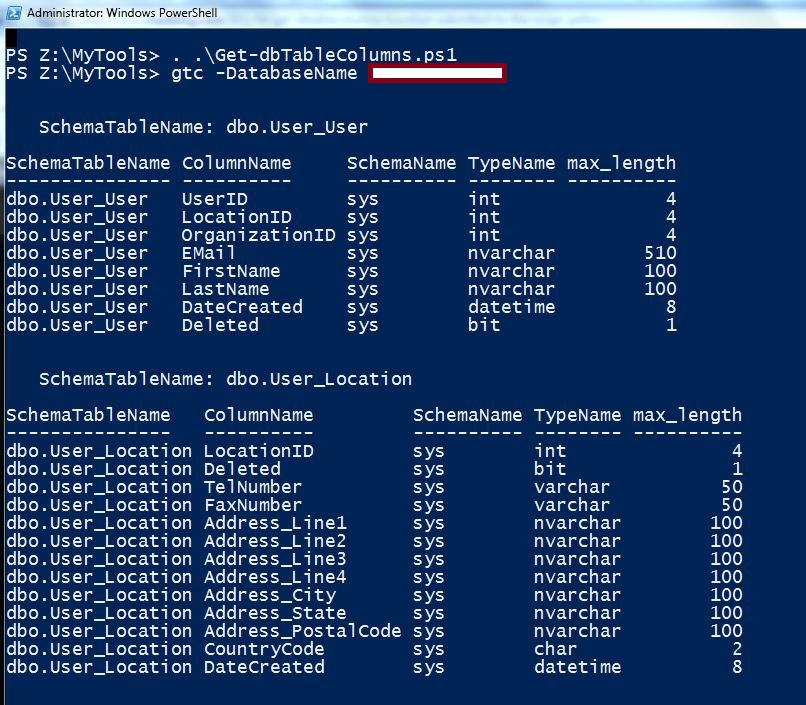
Get-dbTableColumns function submitted to the Script Gallery

Based on recent article about getting SQL Server table columns information, I decided to create a function “Get-dbTableColumns.ps1” and posted into the Microsoft Scritp Gallery. I use some of our favorite community tools from Chad Miller and Pinal Dave to bring in a practical and useful command.

So, checked it out at, “Get database table columns list”: http://gallery.technet.microsoft.com/scriptcenter/21c90399-d408-428d-92a5-902e037fdd9b

Instructions are included.

Hint: Want to save result to a text file? Try…

Get-dbTableColumns -DatabaseName YourDbName | Out-File -FilePath c:\TableInfo.txt

Enjoy!

SQL PowerShell – List your DB Table columns information…

Making some addition to Pinal Dave T-SQL code provided in one of his blog on “List All The Column With Specific Data Types” we can use PowerShell to list our database table’s columns in an efficient way.  But, for the information what I needed to produce I had to add a few things to Pinal’s code.

Keep in mind, PowerShell can assist the DBA in effectively providing better T-SQL results.  Let me show you how we can leverage this T-SQL code with PowerShell.

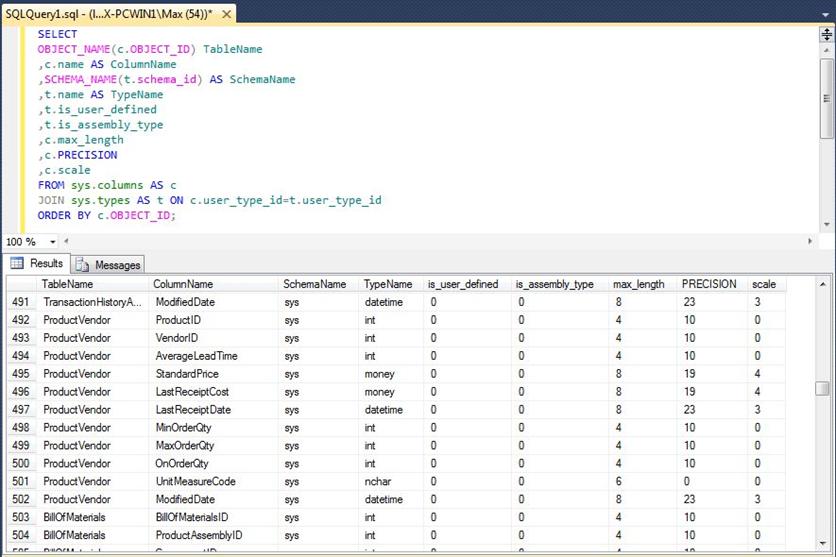
Here’s the original SQL script executed in SSMS and the actual results shown in the following picture:

(Pinal Dave SQL Script)


This is a start but I needed a little more information, and a better way to display it.

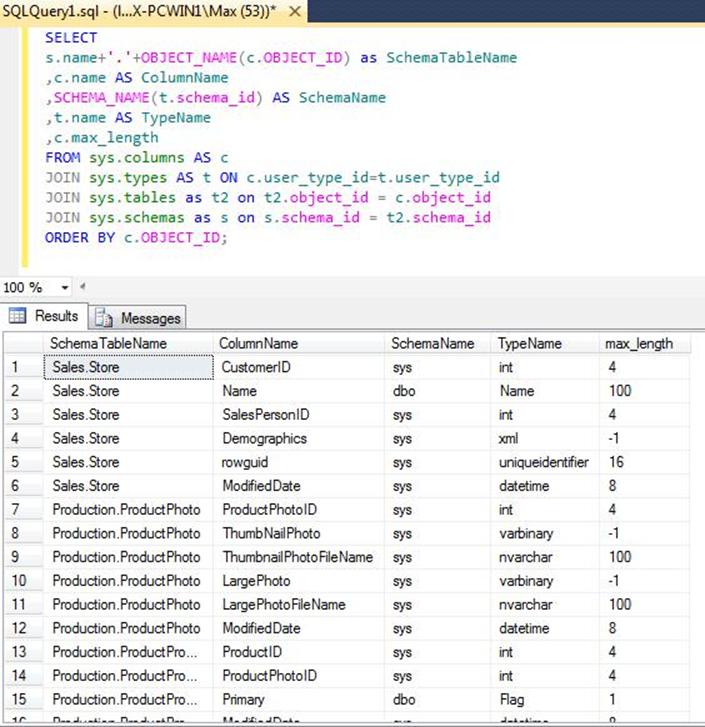
First, I added two other ‘joins’ to the SQL script to include the ‘sys.tables’ and ‘sys.schemas’. Then, I customized the script a little more to get the results I wanted and ran it on my SSMS:

SELECT s.name+‘.’+OBJECT_NAME(c.OBJECT_ID) as SchemaTableName
,c.name AS ColumnName
,SCHEMA_NAME(t.schema_id) AS SchemaName
,t.name AS TypeName
,c.max_length
FROM sys.columns AS c
JOIN sys.types AS t ON c.user_type_id=t.user_type_id
JOIN sys.tables as t2 on t2.object_id = c.object_id   JOIN sys.schemas as s on s.schema_id = t2.schema_id
ORDER BY c.OBJECT_ID;


As you can see, now I included Schema with Table names and removed some columns. Now, let’s put PowerShell in action. I’m going to use my modified T-SQL script, create a simple PowerShell script and run it under SQL PowerShell.

Prerequisite for executing this script, you need to have:

  1. SQL Server 2008 (or above)
    1. Download Chad Miller SQLPS module for SQL Server 2008 and 2008 R2
    2. Or, Download my version of SQLPSv2 for SQL Server ‘Denali’.
  2. PowerShell 2.0

Using the any of the SQLPS modules, you can create a simple PowerShell script to generate our table columns information with a few lines of code:

  1. Store the T-SQL script code in a string variable.
  2. Load the SQL PowerShell Module using the “Import-Module” command.
  3. Run the T-SQL query using the “Invoke-SQLCmd” to store the information in a variable.
  4. Then, we can manipulate the results we just saved in a variable.

Here’s the script:

$sqlQuery = @
SELECT
s.name+’.’+OBJECT_NAME(c.OBJECT_ID) as SchemaTableName
,c.name AS ColumnName
,SCHEMA_NAME(t.schema_id) AS SchemaName
,t.name AS TypeName
,c.max_length
FROM sys.columns AS c
JOIN sys.types AS t ON c.user_type_id=t.user_type_id
JOIN sys.tables as t2 on t2.object_id = c.object_id
JOIN sys.schemas as s on s.schema_id = t2.schema_id
ORDER BY c.OBJECT_ID;
@
Import-Module SQLPSv2
$SavedResults1 = Invoke-SQLCmdServerInstance
“MAX-PCWIN1”Database
“Adventureworks”Query
$sqlQuery
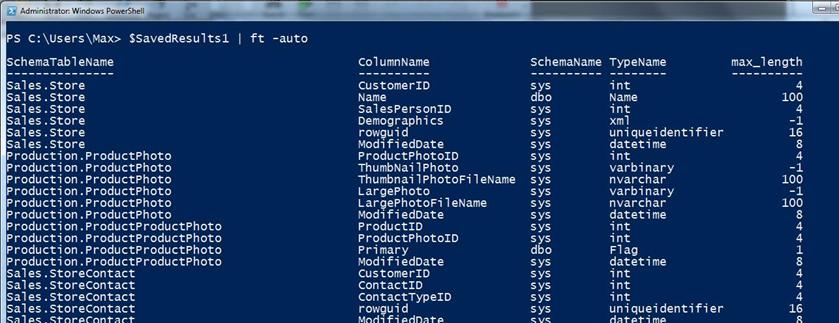
$SavedResults1 | ftauto

The last line of this script will list all content of your stored results and display it in a table format.


We got all tables listed one after another. So, we can add a few more lines of code to separate the tables:

## – First create a list of all the tables in the stored object ‘$SavedResults1’
$TableName = $SavedResults1 | selectunique SchemaTableName | Sort SchemaTableName
## – Verify all tables selected and in order
$TableName

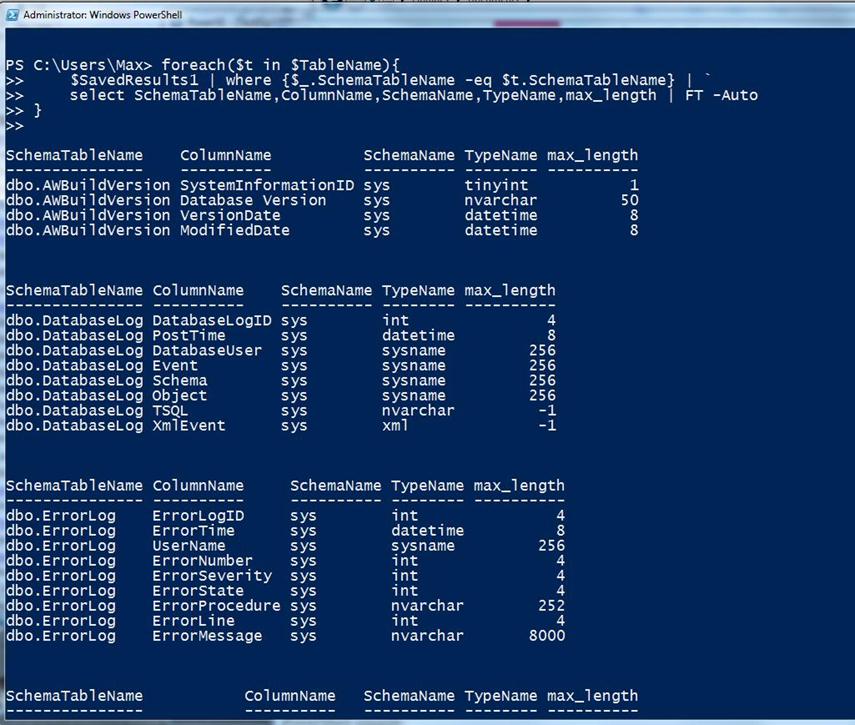
Next step is to use a “ForEach-Object” command to help us break out the tables information individually, and display it on the PowerShell console:

foreach($t
in
$TableName){
    $SavedResults1 | where {$_.SchemaTableName -eq
$t.SchemaTableName} | `
    select SchemaTableName,ColumnName,SchemaName,TypeName,max_length | FTAuto
}


Now, you can be creative in how this information can be displayed, or even exported to another file format such as a ‘CSV’ or ‘TXT’ type. Just try it!!

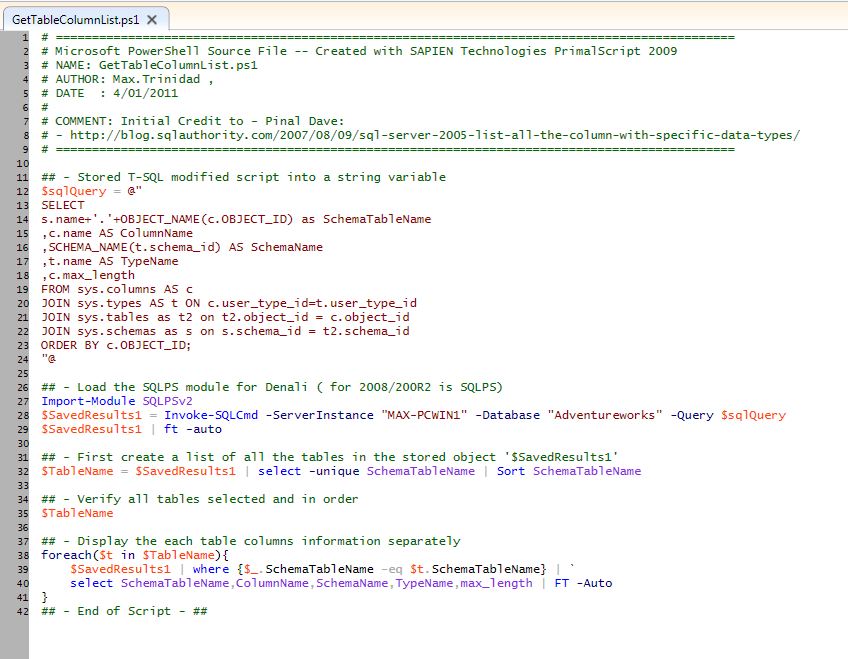
Here’s the complete simple PowerShell script: 


 Stay tuned for more!  

To get script file, download here: 


Tips on scripting with PowerShell objects…

PowerShell is a great tool for collecting information. Here’s some direct tips to try to minimize the pain of coding, or at  least make it (kind of) readable.  I’ve seen some blogs out there that turn some people way just because their script is working.  But, that’s the beauty of PowerShell.  No matter how you build the code, if the end results is what you’re looking for, then good for you. 

I hope later on you realized that your script can be improved, and you will feel the POWER of POWERSHELL!!!

Briefly, I will be covering PSObject, Hash table, and a bonus Array objects

Check this out.  Here’s an example of some script lines building a PowerShell variable object from two Cmdlets executing two different WMI classes: Win32_OperatingSystem and Win32_BIOS.

Original Sample

   1: $ComputerName = "."

   2: $wmi = Get-WmiObject Win32_OperatingSystem –comp $ComputerName | Select CSName,BuildNumber,ServicePackMajorVersion;

   3: $obj = New-Object PSObject;

   4: $obj | Add-Member NoteProperty BuildNumber ($wmi.BuildNumber);

   5: $obj | Add-Member NoteProperty CSName ($wmi.CSName);

   6: $obj | Add-Member NoteProperty SPVersion ($wmi.ServicePackMajorVersion);

   7: $wmi = Get-WmiObject Win32_BIOS –comp $ComputerName | Select SerialNumber;

   8: $obj | Add-Member NoteProperty BIOSSerial ($wmi.SerialNumber);

   9: $obj;

Now, the above code will work.  In my opinion using Add-Member is already old school. 

image

At the end, I checked for the PS variable ($obj) type, using the “.gettype()” method.  This confirmed this variable a PSCustomObject.

I will show you other ways to get a similar results, and hopefully with less typing.  Maybe, it will look nicer too.  The goal is, as you progress using PowerShell for you day-to-day activity, you will continue to improve your existing code.

Improvement #1

   1: $ComputerName = "."

   2: $wmi1 = Get-WmiObject Win32_OperatingSystem –comp $ComputerName | Select CSName,BuildNumber,ServicePackMajorVersion;

   3: $wmi2 = Get-WmiObject Win32_BIOS –comp $ComputerName | select SerialNumber;

   4:  

   5: $results = $wmi1|select csname,BuildNumber,ServicePackMajorVersion,@{Label=”BIOSSerialNum”;Expression={$wmi2.SerialNumber}};

   6: $results;

As you can see, here I’m first collecting all the information by building my PowerShell variables in $wmi1 and $wmi2 which has different results.  Then, I’m combining the values I want from my $wmi1 and $wmi2 using the “Select” command.

image

So we made some improvements from originally 9 lines of code cut down to 5 lines.  And, notice that the new PS variable type still is “PSCustomObject”.

Now, let me show you another very nice variation that is intended to replace the use of “Add-Member” command.  We are going to use the Hash table concept to create our “PSCustomObject” variable.

Here’s another way which is better looking with less typing than our first example.

Improvement #2

   1: $wmi1 = Get-WMIobject -class Win32_OperatingSystem;

   2: $wmi2 = Get-WmiObject Win32_BIOS

   3:  

   4: $PCHashTable = @{

   5:     BuildNumber  = $wmi1.BuildNumber;

   6:     csname       = $wmi1.csname;

   7:     ServPackVersion = $wmi1.ServicePackMajorVersion;

   8:     BIOSSerialNum   = $wmi2.SerialNumber;

   9: }

  10:  

  11: $MyPSObject = New-Object PSObject -Property $PCHashTable;

  12: $MyPSObject;

image

As you can see, this PowerShell code have 10 lines but, for me, it looks cleaner and easy to read.  Basically, we are breaking the code in three sections:

1. Create the variable objects holding our results.

2. Build the hash table where we combine all our selected objects.

3. Convert the hash table to a “PSCustomObject”, so we can display the results in a proper format.  (see next pic.)

image

Hidden Tips:

Check in both improvement samples (1 & 2), I’m showing how you can create/change the label of your variable property in the “Select” command, and when you are creating a Hash table.

Bonus Script: Using Arrays objects to Collect information

Here’s a snippet you could use the gather information about your SQL Servers using .NET SMO SQL Enumeration to get all SQL names on the network.  To run this script you need to have SQLPS loaded in you PowerShell session and have proper server Windows Authentication.

I hope you’ll like it:

   1: ## For SQL Server need SQLPS to be loaded

   2: ##

   3: $SQLSvr = [Microsoft.SqlServer.Management.Smo.SmoApplication]::EnumAvailableSqlServers($false) | Select name;

   4:  

   5: [Array] $SQLinfo += ForEach($SQL in $SQLSvr){

   6:     $MySQL = new-object(“Microsoft.SqlServer.Management.Smo.Server”) $SQL.Name;

   7:     $MySQL | Select NetName, Product, EngineEdition, Version, Platform, ProductLevel;

   8: } 

   9:  

  10: $SQLinfo | select Netname, Product, EngineEdition, Version, ProductLevel | ft -auto;

Hidden Tip: Notice, I  have created an Array object ($SQLInfo) in line 5, in which the “ForEach()” command will be use to add the results from each element read from the server object ($SQLSvr).

BIG REMINDER!!!  Remember that your PS variables will probably have more values you can display in your results using the “.. |Select val1, val2, val5…”.  Use the Get-member command to exposed them.  (see next pic.)

image

That’s it for now!!
Convert your SQL PS variable results to XML… it’s easy!!

Here’s some PowerShell code use to create a PS variable results from a T-SQL query using the SQL  Server 2008 (or higher) SQLPS command “Invoke-SQLCmd”:

Import-Module SQLPSV2

$SQL1 = @”
Select * from SurfSpotTable
“@

$SQL1Query = Invoke-Sqlcmd -Server ‘MAX-PCWIN1’ -Database ‘Developer’ $SQL1Query

As you can see, with a few lines of code we got back some table information:


$SQL1Query

SpotID     SpotName            Location                      State
——       ——–                      ——–                            —–
     1          Wildernes               Aguadilla                     PR
     2         Aviones                   Carolina                       PR
     3         Surfers Beach        Aguadilla                     PR
     4         Jobos                        Isabela                         PR

There’s a couple of things to understand about this code:

1. You need to download either Chad’s Miller SQLPS module for SQL Server 2008 or my SQL Denali SQLPSv2 module version.

2. Need to use the Import-Module to load the SQL Server snapins.

3. Invoke-SQLCmd is using Windows Authentication to connect to the database.

Now, that we have our PS variable “$SQL1Query” then we use the Export-Clixml to export the information to a XML formatted file:

## Convert to XML
$SQL1Query | Export-Clixml -Path createxml.xml -NoClobber -Encoding ASCII

ii createxml.xml

Then, use an XML Editor such as SAPIEN Technologies PrimalXML 2009 to open the file and see the information.  The XML file will look like this:

<Objs Version=”1.1.0.1″ xmlns=”http://schemas.microsoft.com/powershell/2004/04″>
  <Obj RefId=”0″>
    <TN RefId=”0″>
      <T>System.Data.DataRow</T>
      <T>System.Object</T>
    </TN>
    <ToString>System.Data.DataRow</ToString>
    <Props>
      <I64 N=”SpotID”>1</I64>
      <S N=”SpotName”>Wildernes</S>
      <S N=”Location”>Aguadilla</S>
      <S N=”State”>PR</S>
    </Props>
  </Obj>
  <Obj RefId=”1″>
    <TNRef RefId=”0″ />
    <ToString>System.Data.DataRow</ToString>
    <Props>
      <I64 N=”SpotID”>2</I64>
      <S N=”SpotName”>Aviones</S>
      <S N=”Location”>Carolina</S>
      <S N=”State”>PR</S>
    </Props>
  </Obj>
  <Obj RefId=”2″>
    <TNRef RefId=”0″ />
    <ToString>System.Data.DataRow</ToString>
    <Props>
      <I64 N=”SpotID”>3</I64>
      <S N=”SpotName”>Surfers Beach</S>
      <S N=”Location”>Aguadilla</S>
      <S N=”State”>PR</S>
    </Props>
  </Obj>
  <Obj RefId=”3″>
    <TNRef RefId=”0″ />
    <ToString>System.Data.DataRow</ToString>
    <Props>
      <I64 N=”SpotID”>4</I64>
      <S N=”SpotName”>Jobos</S>
      <S N=”Location”>Isabela</S>
      <S N=”State”>PR</S>
    </Props>
  </Obj>
</Objs>

So, with a few lines of code we just produce an XML file from a SQL DataRow results.  You be the judge… but I think this is another example of PowerShell Awesomeness!!

.. I’m Just Saying!!

Stay tuned!! I will have more on PowerShell, SQL, and XML files soon.

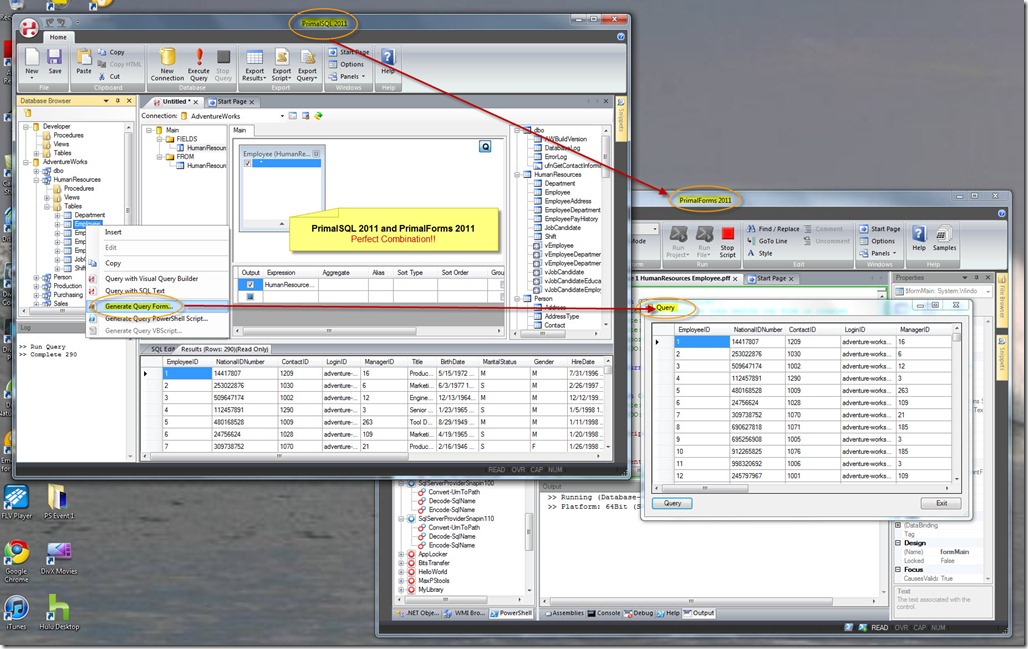
PrimalSQL and PrimalForms 2011, a perfect couple…

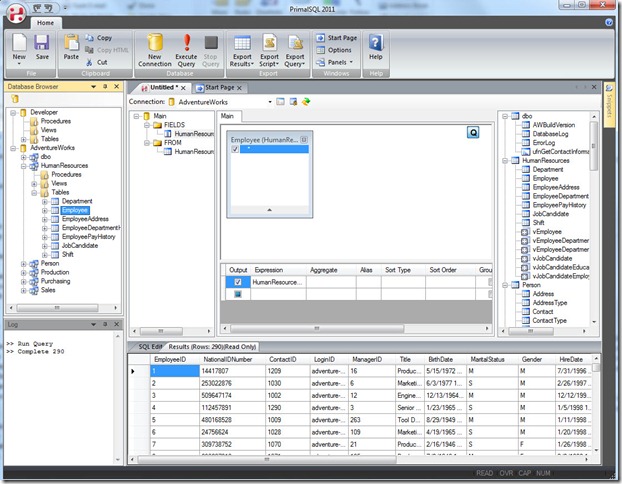
Here’s a quick overview of both PrimalSQL and PrimalForms 2011 working together.  These products gives you the ability to create GUI PowerShell scripts on the fly so you cut down you scripting time.

PrimalSQL2011

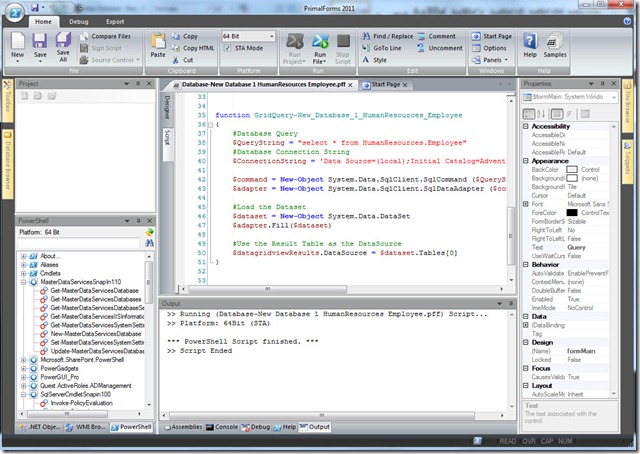
PrimalForms2011

I am test driving the upcoming new SAPIEN Technologies PrimalSQL 2011, and especially the new option to either “Generate Query Form…”, or “Generate Query PowerShell Script…”.   The best is the ability the generate a basic query form that you can change using the new upcoming PrimalForms 2011.  Both products are looking very solid with few bugs, and it’s still not in Beta yet!  It’s impressive.

Here’s both products working together:

PrimalSQLFORMS2011

Stay tuned for more information about this new product releases! 

Checkout more on exporting to a PowerShell script on SAPIEN Technologies blog: http://blog.sapien.com/index.php/2011/01/11/feature-peek-2011-primalsql-exporting-powershell-guis/?utm_source=feedburner&utm_medium=feed&utm_campaign=Feed%3A+SapienBlog+%28SAPIEN+Technologies+Blog%29