Building PowerShell Custom Objects Quick Tips

Let’s get right to the point. Here are a total of 4 simple tips to help you build custom PowerShell objects in both Version 2.0 and 3.0:

[sourcecode language=”powershell”]
##
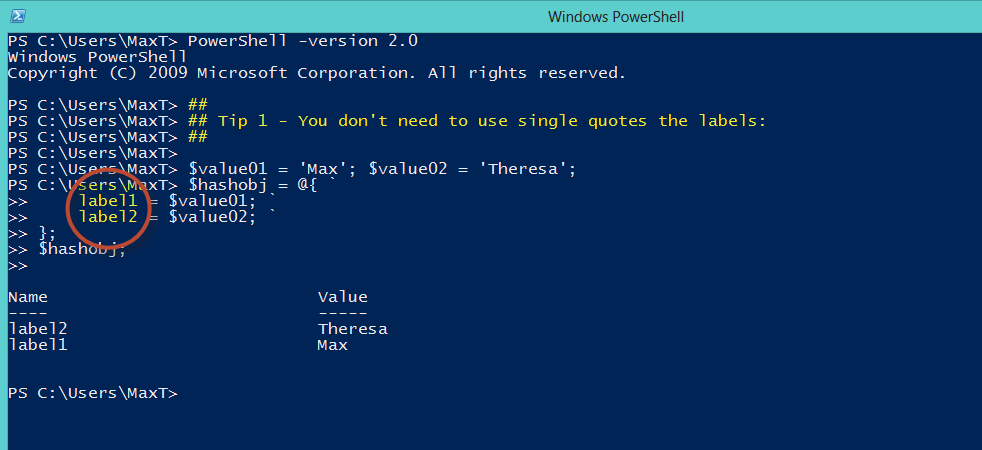
## Tip 1 – You don’t need to use single quotes the labels:
##

$value01 = ‘Max’; $value02 = ‘Theresa’;
$hashobj = @{ `
label1 = $value01; `
label2 = $value02; `
};
$hashobj;

[/sourcecode]

[sourcecode language=”powershell”]
##
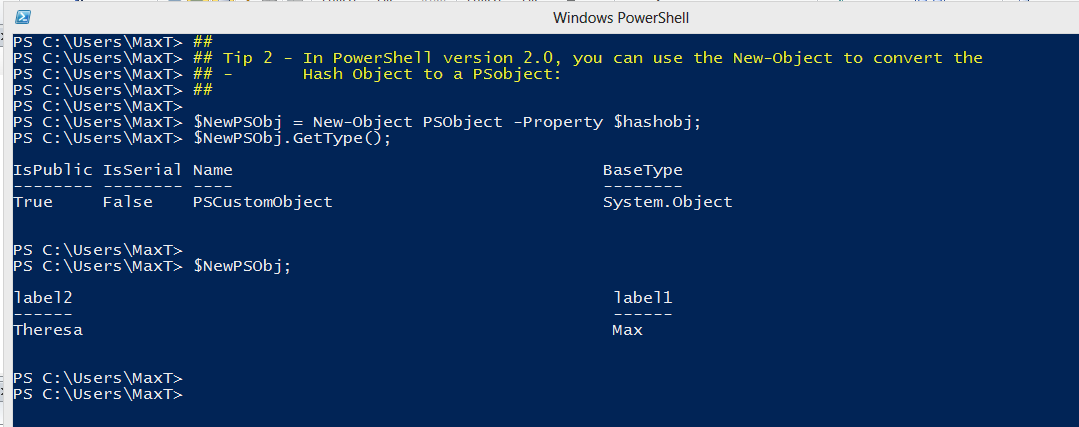
## Tip 2 – In PowerShell version 2.0, you can use the New-Object to convert the
## – Hash Object to a PSobject:
##

$NewPSObj = New-Object PSObject -Property $hashobj;
$NewPSObj.GetType();

$NewPSObj;

[/sourcecode]

[sourcecode language=”powershell”]
##
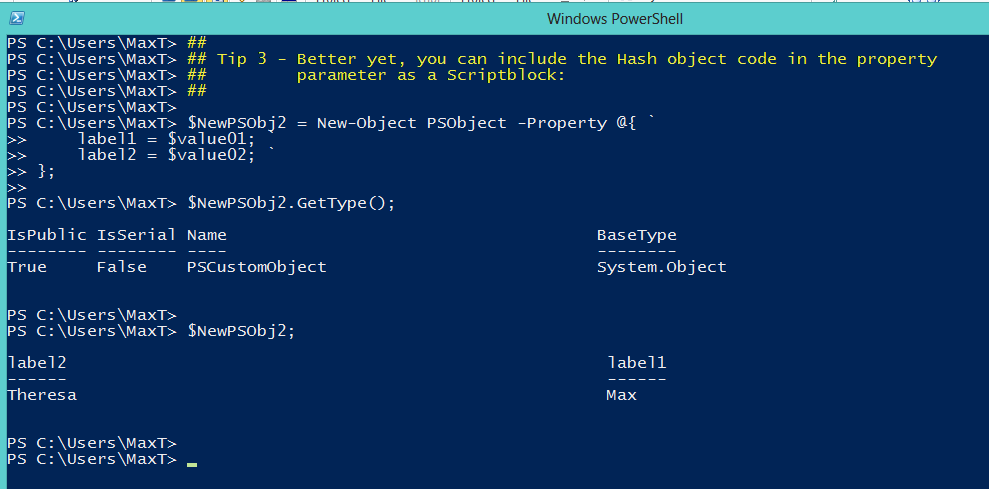
## Tip 3 – Better yet, you can include the Hash object code in the property
## parameter as a Scriptblock:
##

$NewPSObj2 = New-Object PSObject -Property @{ `
label1 = $value01; `
label2 = $value02; `
};

$NewPSObj2.GetType();

$NewPSObj2;

[/sourcecode]

[sourcecode language=”powershell”]
##
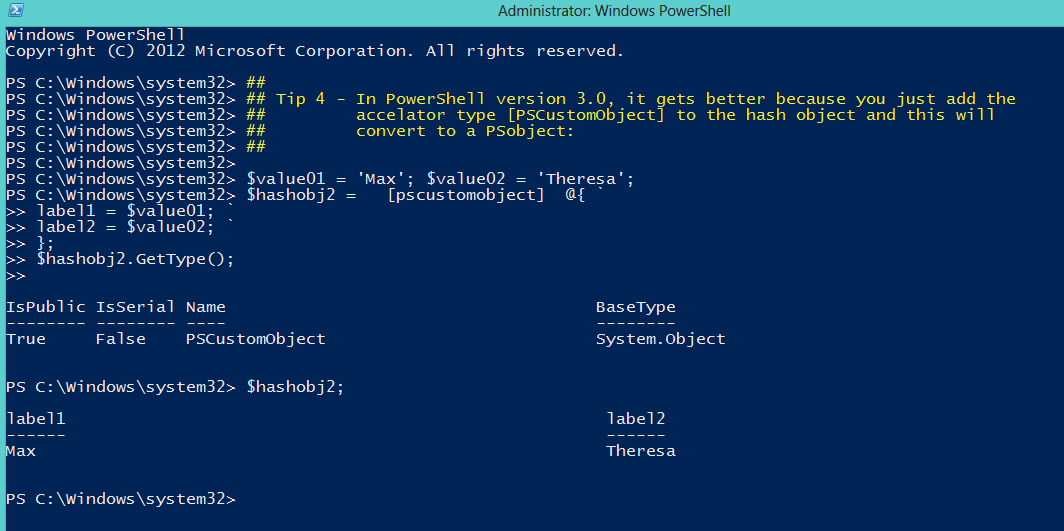
## Tip 4 – In PowerShell version 3.0, it gets better because you just add the
## accelator type [PSCustomObject] to the hash object and this will
## convert to a PSobject:
##

$value01 = ‘Max’; $value02 = ‘Theresa’;
$hashobj2 = [pscustomobject] @{ `
label1 = $value01; `
label2 = $value02; `
};
$hashobj2.GetType();

$hashobj2;

[/sourcecode]

Also, in this code you’ll see the use of the space follow by a tick ” `” which is a “line continuation”, and the semi-colon “;” which is commonly use as a line terminator. Both are optional but useful.
PowerShell – Start getting your Computer Last BootUp Time

The PowerShell community has done an Excellent job in providing LOTs of sample codes. But sometime can be very intimidating for a beginner to understand. Well, PowerShell can be both simple, and complicated but not impossible to learn.

Is good to know there are other ways other to get the same or similar result. And I’m not against it because you can even integrate those solutions into PowerShell.

BUT, you need to realized this is a SKILL you need nowadays. PowerShell can’t be ignore any more. If you don’t build up this skill then you’re probably going to lose a job opportunity.

Now, here’s a series of oneliners to assist you in getting the computer BootUp time information:

[sourcecode language=”powershell”]
## – Simple way to start knowing your PSobject
$x = get-wmiObject -Class Win32_OperatingSystem -Computername "YourComputerName";

## – Discovering you PSobject content:
$x | get-member;

## – Sample getting the PSObject ‘Property’ names for computername and Lastboottime:
$x | Select csname, LastBootUpTime;

## – Need to use the "ConvertToDateTime" script method which is in your PSobject $x:
$x.ConvertToDateTime($x.LastBootUpTime);

## – Wee need to create a one-liner to display the date/time correctly
## – using scriptblock expression:
$x | Select csname, `
@{label=’MyLastBootUpTime’;Expression={$_.ConvertToDateTime($_.LastBootUpTime)};} `
| format-table -autosize;

## – Now, pay attention to the Get-member results and you’ll find the following methods:
# Reboot()
# SetDateTime()
# Shutdown()
# Win32Shutdown()
# Win32ShutdownTracker()
## – You will realized the PSObject you just created can be use to perform
## – task such as: reboot or shutdown.

## – This is an example to create an Array list of servernames:
$srvList = @("Server1","Server2","Server3");

###### BUILDING A SCRIPT with above onliners ########
## – Now we need to loop through each of the servers in the array with ‘Foreach’
## – and display the results on screen:

$srvList = @("Server1","Server2","Server3");

foreach($server in $Srvlist)
{
$x = get-wmiObject -Class Win32_OperatingSystem -Computername $server;
$x | Select csname, `
@{label=’MyLastBootUpTime’;Expression={$_.ConvertToDateTime($_.LastBootUpTime)};} `
| format-table -autosize;
};

## OR, the next sample will create a PSObject from you looping results:

$srvList = @("Server1","Server2","Server3");

[array] $myUpTimeList = foreach($server in $Srvlist)
{
$x = get-wmiObject -Class Win32_OperatingSystem -Computername $server;
$x | Select csname, `
@{label=’MyLastBootUpTime’;Expression={$_.ConvertToDateTime($_.LastBootUpTime)};};
};

$myUpTimelist | ft -auto;

## – End of scripts

[/sourcecode]

This is your starting code block. This code can be improved to suite your need by adding more PSobject properties and/or routing the results to an output file.

I hope this can give some insight on how PowerShell can help in your admin tasks.

Add from one XML data to another existing XML file

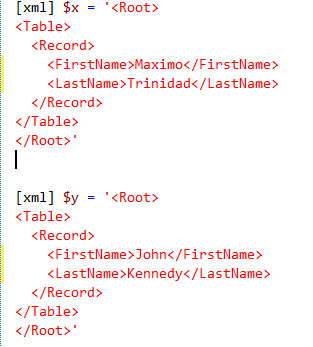
This topic came up after my SQLSaturday presentation in Tampa last weekend. In an scenario when (for some reason) someone is supplying an single XML file containing one series of information, or I should say, one record at the time. Maybe we can’t have the client to provide us with an XML file containing a series of records. This will force us to be creative and build a solution to accumulate and/or append all the individual XML files.Well, here’s how I think it can be done. I’m creating two PowerShell XML objects with one single record containing two fields: FirstName and LastName.

Here’s an image showing how to load an XML into a PowerShell object:

Notice I’m using the “xml” (inside square-brackets) accelerator to create the object of type ‘XML’. To verify the type of object use the following .NET object method ‘.GetType()‘.

PS C:\Users\Max> $y.gettype()

IsPublic IsSerial Name BaseType
——– ——– —- ——–
True False XmlDocument System.Xml.XmlNode

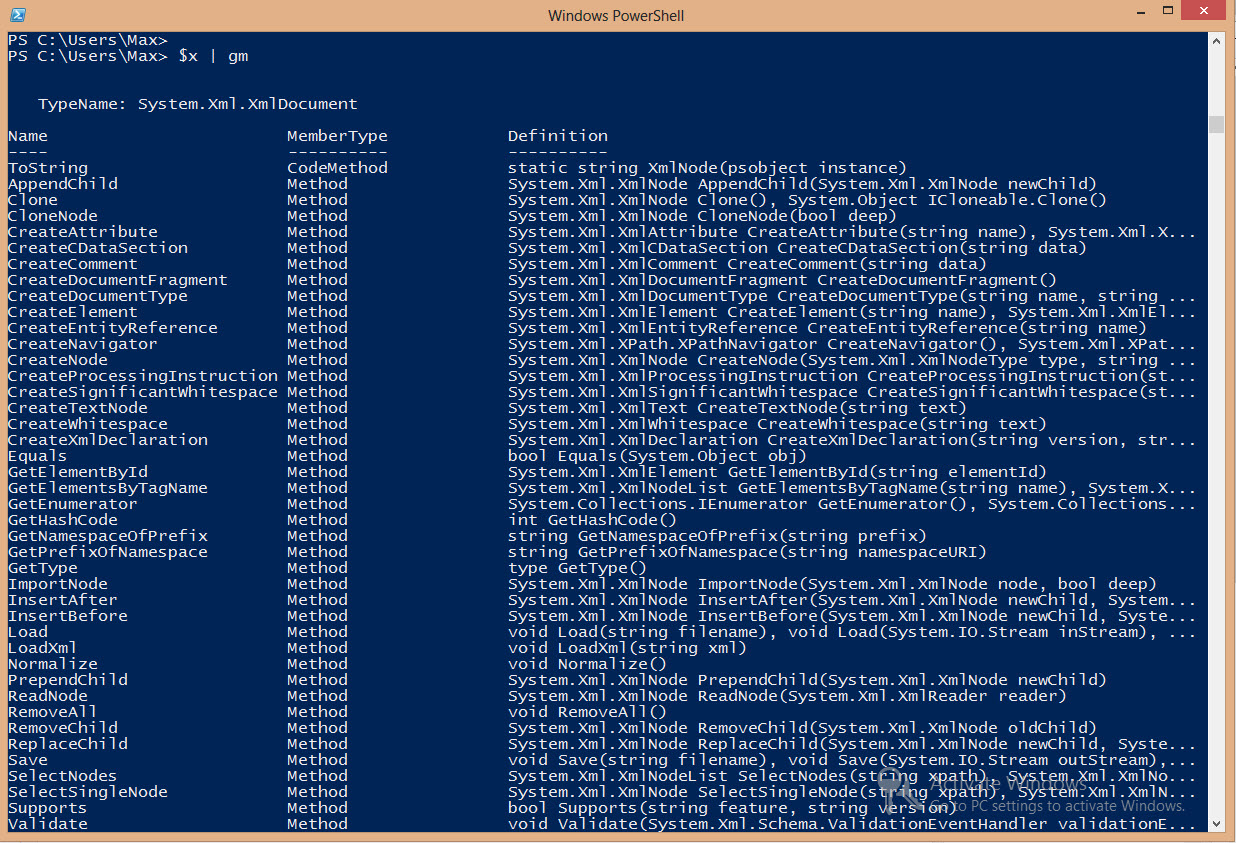
If you want to find more information about the PowerShell object you created use the ‘Get-Member‘ command to all of its Methods and Properties.

$x | Get-Member;

Now we have our two XML objects created: $x and $y. We want to add the record information from $y into $x. First, we need to make sure that the XML structure are the same in both objects:

PS C:\Users\Max> $x.Root.Table.Record

FirstName LastName
——— ——–
Maximo Trinidad

PS C:\Users\Max> $y.Root.Table.Record

FirstName LastName
——— ——–
John Kennedy

As you can see both XML objects contains the “Record” elements content: FirstName and LastName.

So, instead of processing these two objects separately, we are going the extract the “Record” elements from $y and inserted into $x. We can accomplish this process in two steps:

1. Creating another object that will hold the extracted elements:

$z = $x.ImportNode(($y.root.table.Record), $true);

2. Use the ‘.AppendChild()‘ method to add the extracted elements to the destination XML object (ie. $x):

$x.Root.Table.AppendChild($z);

Or, you can simply create a oneliner command to do this:

$x.Root.Table.AppendChild($x.ImportNode(($y.root.table.Record), $true));

To verify that all the “Record” elements from $y has been included in $x we can use the following command:

PS C:\Users\Max> $x.Root.Table.Record

FirstName LastName
——— ——–
Maximo Trinidad
John Kennedy

As you can see, we have successfully added the “Record” elements data.

Now, all this information have been modified in memory. To save this object to a file, then we use the ‘.Save()‘ method:

$x.Save(‘C:\Temp\XML\MultiRecord.xml’);

Finally, to display the content of the file, use the ‘ii‘ which is the Alias for ‘Invoke-Item‘ command:

ii ‘C:\Temp\XML\MultiRecord.xml’;

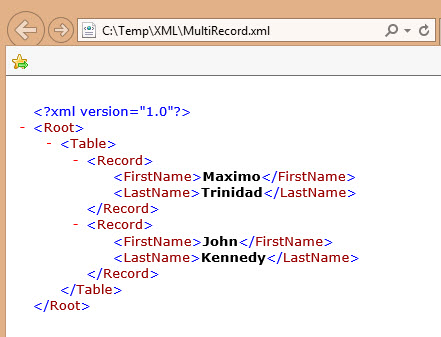
As you can see we have added new records from one XML into another. Here’s the end result:

Florida PowerShell User Group Virtual Meeting is using Office 2013 Lync …

Tomorrow night (Nov. 14th) I will be relaunching our virtual PowerShell chapter.  For all who wants to join me here’s what you need to attend our “PowerShell working with SQL Server SMO” session at 7:00 PM.

1. Download and install “Microsoft Lync 2010 Attendee – User Level Install” from the following link: http://www.microsoft.com/en-us/download/details.aspx?id=15755

2. Then, when connecting to the meeting, you need to go the “Share” menu and select “stage”.

I’m excited to use Office 2013 Lync for our PowerShell virtual meeting.

I will be providing the virtual meeting link on Wednesday about 1 hr before the meeting.  Link will be provided here: http://www.FLPSUG.comhttp://www.powershellgroup.org/Florida , and Twitter.

Here’s tonight meeting information:

Join Lync Meeting: (meeting start at 7:00PM)
https://meet.lync.com/flpowershellug/maxt/XXXXXX

Stay tuned.

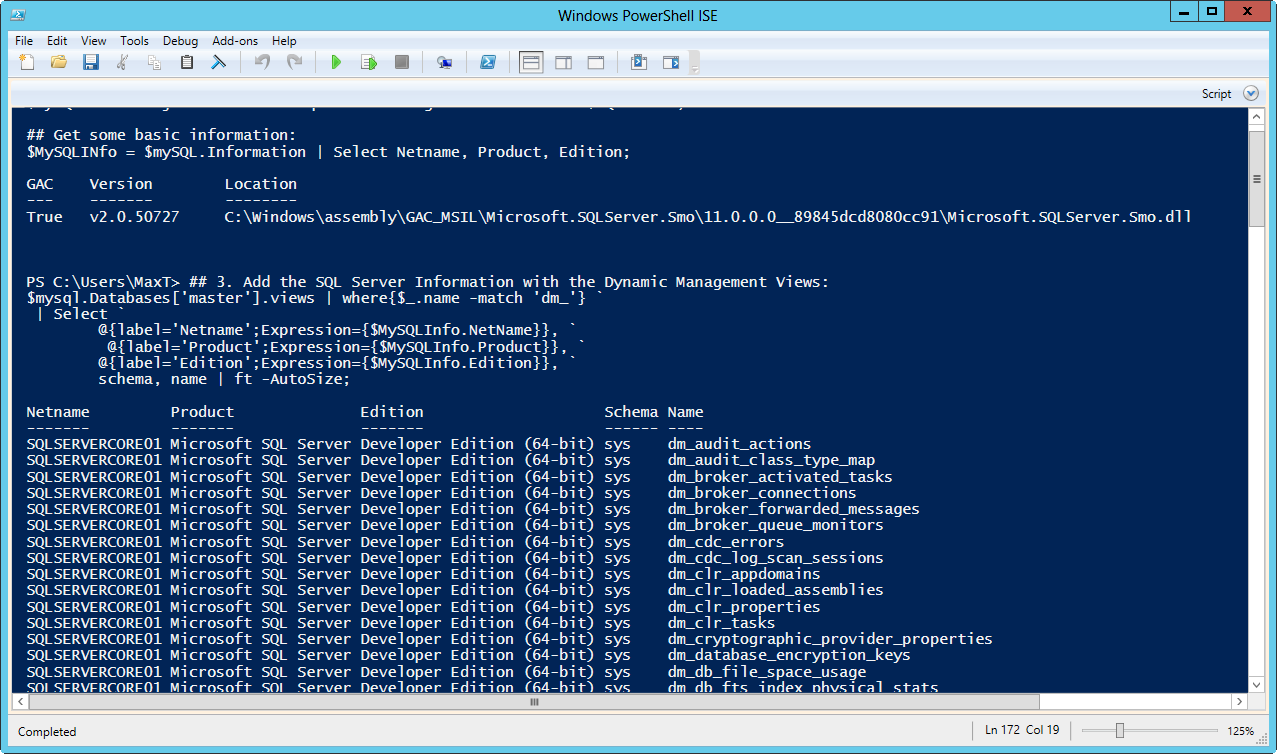
QuickBlog: Finding all SQL Server DMV’s with PowerShell

Execute the following PowerShell with script SMO to quickly list all your Dynamic Management View’s from your SQL Server instance.  Let’s do this!

[sourcecode language=”powershell”]
## – Loads the SQL Server SMO Assembly:
[system.reflection.assembly]::LoadWithPartialName("Microsoft.SQLServer.Smo")

## – Initialize the variable and loads the SQL Server objects:
$SQLServer = ‘SQLServerInstanceName’;
$mySQL = new-object Microsoft.SqlServer.Management.Smo.Server $SQLServer;
## Get some basic information:
$MySQLINfo = $mySQL.Information | Select Netname, Product, Edition;

## 1. List all SQL Server views:
$mysql.Databases[‘master’].views | Select schema, name | ft -AutoSize;

## 2. List all SQL Server Dynamic Management Views:
$mysql.Databases[‘master’].views | where{$_.name -match ‘dm_’} `
| Select schema, name | ft -AutoSize;

## 3. Add the SQL Server Information with the Dynamic Management Views:
$mysql.Databases[‘master’].views | where{$_.name -match ‘dm_’} `
| Select `
@{label=’Netname’;Expression={$MySQLInfo.NetName}}, `
@{label=’Product’;Expression={$MySQLInfo.Product}}, `
@{label=’Edition’;Expression={$MySQLInfo.Edition}}, `
schema, name | ft -AutoSize;
[/sourcecode]

List SQL Server DMV's

Go ahead and give it a try!

PowerShell working with SQL Server SMO Month…

It’s SQL Server SMO week and I’ll be presenting at the next Space Coast SQL Server User Group on Thursday October 11th at 6:30PM. For more information check out the following #SCSUG link: http://spacecoast.sqlpass.org/

Also, I’m restarting the Florida PowerShell User Group virtual meeting this coming Friday October 12th at 11:30am rescheduled t0 October 26th due to equipment problems with the same topic: “PowerShell working with SQL Server SMO“. I will be providing the virtual meeting link on Friday morning before the meeting at my http://www.FLPSUG.com site.

Stay tuned for more information.

PowerShell 3.0 at the Tampa – IT Pro Camp 2012.

This coming weekend come and see the New Windows PowerShell 3.0 at the IT Pro Camp in Tampa on Saturday, September 22nd.  I’ll be giving a session on :

Getting started with Windows 8 PowerShell 3.0

Lets the games begins. Let’s take a look at Window 8 PRO (RTM) and Windows PowerShell version 3.0. Check out the new enhanced new editor and features.  This new version is loaded with new functions to keep you busy.

For more information and to register, click on the following link: http://itprocamp.com/tampa/


Stop by and say Hi!!

Create PowerShell SMO scripts without installing SQL Server

There’s no need to install SQL Server to create PowerShell SMO scripts.  So, how I do this?  You need three stand-alone packages from the “Microsoft® SQL Server® 20xx Feature Pack”.  Notice the “xx” in the SQL Server version.  This is because the
“feature packs” has been available since SQL Server Version 2005.   In my scenario I decided to use the “Microsoft® SQL Server® 2012 Feature Pack”: http://www.microsoft.com/en-us/download/details.aspx?id=29065

You need to installed them in the following order:

  1. Microsoft® System CLR Types for Microsoft® SQL Server® 2012
  2. Microsoft® SQL Server® 2012 Shared Management Objects
  3. *Microsoft® Windows PowerShell Extensions for Microsoft® SQL Server® 2012

Make sure to pick the right package for your system: (x86) or (x64).

When you’re done with the installation then you are ready to start scripting with SMO.  Also, you will notice that the SQL Server SQLPS module will get installed in your system.

Use the “Get-Module -ListAvailable” command and look for the SQLPS module in the bottom of the screen.

Now we can create the following PowerShell SMO script:

[sourcecode language=”powershell”]
## – Loading the SQL Server SMO Assembly"
[System.Reflection.Assembly]::loadwithPartialName("Microsoft.SQLServer.SMO");

## – Build SQL Server object connecting using default Windows Authentication:
$SQLSvr = ‘WIN2K3SQL1’;
$MySQL = new-object(‘Microsoft.SqlServer.Management.Smo.Server’) $SQLSvr;

## – Changing from default Windows to SQL Authentication:
$MySQL.ConnectionContext.LoginSecure = $false;
$MySQL.ConnectionContext.set_Login(‘User1’);
$SqlUPwd = ConvertTo-SecureString ‘$Pwd01!’ -AsPlainText -Force;
$MySQL.ConnectionContext.set_SecurePassword($SqlUpwd);

## – Get some information:
$MySQL.Information | Select-Object Parent, Version, Edition | fl;
[/sourcecode]

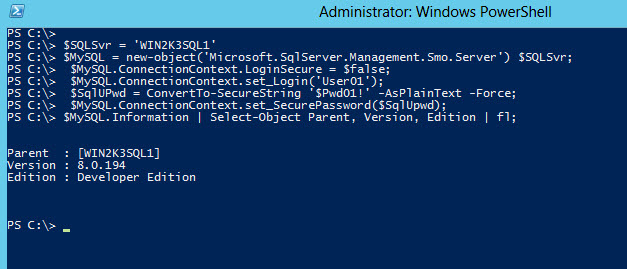
Here’s the results:
Notice I installed my three “SQL Server 2012 feature” packages and created to use a PowerShell SMO script to access a SQL Server 2000 Engine.  But, Keep In Mind, that SQL Server SMO 2012 will work for most parts to extract information off SQL Server 2000.   Just by trial and error you will notice some limitations. Also, although I have the SQLPS module available but I didn’t have to use it yet.

Go ahead and give it a try!

Here’s the link of others SQL Server Features Pack:

Feature Pack for Microsoft SQL Server 2005 – November 2005: http://www.microsoft.com/en-us/download/details.aspx?id=15748

*Microsoft SQL Server 2008 Feature Pack, August 2008: http://www.microsoft.com/en-us/download/details.aspx?id=16177

*Microsoft® SQL Server® 2008 R2 Feature Pack: http://www.microsoft.com/en-us/download/details.aspx?id=16978

*Note:  The “Microsoft® Windows PowerShell Extensions for Microsoft® SQL Server” is available since SQL Server 2008 (and greater).

PowerShell and T-SQL converting XML UTC DateTime value to DateTime string

Following my previous blog (“PowerShell – SQL Server SMO has XML and XSD Schema method“) I continue to use SMO to generate my XML files, I encountered that my SQL datetime field is converted to a UTC DateTime string. This gave me some work to get it back to a DateTime type. I had the requirement to provide my source file in XML format.

I realized using SMO WriteXml() method will write the DateTime type to a UTC DateTime string format in the XML file resulting in something like this:

[sourcecode language=”text”]
:
<OrderDate>2001-07-01T00:00:00-04:00</OrderDate>
:
[/sourcecode]

Unfortunate, trying to pass this value to a SQL DateTime field is tricky. I look around the internet and there’s plenty of examples of UTC but not in this format “2001-07-01T00:00:00-04:00″.   So, I ended up using PowerShell to ease off the pain.

Here’s an example of how PowerShell can easly convert UTC DateTime string to a regular System.DateTime type:

[sourcecode language=”powershell”]
$utc = "2001-07-01T00:00:00-04:00";
[datetime] $converte_DateTime = $utc;

## – Resulting in:
#-> Sunday, July 1, 2001 12:00:00 AM

[/sourcecode]

That was easy. Right! But the issue is when we want to pass this value into a SQL DateTime type. Then, here’s a possible solution now that I got PowerShell to convert my UTC string to string DateTime output.

Using the string generated from PowerShell, as a proof-of-concept, I can test this value in the following T-SQL script:

[sourcecode language=”sql”]
–now using t-SQL to convert a UTC string to a standard datetime type value:
Declare @stringFromPowerShellDateTime nvarchar(50)
Declare @fixDate nvarchar(50)
Declare @cleanup int
Declare @dtDateTime DateTime

Set @stringFromPowerShellDateTime = ‘Sunday, July 1, 2001 12:00:00 AM’
Set @cleanup = (charindex(‘,’, @stringFromPowerShellDateTime, 1))
Set @fixDate = (Substring(@stringFromPowerShellDateTime, (@cleanup+1), len(@stringFromPowerShellDateTime)))
Set @dtDateTime = (Convert(DateTime, @fixDate, 101))

Select @dtDateTime

— – Resulting in:
– -> 2001-07-01 00:00:00.000

[/sourcecode]

The end result of this SQL script is to be able to create my SQL DateTime type from the PowerShell converted UTC-to-DateTime-String.

Now I need go back to my first XML file, and update my DateTime elements values with the converted UTC to string format. Here’s where I go back PowerShell to fix my XML file:

[sourcecode language=”powershell”]
## – the following routine will correct UTC datetime as string:
[xml] $xmlfile = Get-Content ‘C:\PowerShellScripts\ADWtblOrders1.xml’;
foreach($xItem in ($xmlFile.newdataset.table))
{
[string] $dt = ([DateTime] $xItem.OrderDate).ToString();
$xItem.OrderDate = $dt;
};
$xmlfile.save(‘C:\PowerShellScripts\ADWtblOrders1_New.xml’);

[/sourcecode]

The results after convert the DateTime to the new XML DateTime values fix will look like this:

[sourcecode language=”text”]
:
<OrderDate>7/1/2001 12:00:00 AM</OrderDate>
:
[/sourcecode]

Now, this DateTime values can be consume in SQL Server without any issues. Notice that I’m using the “xml” Accelerator which has a *.Save() method so you can save your changes to file .

I think you got the pieces necessary to use PowerShell, XML, SMO, and T-SQL.

Don’t be afraid!

PowerShell – SQL Server SMO has XML and XSD Schema method.

As I continue to work with Microsoft BizTalk Server it still amazed me when I can find something useful.  As I was building a BizTalk solution that involves getting data from our SQL Server table, I found an SMO method that allow me to create both the XML and the XML Schema (XSD) so I can use them in my BizTalk solution.

Here’s the quick route using PowerShell and SQL Server SMO (SQL Server Management Objects) to create your XML Schema from a SQL table.  Keep in mind, in order to use SQL Server SMO you must have SQL Server 2005 or greater.

1. Here’s a simple T-SQL script to query a table:

[sourcecode language=”powershell”]
## – Prepare you SQL Script in ‘PowerShell’ Here-String:
## (for more Info on ‘Here-String’use the command: get-help about_Quoting_Rules
$Sqlqry1 = @’
Use Northwind
SELECT TOP 3 [OrderID]
,[CustomerID]
,[EmployeeID]
,[OrderDate]
,[RequiredDate]
,[ShippedDate]
,[ShipVia]
,[Freight]
,[ShipName]
,[ShipAddress]
,[ShipCity]
,[ShipRegion]
,[ShipPostalCode]
,[ShipCountry]
FROM [Northwind].[dbo].[Orders]
‘@;

[/sourcecode]

2. Then, the next three SMO lines we get the information and store it in our variable.  Make sure to define the variable as an array so you can get the right format:

[sourcecode language=”powershell”]
## – Load the SQL Server SMO Assembly:
[System.Reflection.Assembly]::loadwithPartialName(‘Microsoft.SQLServer.SMO’)

## – Connect to your SQL Server Instance and execute your SQL Query:
$MySQL = New-Object(‘Microsoft.SqlServer.Management.SMO.Server’) ‘BIZTALK2K10DEV’;
$tbldata = $MySQL.Databases[‘Northwind’].ExecuteWithResults($Sqlqry1);

[/sourcecode]

3. The following line just check the first 10 records in your PowerShell object:

[sourcecode language=”powershell”]
## – Display the first 10 lines of your data:
($tbldata.Tables) | Select -First 10 $_ | Format-Table -AutoSize;

[/sourcecode]

4. Finally, we can use the “.WriteXML()” and “.WriteXmlSchema()” methods to create our XML and XSD files:

[sourcecode language=”powershell”]
## – Create you XML file with your data:
($tbldata).WriteXml(‘C:\PowerShellScripts\tblServiceFacts.xml’);

## – To create the XML Schema (.xsd file) use the following method:
($tbldata).WriteXmlSchema(‘C:\PowerShellScripts\tblServiceFacts.xsd’);

[/sourcecode]

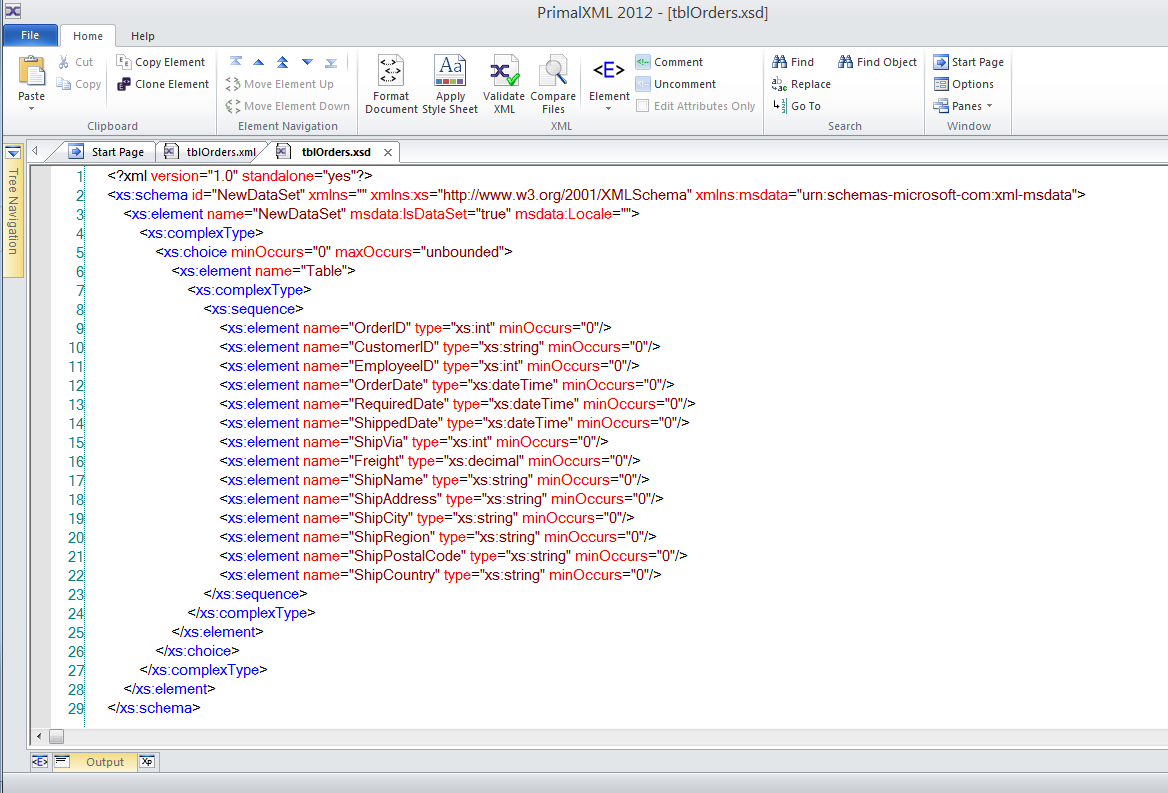
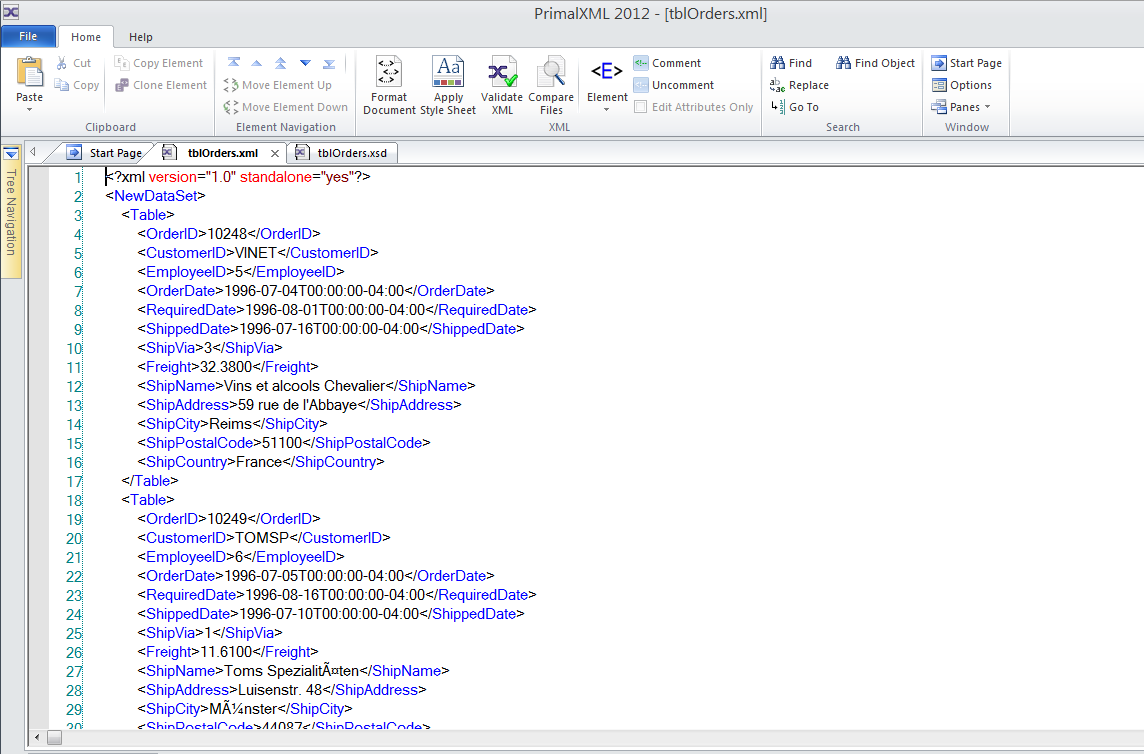
Sapien XML Editor - looking at teh XSD file created with SMO
Sapien XML Editor - looking at the XML file generated with SMO

We are ready to incorporate the XSD file in your BizTalk solution(s).

There’s a few things to keep in mind. The above version will work with SQL Server 2008 but will behave different with SQL Server 2005 and PowerShell V2.0 it might giving you an “overload” error.

So, if you encounter the following error, then here’s a possible how-to fix it: (it work for me but further testing in other environment gave me a different results.  It’s all just about testing and understanding your tools.

[sourcecode language=”powershell”]
## – Create you XML file with your data:
$tbldata.WriteXml([string] ‘C:\PowerShellScripts\tblOrders.xml’);

## – To create the XML Schema (.xsd file) use the following method:
$tbldata.WriteXmlSchema([string] ‘C:\PowerShellScripts\tblOrders.xsd’);

[/sourcecode]

Don’t forget to test your code to make sure you’re getting what you want.   The main code will work in both PowerShell v2.0/v3.0, and SQL Server 2008 (or greater).

Awesome Technology!   I will come back to this issue later and provide the PowerShell V2 solution.