PowerShell Open Source on Bash on Windows 10 Breakthru

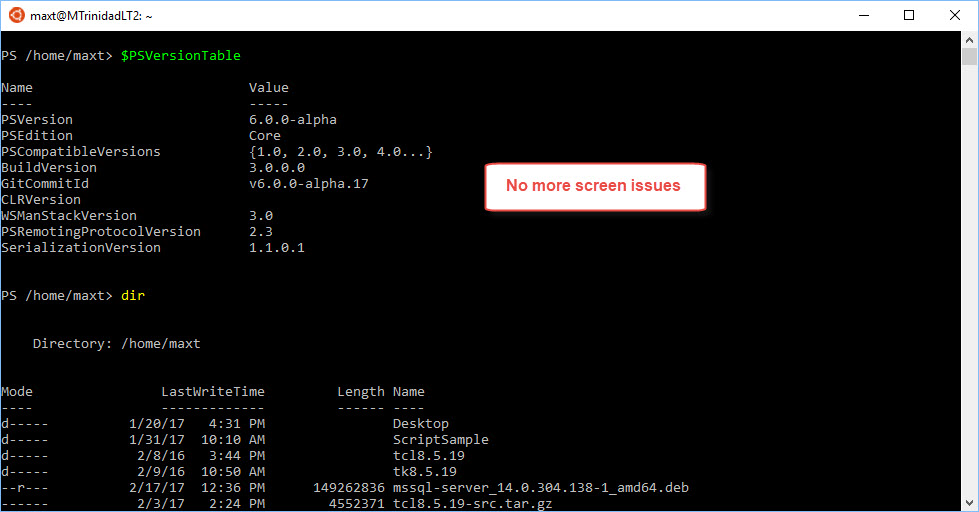
Finally, the fix we all been waiting for has arrived with the newest release of PowerShell version v6.0.0-alpha.17. Now, when you installed the Ubuntu 16.04.1 version of PowerShell 6 in Bash on Windows 10, it works this time.

Thanks God! No more crazy cursor screen issues going on when you type commands and/or display results.

Screen issues before PowerShell v6.0.0-alpha.17

And, not it’s corrected!

Now you experiment with both Linux Ubuntu Desktop GUI and non-GUI interface to try using PowerShell. It was just a matter of time for this to be corrected.

How do you install PowerShell 6 in Bash on Windows?

Using your Windows 10 browser, go to the following Github PowerShell “Release” link:
https://github.com/PowerShell/PowerShell/releases/tag/v6.0.0-alpha.17

Look for the “powershell_6.0.0-alpha.17-1ubuntu1.14.04.1_amd64.deb” download file then click to download.

Keep in mind, this is a Linux Debian file type and there’s no need to “unblock” the file.

Open your “Bash on Ubuntu on Windows” console then look for the PowerShell *.deb file. This file will be found in the following Linux folder path “/mnt/c/Users/mtrinidad/Downloads

To *list all Debian file types use the following command: (Change directory first!)

cd /mnt/c/Users/mtrinidad/Downloads
ll *.deb

*note: Using the “ll” command will list the files with their date/time.

After you have verify the file has been downloaded, then follow the installation instructions on the following link: https://github.com/PowerShell/PowerShell/blob/master/docs/installation/linux.md#ubuntu-1604

If you have previously installed any version PowerShell v6.0.0-Alphaxx, it won’t hurt to remove it first using “super user” privileges (with “sudo ..”), as follows:

sudo apt remove powershell

Then proceed to install from the “Downloads”, by typing the following command:

sudo dpkg -i powershell_6.0.0-alpha.17-1ubuntu1.16.04.1_amd64.deb

So, when done just type “powershell” (lowercase) and you’re good to know.

Start using Bash on Windows and keep learning PowerShell!

Thanks to Jeffery Hicks to letting me know that this was fix on Bash on Windows. Check out his PowerShell blog at: http://jdhitsolutions.com

PowerShell, SQL Server, and Linux Oh My!

The South Florida Code Camp 2017 is ON! Come and join me in this event on Saturday, March 11th 2017 all day event.

Check out the event speaking agenda: http://www.fladotnet.com/codecamp/Agenda.aspx

I will be presenting the following 3 sessions:

1. 09:50am – 11:00amWorking with SQL Server for Linux Cross-platform:
I will be showing the latest build of SQL Server vNext for Linux. Everything you need to install and connect to SQL Server. Then, what tools are available to use from either Linux and Windows. Sample on querying for database information using Python and PowerShell between two environments. This will be a demo intensive session.

2. 11:10am – 12:20pm Using Windows 10 Bash with PowerShell Open Source:
We’ll be taking a tour into Windows 10 Bash Linux subsystem. I’ll be sharing some tips on how to work with Bash, and the workaround to make PowerShell in side BASH. This is the perfect environment to start learning about Linux while you work in windows. We’ll be take advantage of how-to use cross-platform Open source product(s). All this and more from Windows 10.

3. 01:20pm – 02:30pm Using PowerShell Open Source across multiple Platforms:
PowerShell is Open Source now! Come see how you could use PowerShell cross-platform between Windows and Linux sharing scripts to assist in admin task automation. I’ll be walking on how to make this work with existing tools. Also, interacting with SQL Server for Linux.

To register go to the following link: http://www.fladotnet.com/codecamp/

Can you run PowerShell in SQL Server Management Studio? YES!

Just to be clear!! You can run PowerShell in SQL Server Management Studio.

Not only you can run PowerShell, but you can create scheduled jobs in SQL Agent to run PowerShell scripts. This has been available since SQL Server 2008 (before R2). And, this is a lot better now, as each version are finally providing more “SQL PowerShell cmdlets” to manage your SQL Server in their *”SQLPS” PowerShell module.

*Note: SQLPS Module was introduce with SQL Server 2008.

Nowadays, Thanks to both Aaron Nelson, Christy LeMaire, and Rob Sewell who have contribute to the success of provide new enhancements to SQL Server PowerShell (SQLPS) cmdlets. Check out their tools:

DBA Tools “best practices and instance migration module” link: https://dbatools.io/
DBA Reports “free, fun” link: https://dbareports.io/

By the way, DBA Reports is owned by Rob Sewell – @sqldbawithabeard. Great Work!!

So, YES! You can run PowerShell from SQL Server Management Studio.

How to run PowerShell?

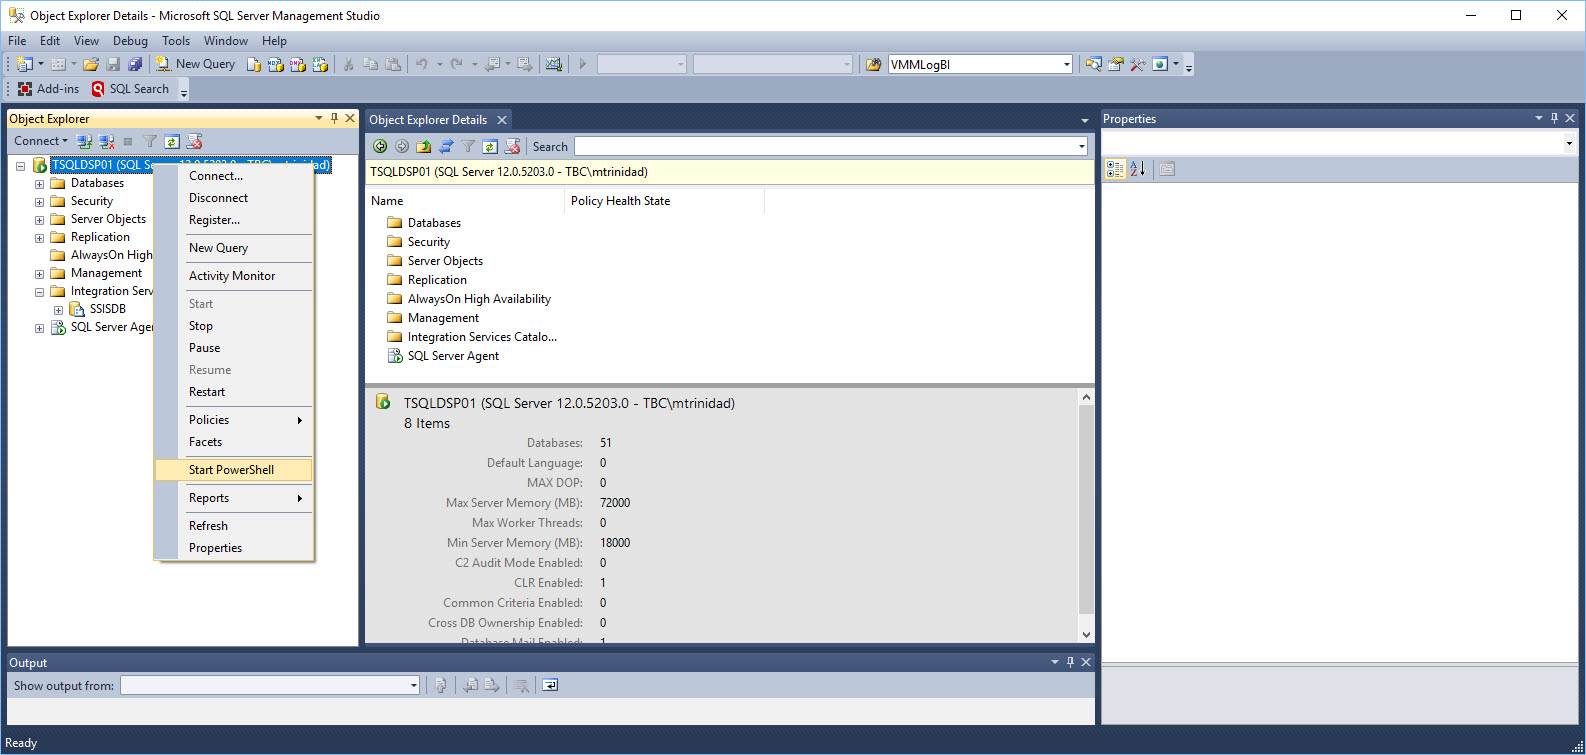
You can Right-Click on most of the SQL Server objects under “Object Explorer” and look for “Start PowerShell“.

This will open the PowerShell prompt and you are ready to start your adhoc scripting.

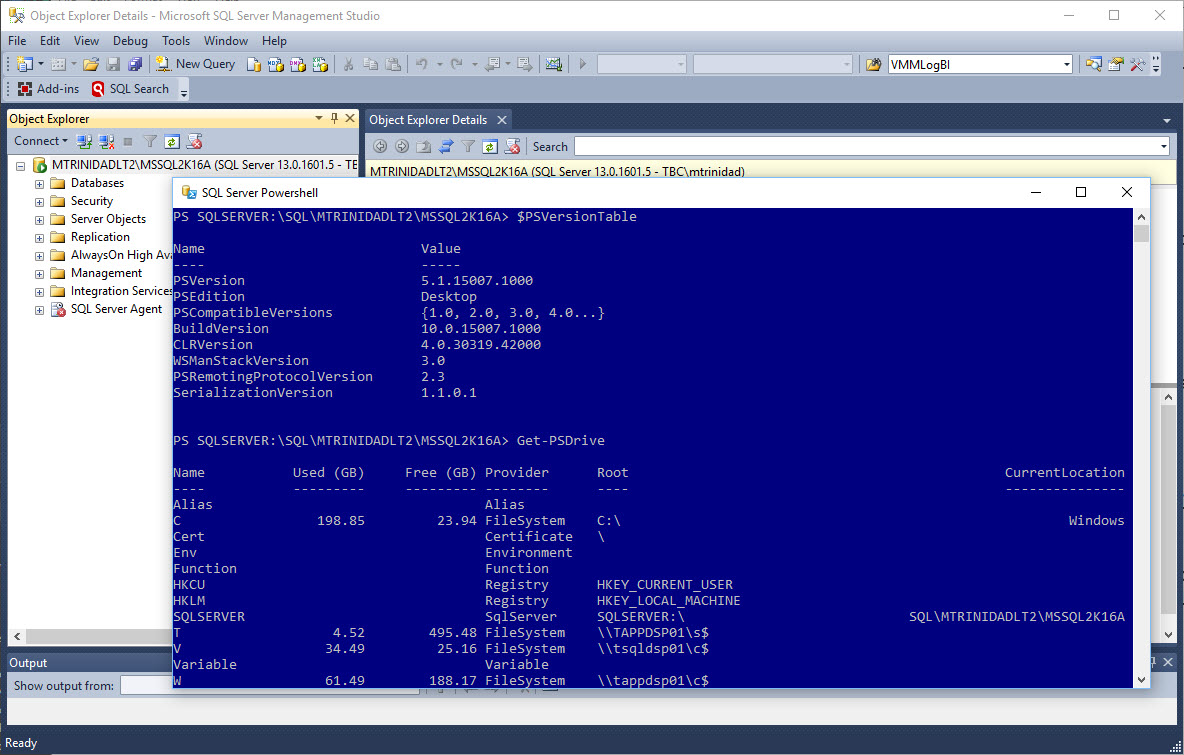
Keep in mind, on the latest version of SQL Server (< 2012), the SQL PowerShell module (SQLPS) is loaded and already available. This will create a SQL Server Drive connecting (in this case) to your local instance installation or whichever instance you’re connecting to.

Notice, in my case, the above image will open a PowerShell prompt and is using PowerShell version 5.1 which is part of my Windows 10. The same will be true on earlier OS version of PowerShell. The “Start PowerShell” will open the current PowerShell version installed on that machine.

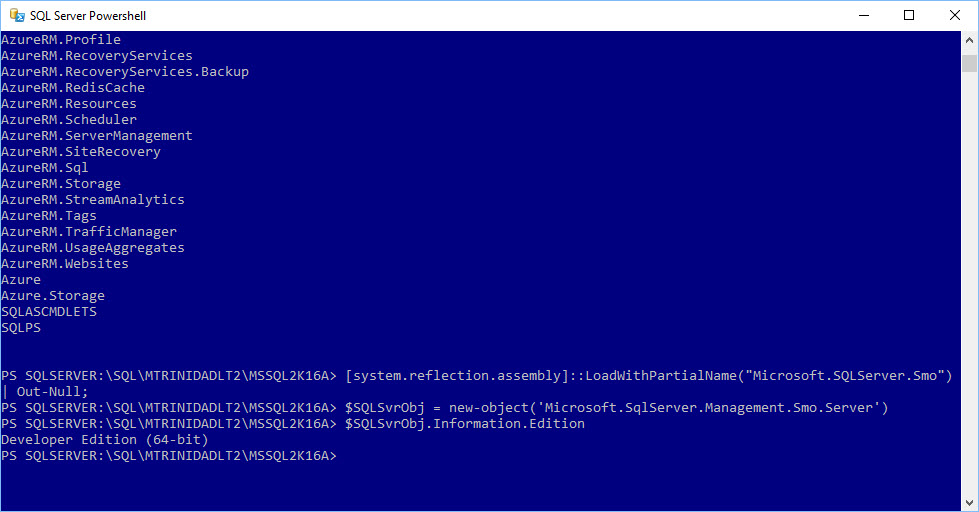
Another thing to understand, although you already have a set of available cmdlets to manage your SQL Server, you can still expand and build more script with the use SMO (SQL Server Management Objects). So, the possibilities to build your own solutions are endless.

All SMO .NET assemblies are loaded into your system when installing SSMS.

About SQLPS been removed

To be clear! Documentation states that SQLPS “Utility” (sqlps.exe) will be removed in the future. But, the SQLPS PowerShell module will still be available. (See reference link)
https://technet.microsoft.com/en-us/library/cc280450(v=sql.130).aspx

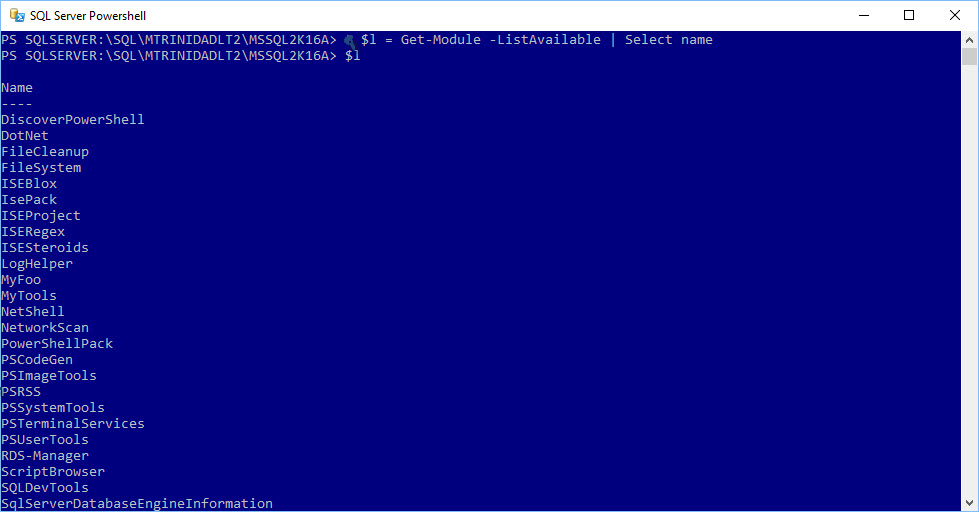
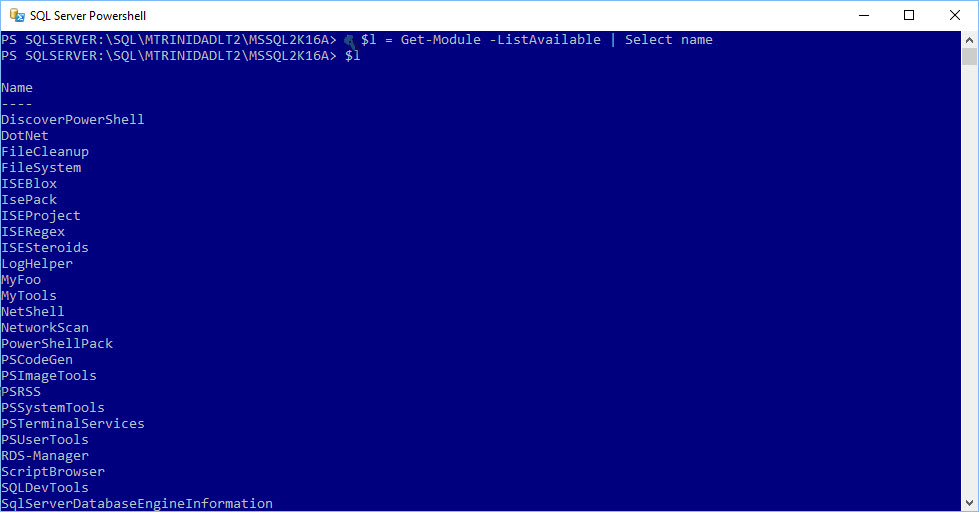
This is why you rather use the normal PowerShell console and start using the SQLPS module. Keep in mind, that since PowerShell 3.0, all existing installed modules are automatically loaded and ready to use in your PowerShell session.

How do I get SQL PowerShell?

Simple! SQL PowerShell comes included when SQL Server Management Studio(SSMS) is installed. For sometime ago SSMS (SSMS 2012) has been available to install separately (free-of-charge). As a matter of fact, you could install three separate SQL Server Features components without the need of installing SSMS and start scripting against your SQL engine.

The following link shows both latest version of SSMS (16.5.3) and the preview SSMS for SQL Server vNext (RC 17) can be found here:
https://docs.microsoft.com/en-us/sql/ssms/download-sql-server-management-studio-ssms

Bonus – No need for SSMS GUI nor the SQL Engine

Sometimes there’s no need to install a SQL instance, nor SSMS GUI but only the necessary components installed in order to run and scheduled some SQL PowerShell scripts in Windows Server Task Scheduler. I had this scenario on a **server with no SQL engine but needed to run some scheduled SQL PowerShell scripts. Only 3 components are needed:

(Below content extracted from Microsoft link (Install section) : https://www.microsoft.com/en-us/download/details.aspx?id=52676 )

Microsoft® Windows PowerShell Extensions for Microsoft SQL Server® 2016
The Microsoft Windows PowerShell Extensions for SQL Server includes a provider and a set of cmdlets that enable administrators and developers to build PowerShell scripts for managing instances of SQL Server. The SQL Server PowerShell Provider delivers a simple mechanism for navigating SQL Server instances that is similar to file system paths. PowerShell scripts can then use the SQL Server Management Objects to administer the instances. The SQL Server cmdlets support operations such as executing Transact-SQL scripts or evaluating SQL Server policies.

Filename: X86 and x64 Package (PowerShellTools.msi)

– Microsoft® SQL Server® 2016 Shared Management Objects
SQL Server Management Objects (SMO) is a .NET Framework object model that enables software developers to create client-side applications to manage and administer SQL Server objects and services.

Note: Microsoft SQL Server Management Objects requires – Microsoft SQL Server System CLR Types, that is available on this page.
Filename: X86 and x64 Package (SharedManagementObjects.msi)

– Microsoft® System CLR Types for Microsoft SQL Server® 2016
The SQL Server System CLR Types package contains the components implementing the geometry, geography, and hierarchy id types in SQL Server. This component can be installed separately from the server to allow client applications to use these types outside of the server.

Filename: X86 and x64 Package (SQLSysClrTypes.msi)

**Note: This can apply to desktop/laptop is you don’t want to install the whole SQL Server CD. As long as, you have remote connection to a SQL Server system, then you just start building scripts. You will save some disk space too.

IDERA Geek Synch Webinar – Wednesday February 22nd, 2017

Topic: Using PowerShell with Python and SQL Server


Description: Just as PowerShell is argued as the main technology for automation in Windows Datacenters Infrastructure, it is equally important in other non-Windows Operating Systems. According to Maximo Trinidad, Windows Administrators have an advantage working with PowerShell just as Linux Administrators have an advantage with Bash / PHP / Python.

Webinar starts at: 11:00AM – 12:00PM (CDT) / 12:00pm – 01:00pm (EST)

Register at: https://www.idera.com/events/geeksync

Florida PowerShell User Group Online Meeting – Thursday February 23rd, 2017

Topic:  Understanding Bash On Windows 10


Description: Come and learn how to setup and use Bash On Windows 10. Learn the tips and tricks to use PowerShell and Python together. At the same time, there are some differences in working with script files between Bash and Windows systems. We’ll be seen how to use efficiently use Windows apps with Python scripts on Bash. Lots of demo!

Meeting starts at: 6:30pm(EST)

Register at: https://www.eventbrite.com/e/florida-powershell-user-group-monthly-meeting-february-2017-tickets-31689059831

PowerShell – Exciting January 2017 New Releases

Here are a couple of interesting announcements back in January 2017:

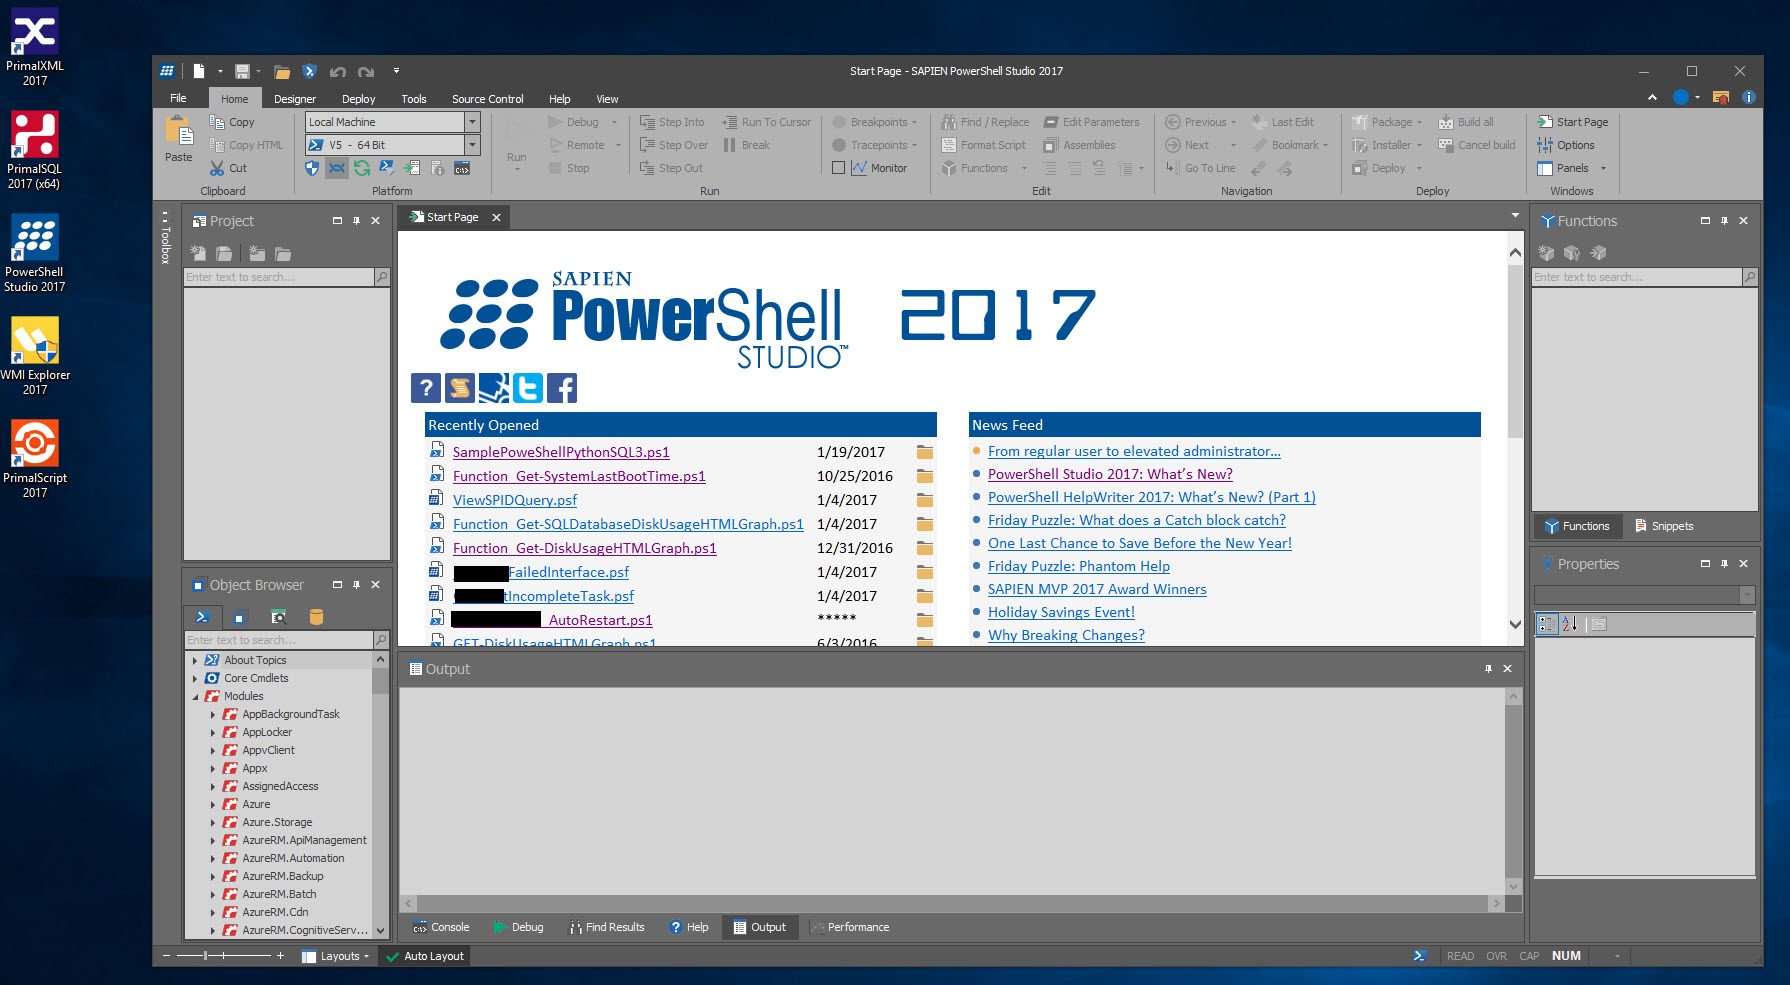
SAPIEN 2017 all products released on 1/17/2017: https://www.sapien.com/software
Check out what’s new on PowerShell Studio 2017:
https://www.sapien.com/blog/2017/01/18/powershell-studio-2017-whats-new/

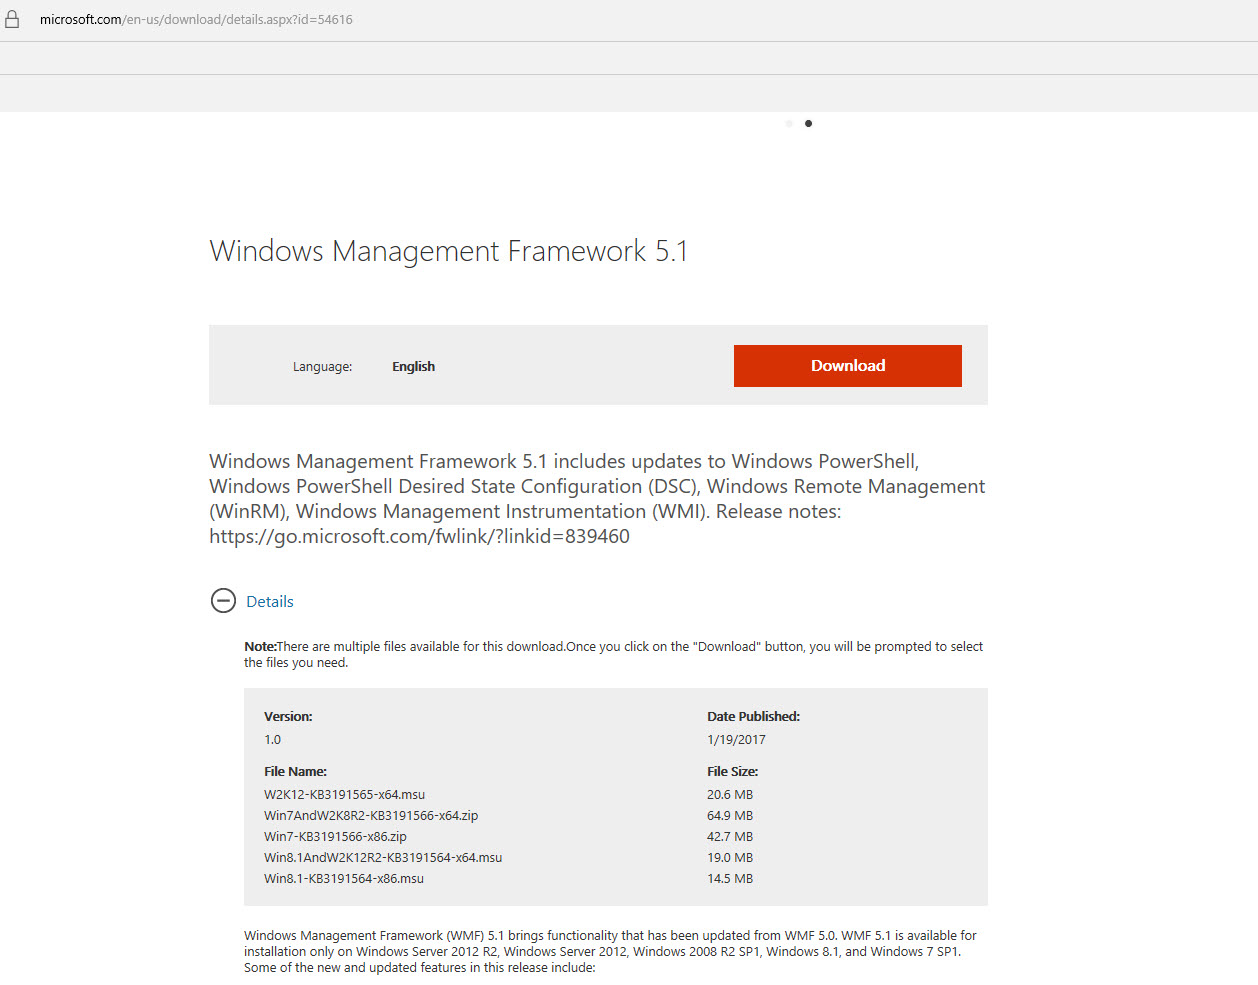
Windows Management Framework 5.1 RTM released on 1/19/2017.  More information at the following links:
https://blogs.msdn.microsoft.com/powershell/2017/01/19/windows-management-framework-wmf-5-1-released/
https://msdn.microsoft.com/en-us/powershell/wmf/5.1/install-configure

Download from: https://www.microsoft.com/en-us/download/details.aspx?id=54616

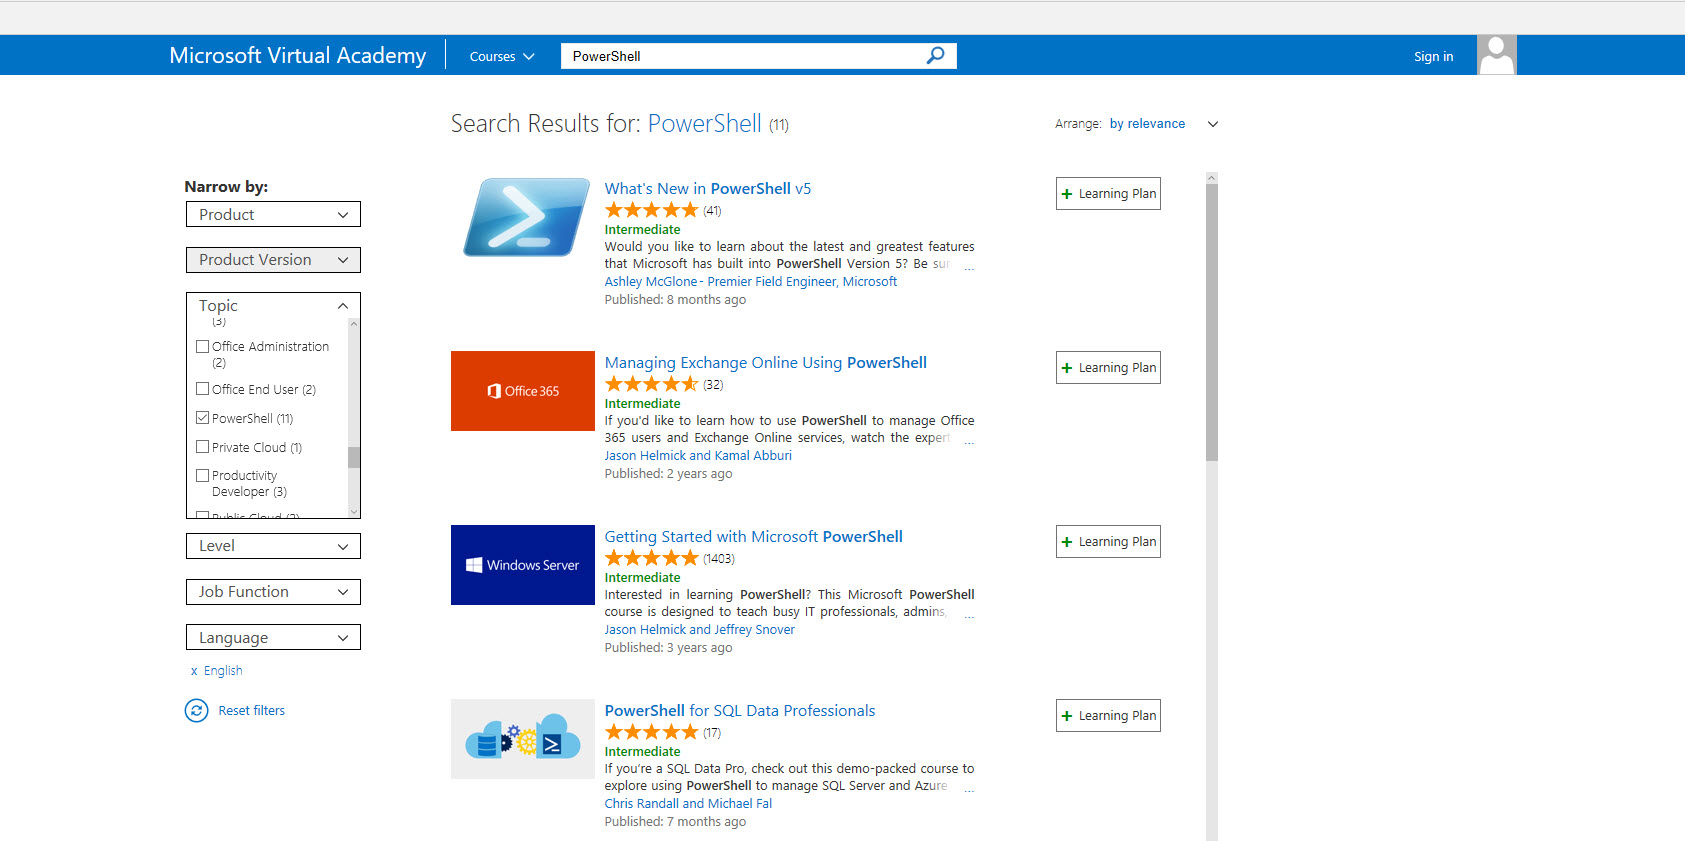
Also, don’t forget to check out Microsoft Virtual Academy (MVA) and look for existing “free” PowerShell training topics: https://mva.microsoft.com/

Current list of MVA PowerShell Topics:
https://mva.microsoft.com/search/SearchResults.aspx#!q=PowerShell&index=2&topic=PowerShell&lang=1033

Windows 10 Bash and PowerShell Redux

In my previous blog “http://www.maxtblog.com/2016/10/running-powershell-in-windows-10-bash-workaround/“, I was able to find a workaround to how work with PowerShell Open Source in Windows Bash subsystem.  But now, I found a better way using the Ubuntu Desktop component.

It’s a known fact, if you install PowerShell Open Source in Windows 10 Bash subsystem, that it won’t work correctly. As soon as start typing $PSVersionTable and press enter, the cursor goes to the top of the screen. And, you keep typing and it gets very ugly.
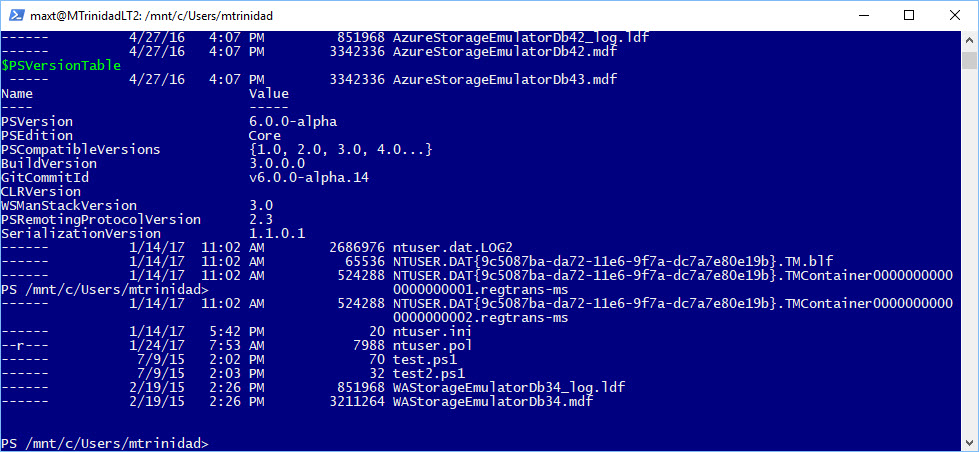
Now, what if I tell you, I found the way to run PowerShell Open Source without any of these issues. Just like running it like it was installed in a Linux environment. No issues with the cursor going crazy and able to page up and down.

The following are the steps required to run PowerShell Open Source.

Windows 10 Requirements

You *MUST* use the following Windows X Server application. Just proceed to Download and install VcXsrv Windows X Server:
https://sourceforge.net/projects/vcxsrv/?source=typ_redirect

Also, proceed to Download (to be install later) PowerShell Open Source. Go to the following Github link, and pick the Ubuntu 16.04 version: for Ubuntu 16.04:
https://github.com/PowerShell/PowerShell/releases/tag/v6.0.0-alpha.14

For best results, make sure to be on Windows 10 Insider Build 15007.rs_prerelease.170107-1846.

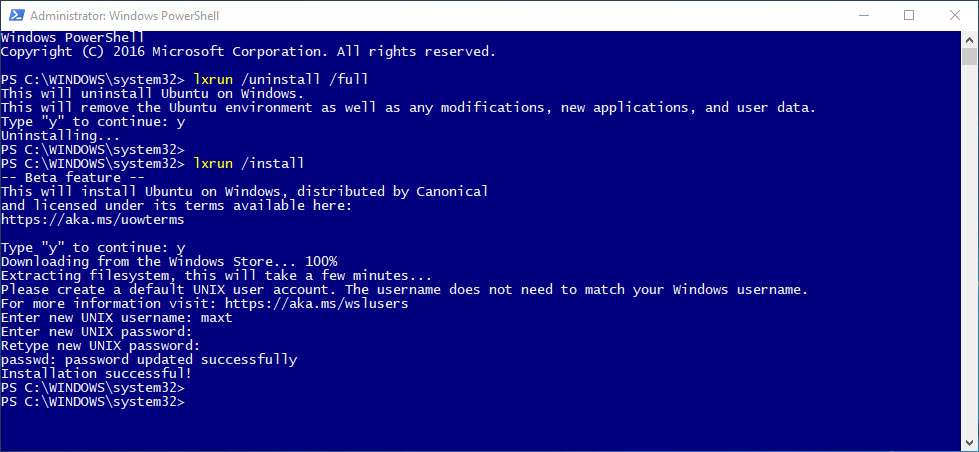
If previously installed, reset your Windows 10 Bash Subsystem installation, by executing to following commands on either DOS or PowerShell prompt:
1. Uninstall command: lxrun /uninstall /full
2. Clean Installation: lxrun /install
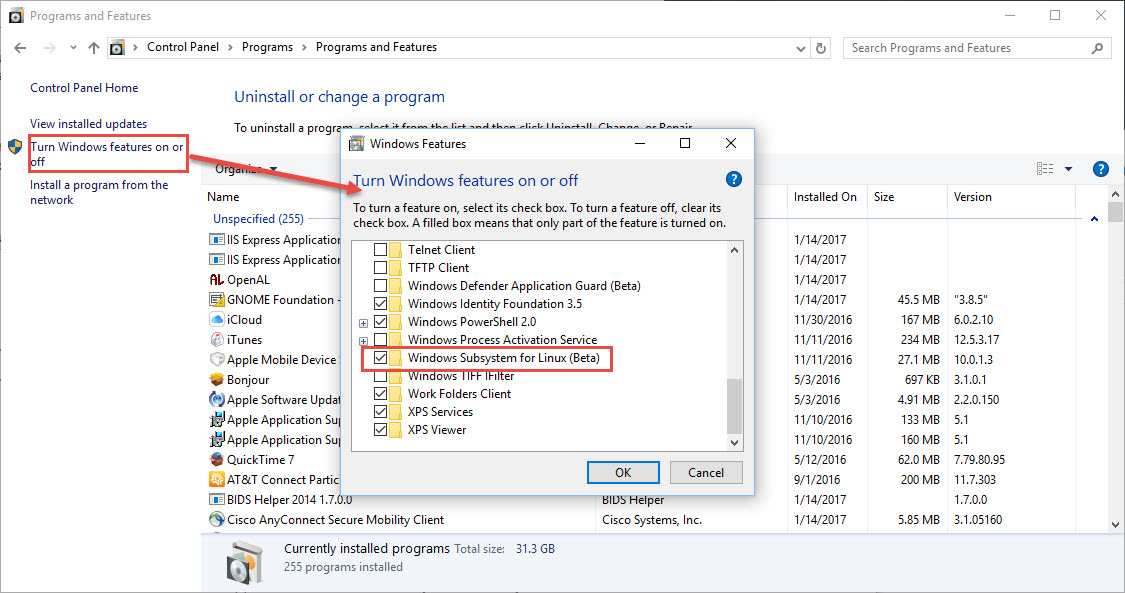
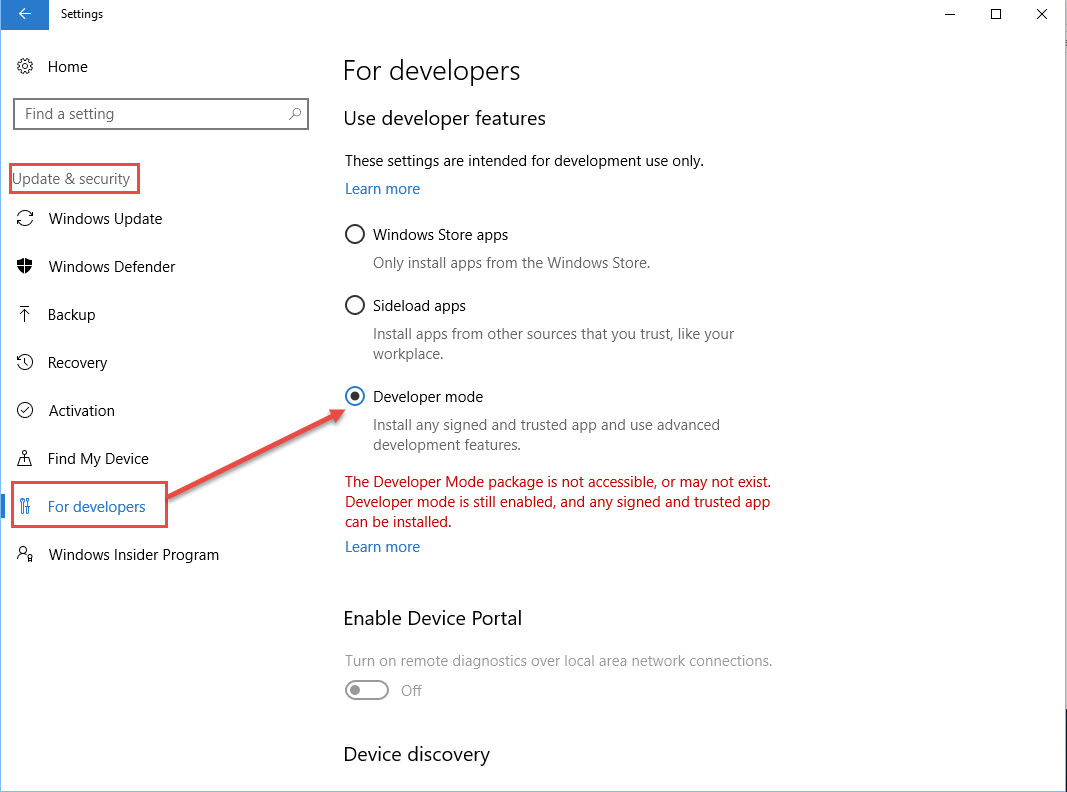
*Note: I’m assuming you’ve been recently checking out Bash in Windows 10. If not, go to “Control Panel | Programs and features” then go to “Turn Windows features on or off” and enable “Windows Subsystem for Linux (Beta)“. By the way, you must have “Developer mode” enabled under “Settings | Update and Security | For Developers” section.
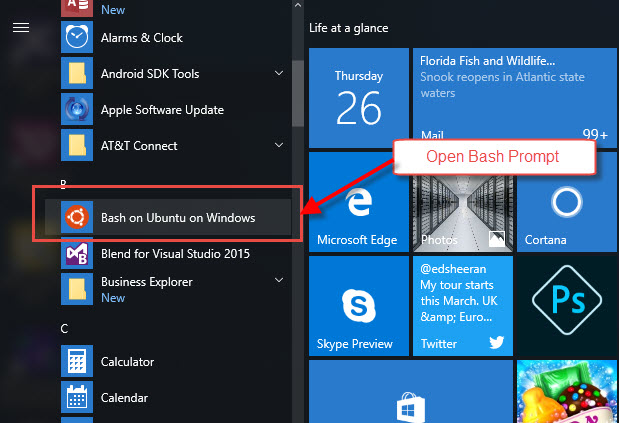
Then, on the Windows menu, look for the “Bash on Ubuntu on Windows” icon and open the console. Make sure Bash is installed and working in Windows 10.
Bash Subsystem Requirements

Now, we need to start installing some additional components in our Bash environment.  Please notice I can use PowerShell console and open “Bash“.  Also, while installing these Linux packages, make sure to open any console “as Administrator“.

Then, in Bash prompt, use the Super User privilege command “sudo su” before installing these packages.

sudo su
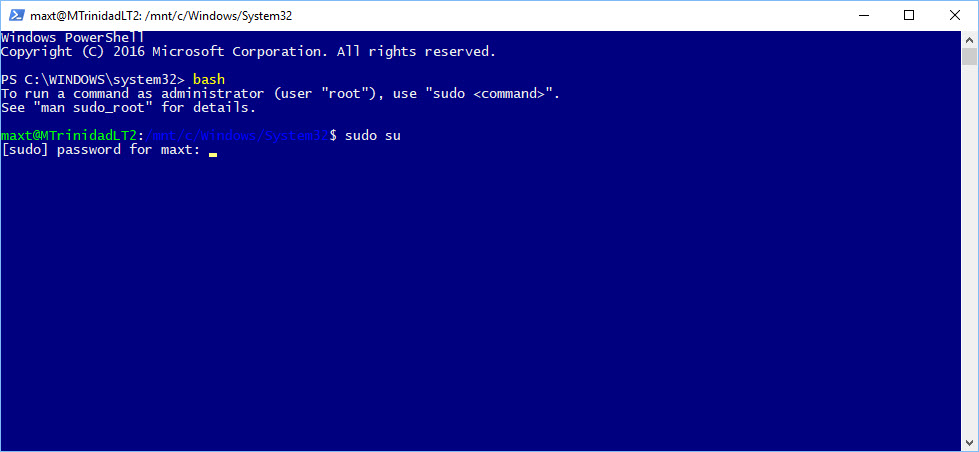
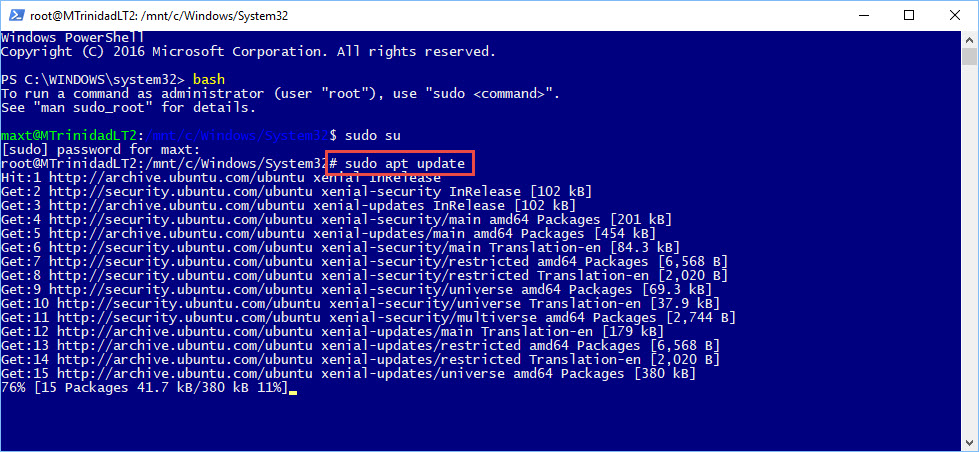
I recommend to use the following two command for the purpose of getting both available updates and upgrades to Bash installed packages. You could use these command on a regular basis to keep you subsystem up-to-date.

sudo apt update

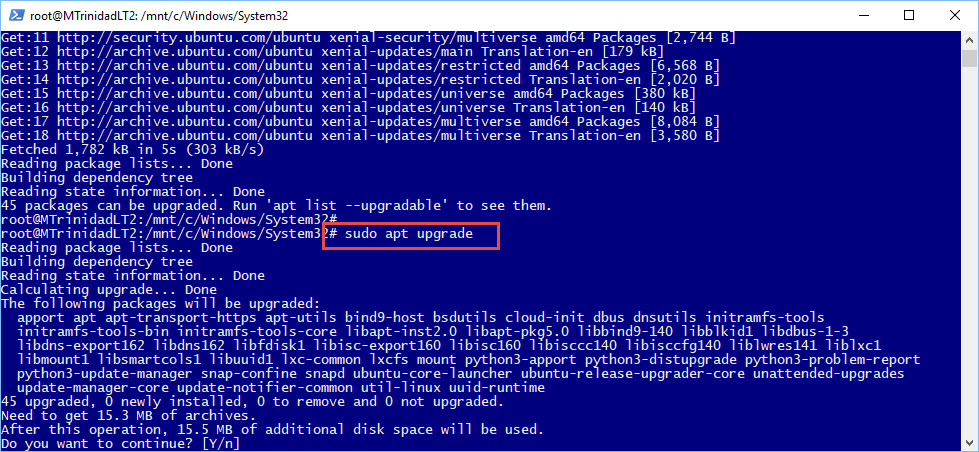
sudo apt upgrade
The following commands will install the Ubuntu Desktop and takes about 1hr to complete. Patience is a virtue!

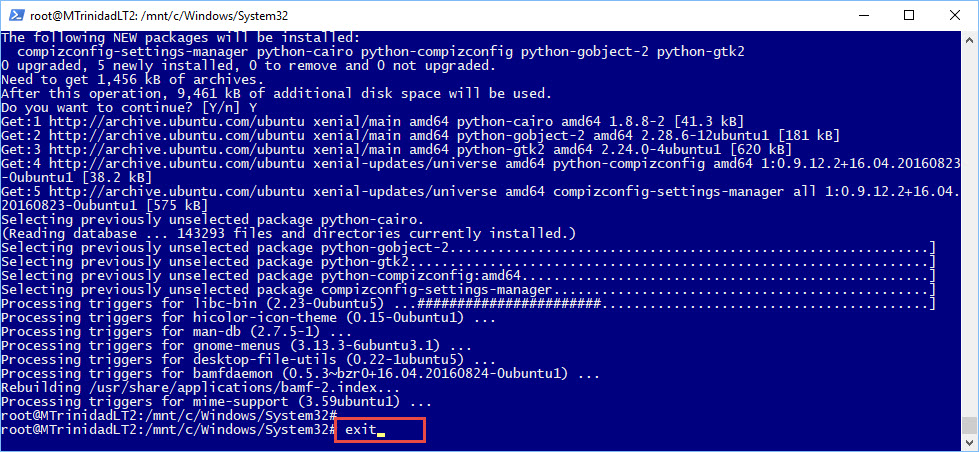
sudo apt install ubuntu-desktop

In some cases, at the end of the installation you will either see no errors, or it will end with the following message: “E: Sub-process /usr/bin/dpkg returned an error code (1)“.
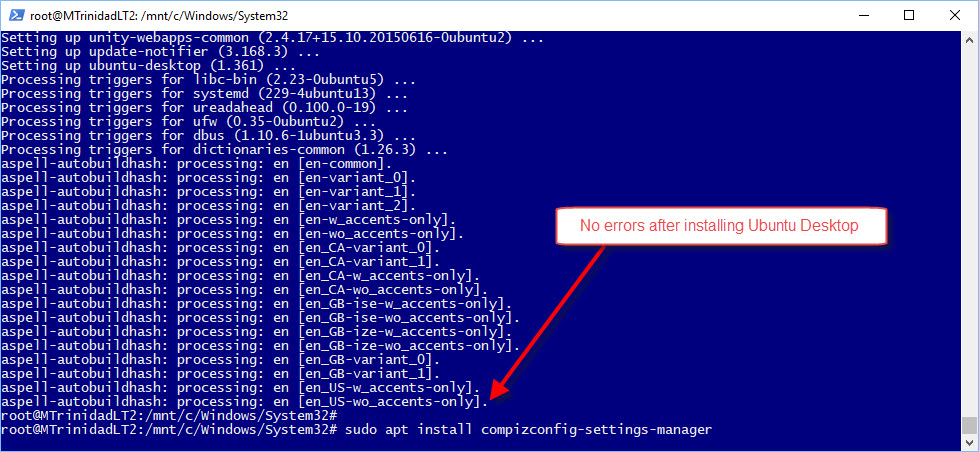
Now, the next package installation install the desktop setting manager application you will need to use later;

sudo apt install compizconfig-settings-manager
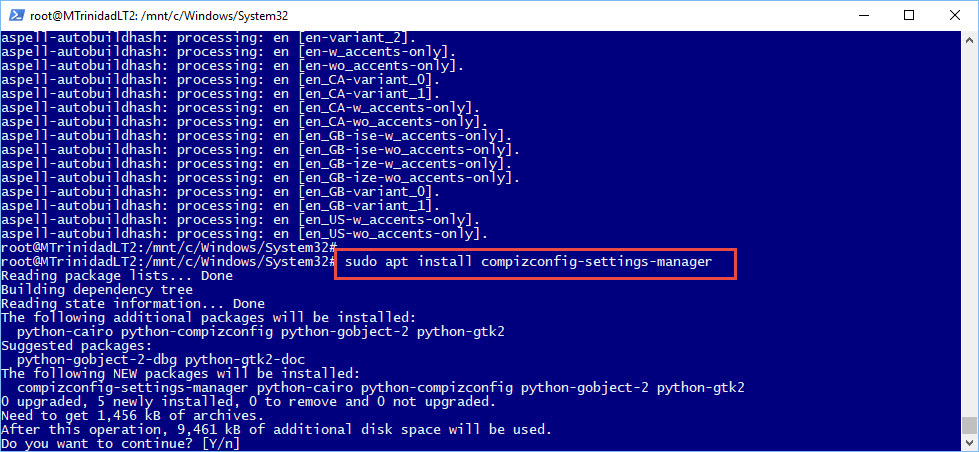
So after all is done, use the “exit” command to get out of the Super User session and get back to your user session.

exit
Installing PowerShell

Now, we are ready to install PowerShell Open Source. Remember, if you follow above Windows 10 Recommendation section, you have already downloaded PowerShell. This file will be located in your “..Username\Downloads” folder.  From the Bash prompt, you’ll probably be seen “username@SystemName:/mnt/c/Users/username$” when you open the console as a regular user (non-Admin privilege).

The following commands change folder location to where the PowerShell installation package was saved and the execute the package.

cd Downloads
sudo dpkg -i powershell_6.0.0-alpha.14-1ubuntu1.16.04.1_amd64.deb

This package installation should end without any errors. Don’t open PowerShell yet!

The Ubuntu Desktop

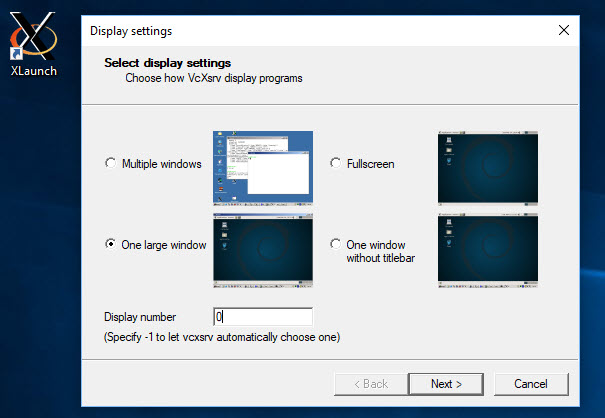
First, in Windows 10, we need to start our “VcXsrv Windows X Server” application by clicking the Windows X Server “Launch” icon. Pay close attention to the field labeled “Display number” should have the value ‘0‘ and pick the “One large window“. Then clicking “Next” to accept all default values.
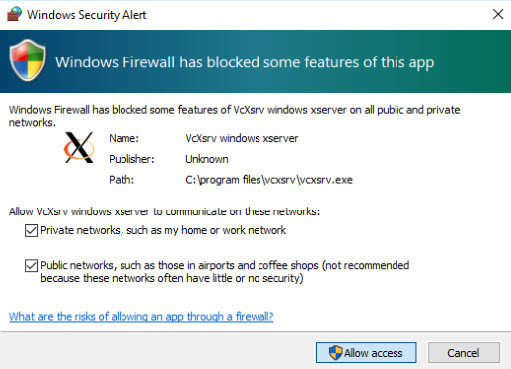
This will open a blank Windows X Server display.
Now, open “Bash on Ubuntu on Windows” prompt, and at this point there’s no need to open “as Administrator”. Type the following commands to start the “Ubuntu Desktop” in Windows 10:

export DISPLAY=localhost:0

This command will allow the any gui application to interact with our Windows X Server service.

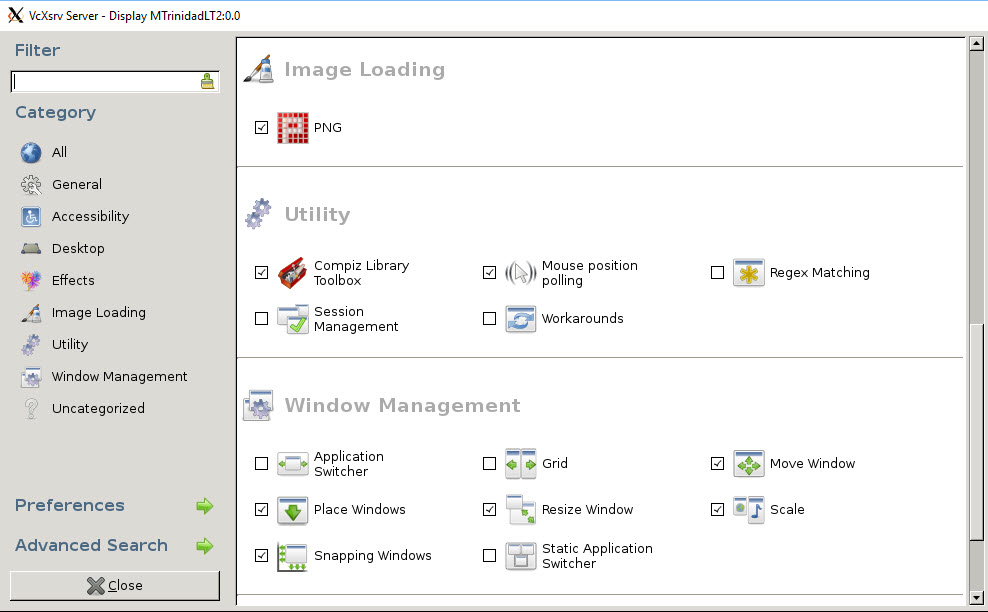
Then, run the command ‘ccsm‘ to configure the Ubuntu Desktop settings: (This is a one time setup)

ccsm
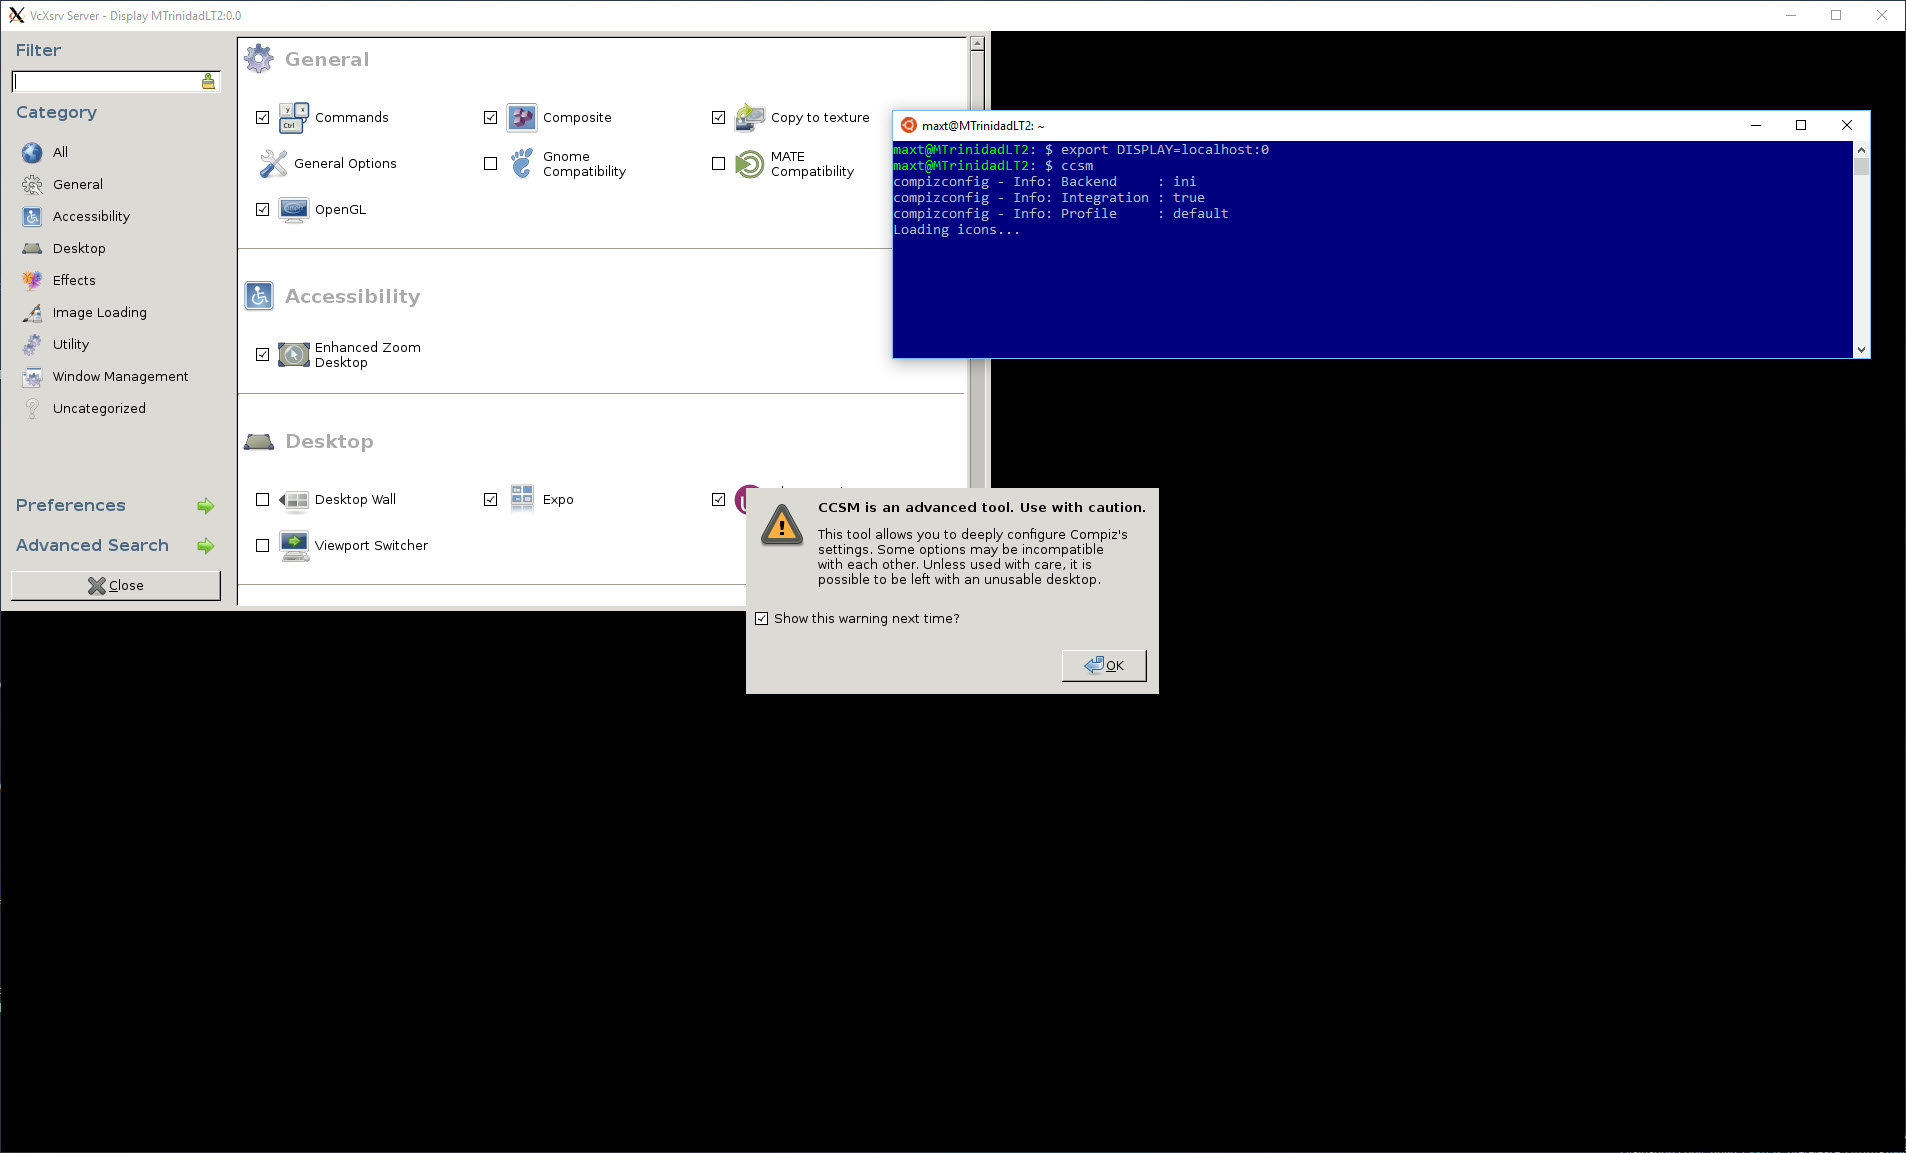
Click “OK” to continue making settings changes following the images below.
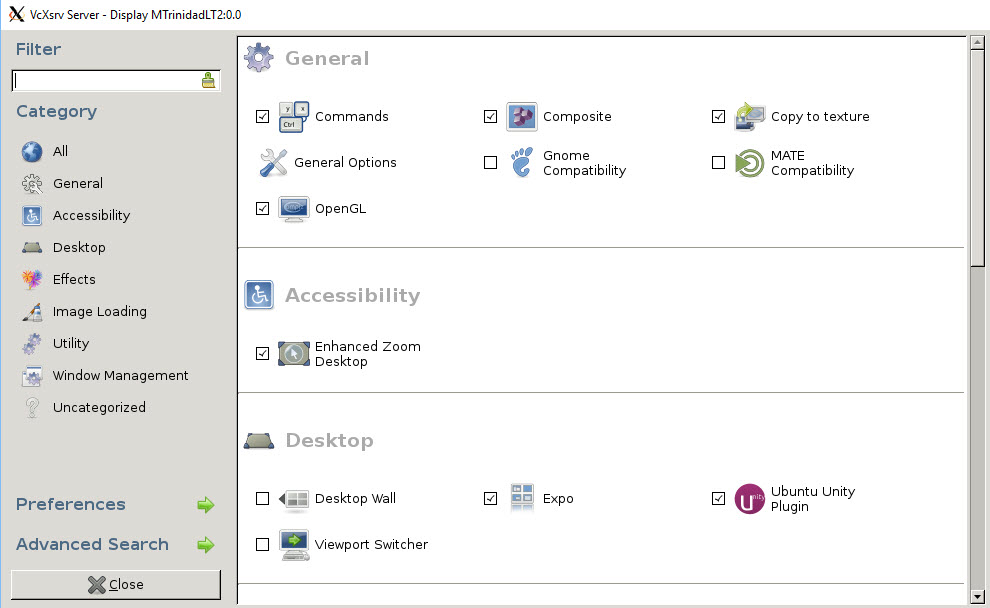
After updating the settings, click “Close

To proceed to start the Ubuntu Desktop, just execute the following command:

compiz
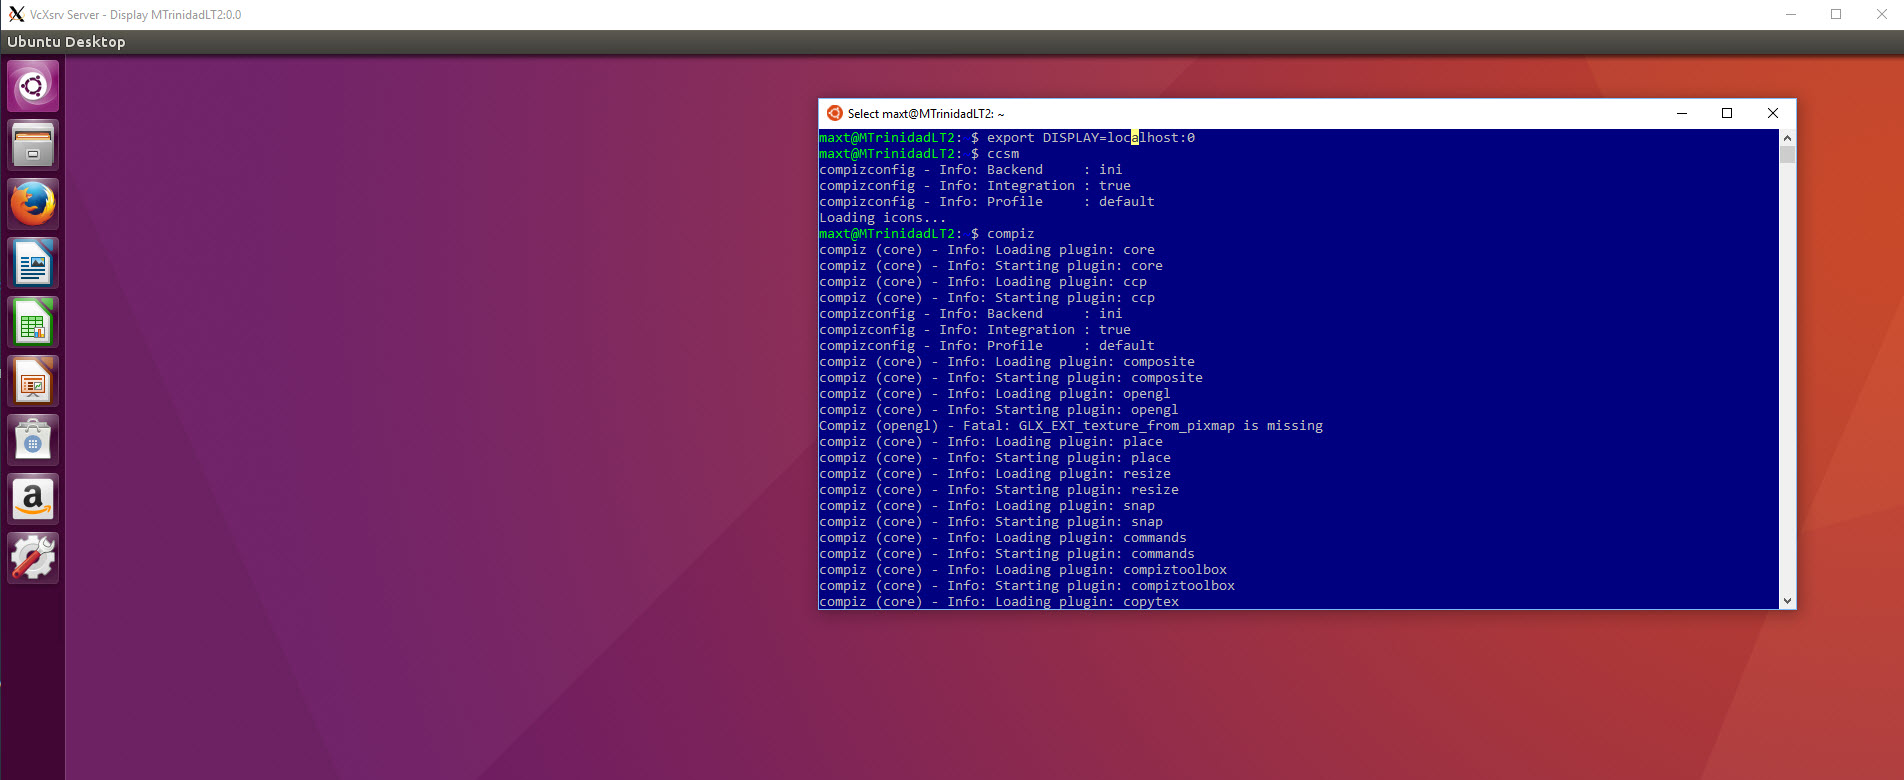
You will notice there are some applications available to use.

Let’s concentrate of the ‘File’, ‘Text Editor’, and ‘Terminal’. You can manually execute some gui applications from the bash command prompt such as:
1. For File Browsing execute: nautilus or ‘sudo nautilus’ with elevaded security.
2. For Text Editor execute: gedit or ‘sudo gedit’ with elevated security.
3. For Internet browsing: firefox
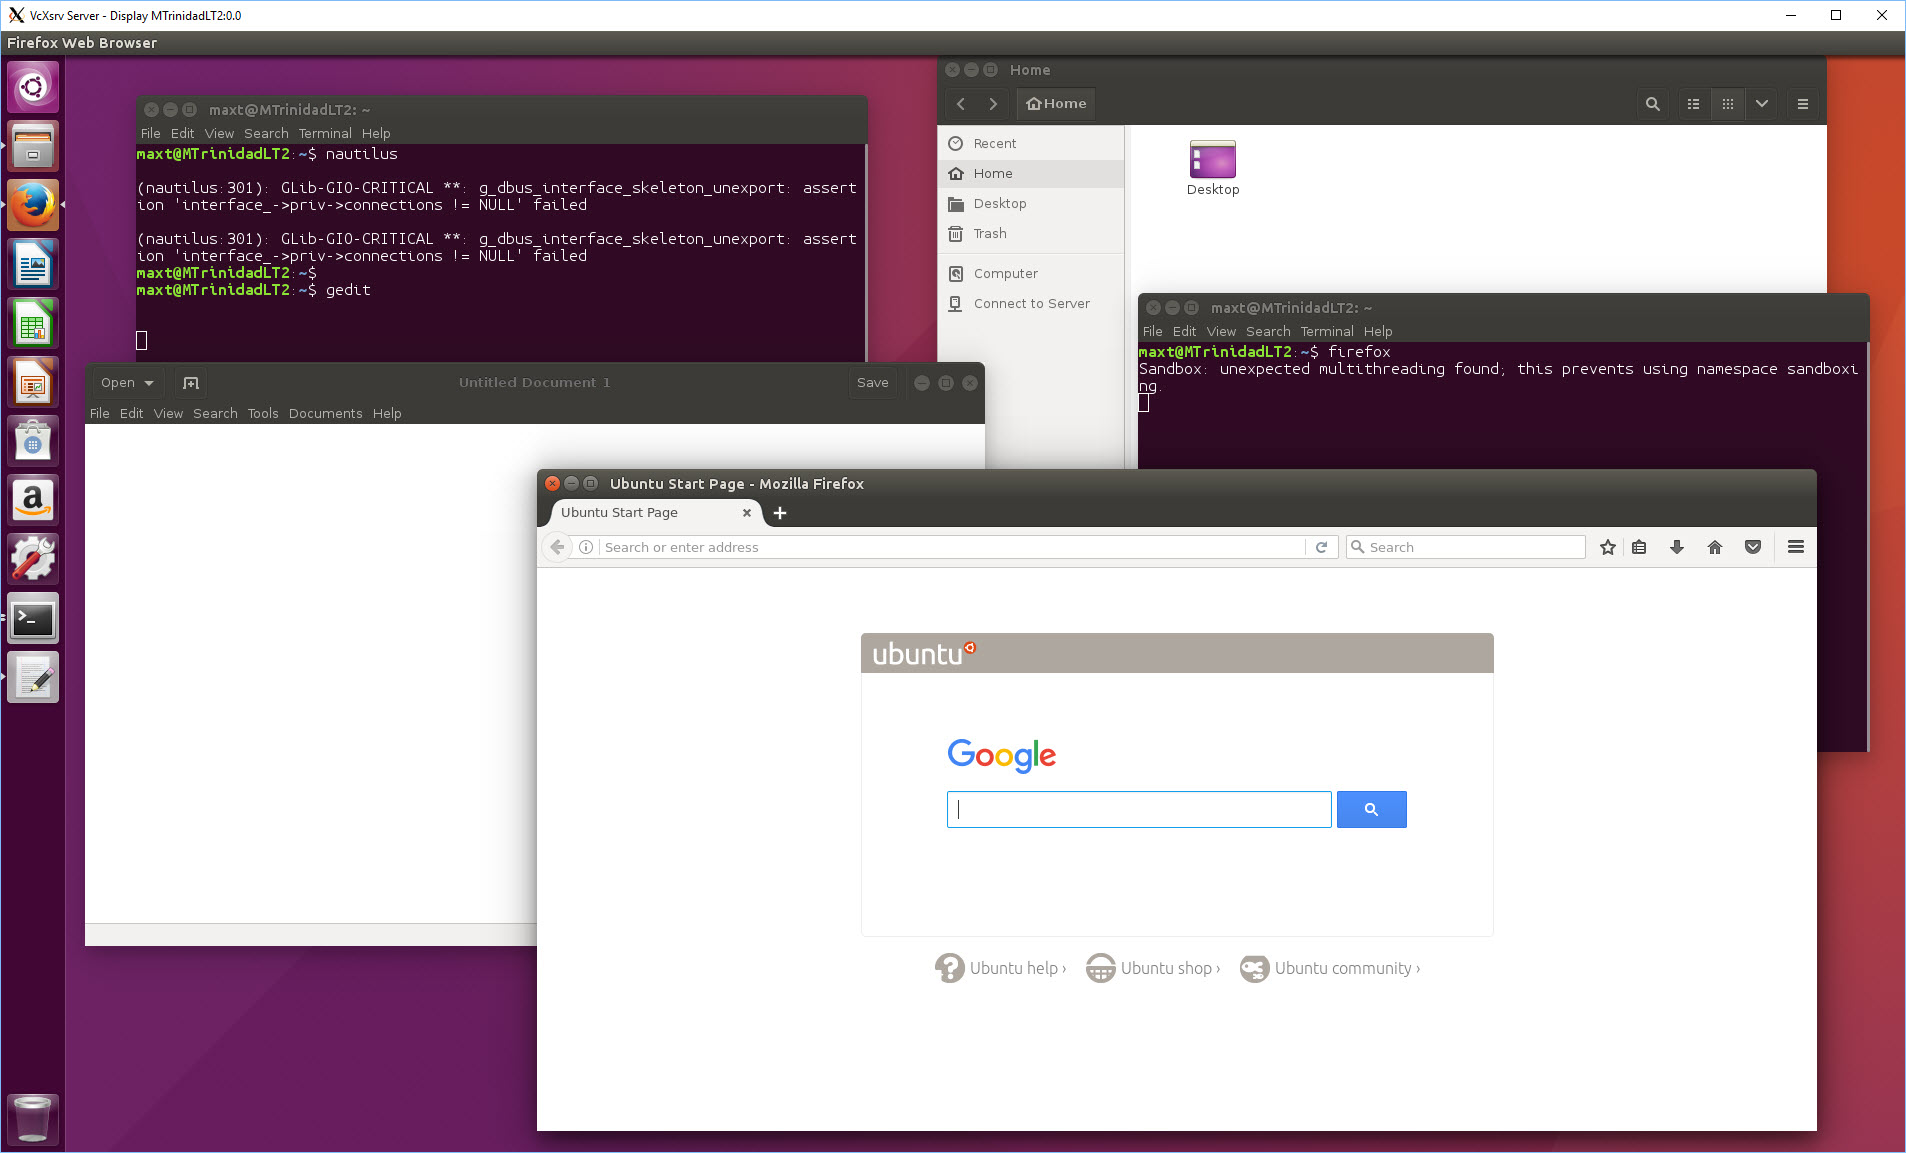
Now, we are ready for PowerShell.

PowerShell in Windows 10 Bash

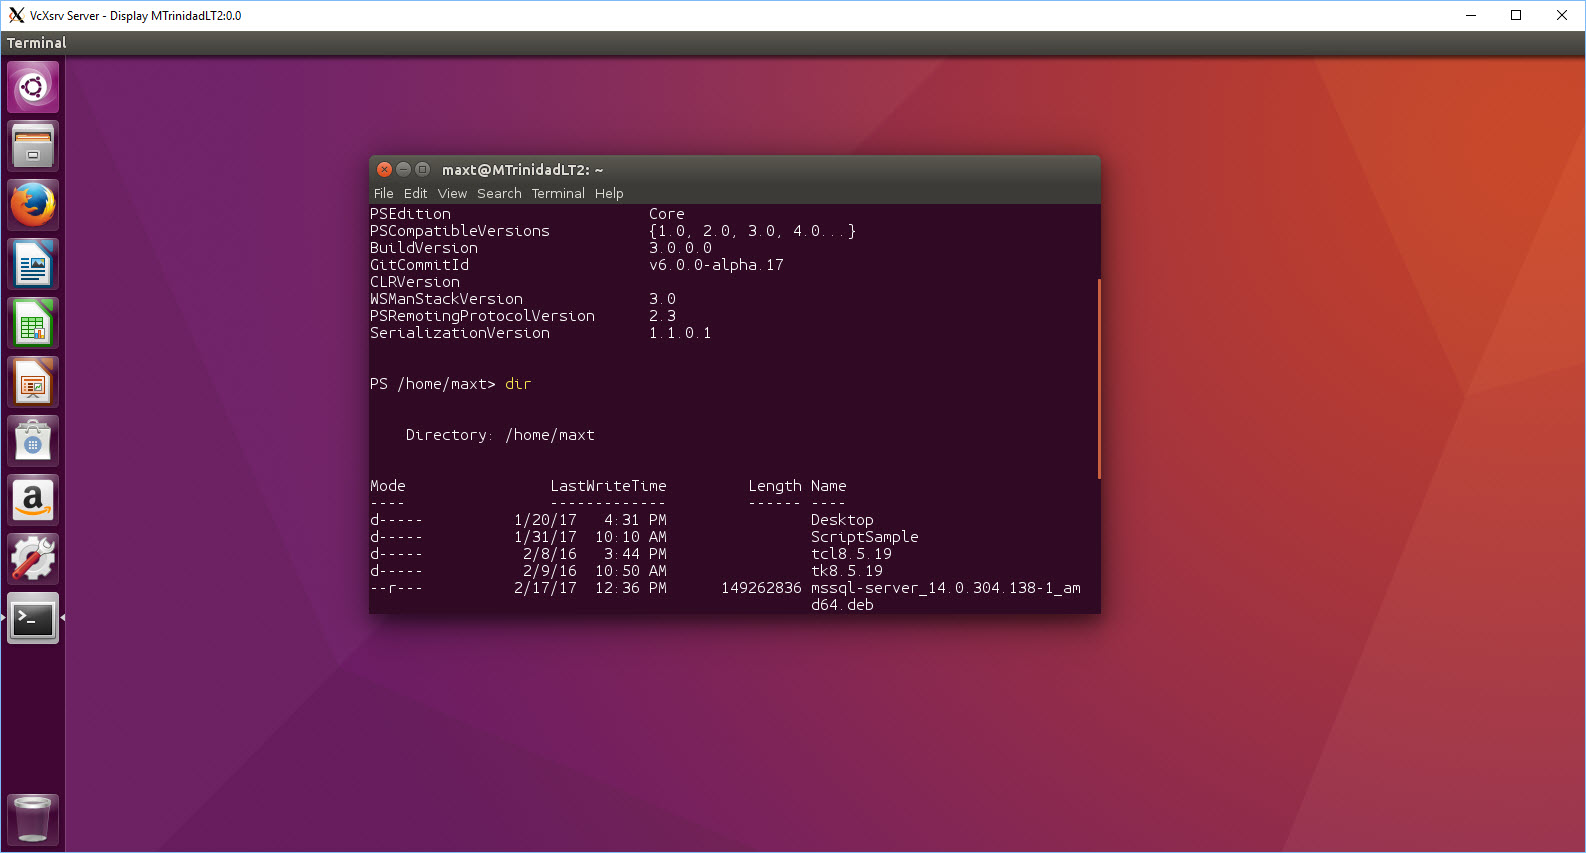
At the Ubuntu Desktop just right-click and pick “Open Terminal”. Then, type “powershell” and press enter.
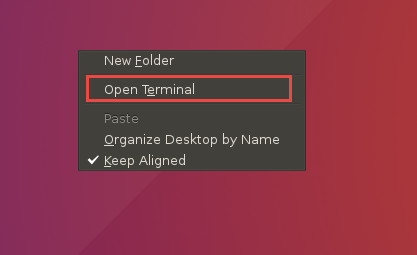
Then execute the following powershell commands:

$psversiontable
dir
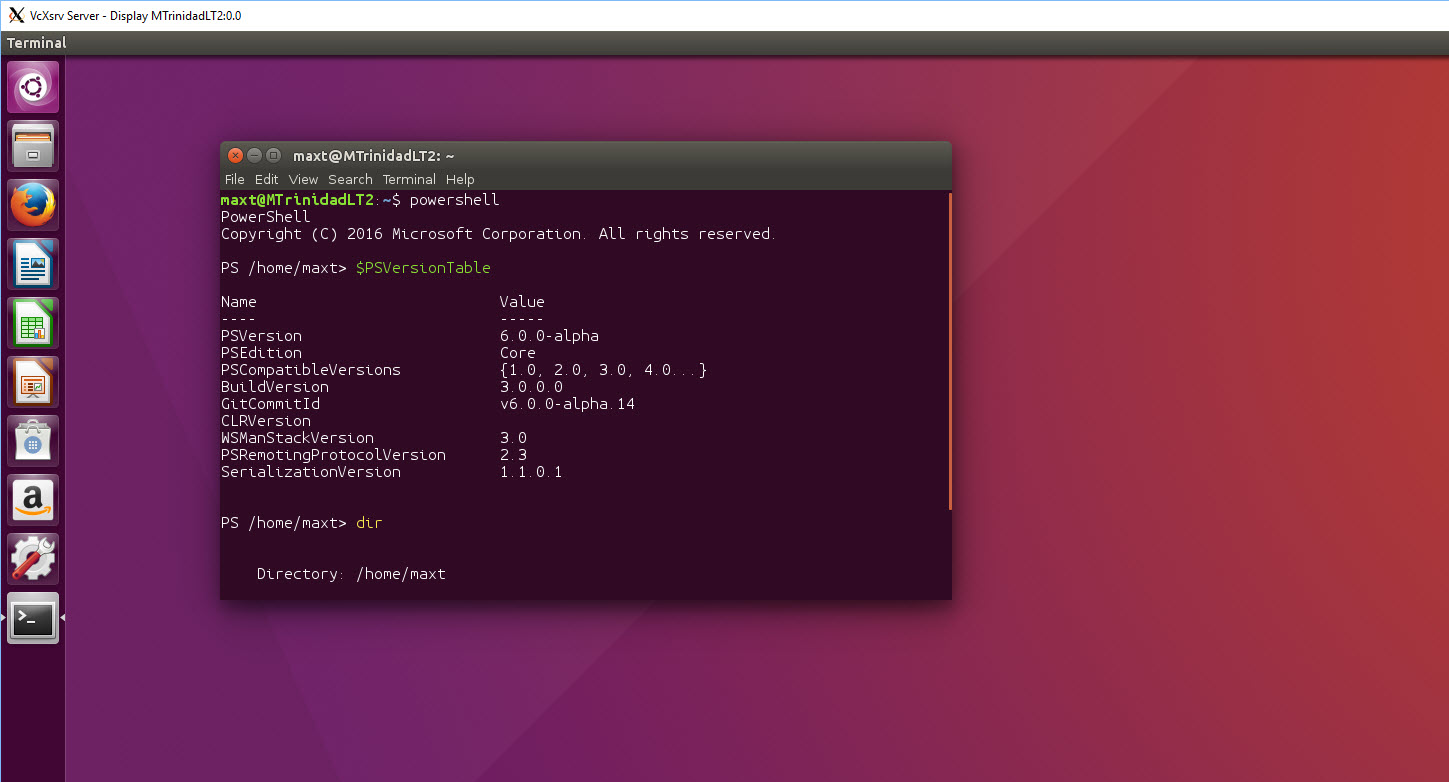
As you can see we, now PowerShell is working in Windows 10 Bash thank to Ubuntu Desktop. But, keep in mind, Ubuntu Desktop is not supported in Windows 10 Bash subsystem. At least, you can give it a test drive.
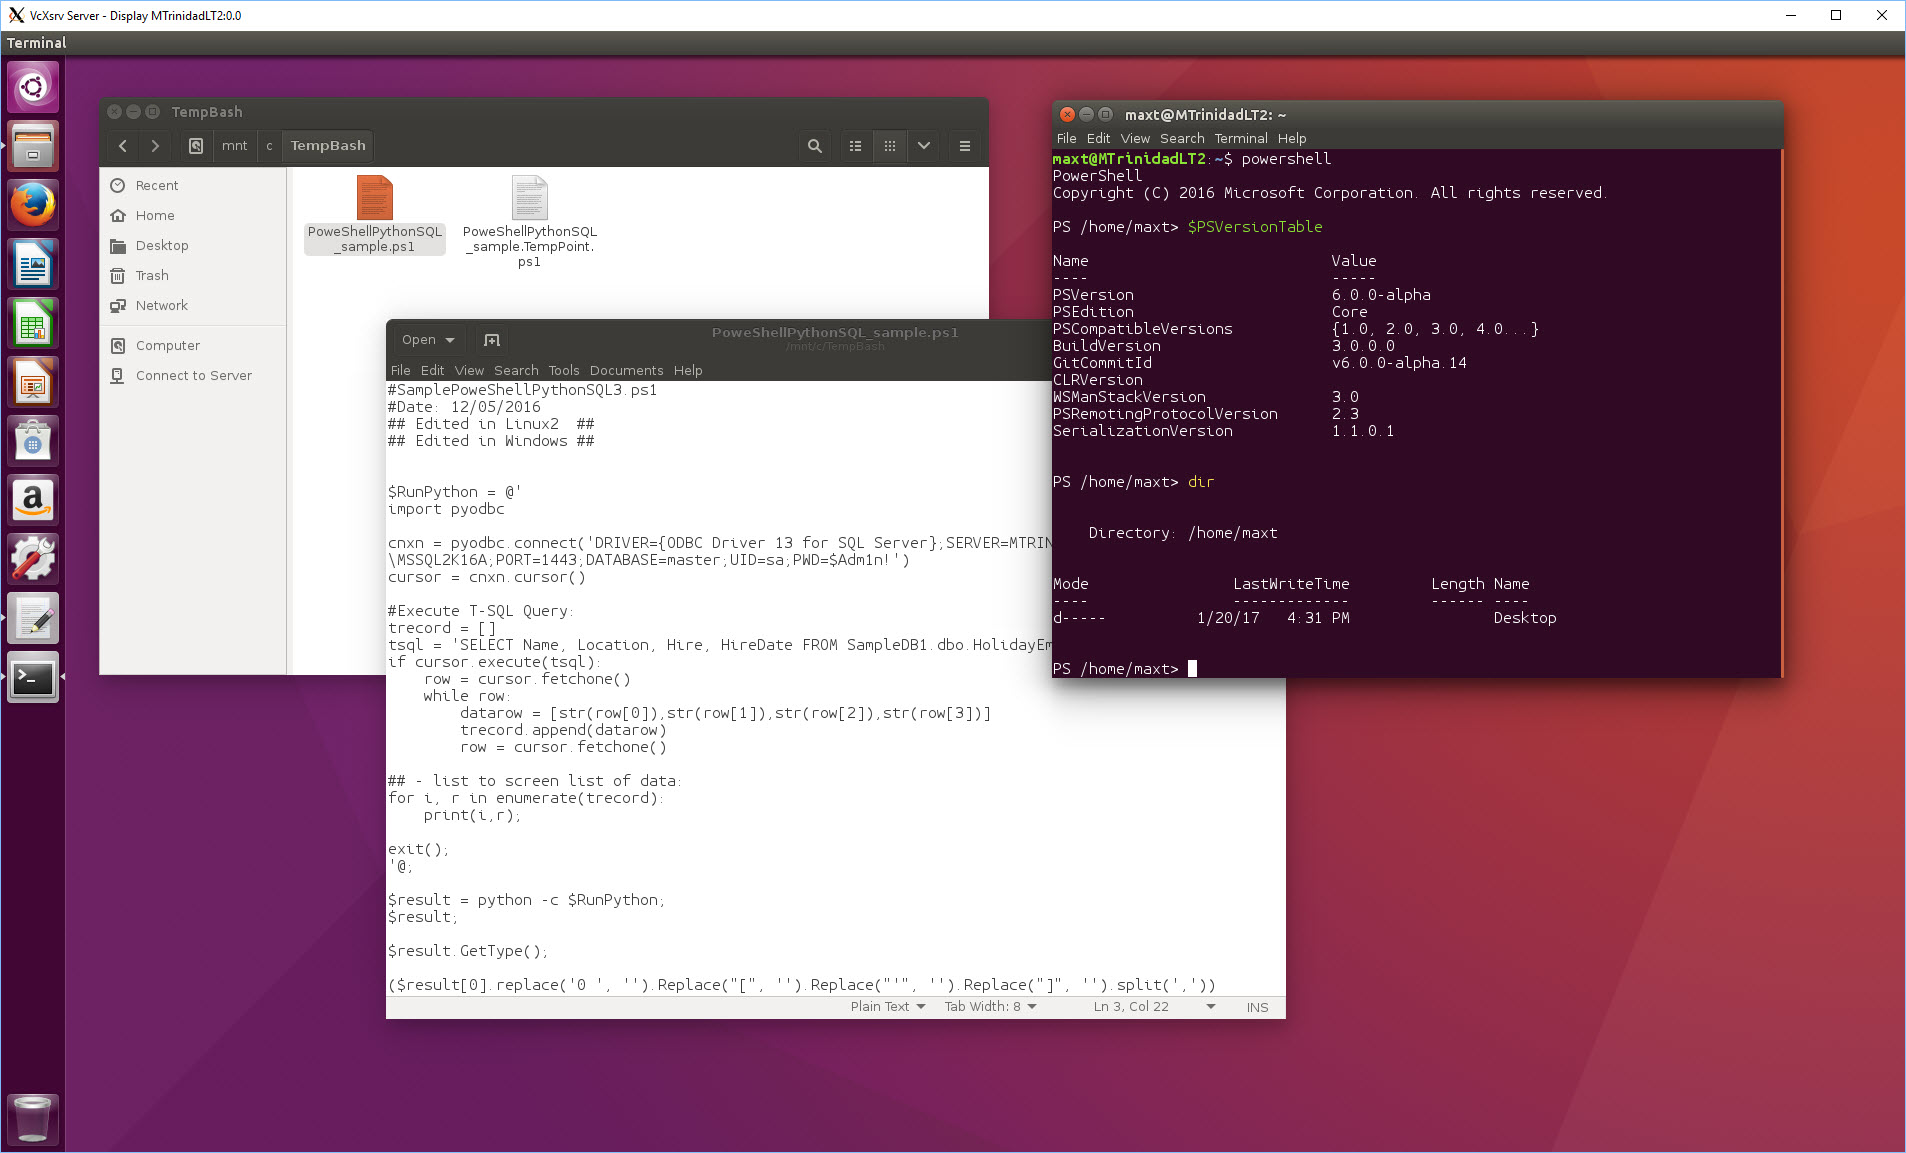
By the way, you can use your favorite PowerShell Editor

BONUS Section

Important Path to Remember, in case you’ll find where things are in Windows 10 Bash Subsystem.

Windows 10 BASH folders:
C:\Users\mtrinidad\AppData\Local\lxss
C:\Users\mtrinidad\AppData\Local\lxss\home\”Linux_UserName”
C:\Users\mtrinidad\AppData\Local\lxss\rootfs\usr\local\bin
C:\Users\mtrinidad\AppData\Local\lxss\home\”Linux_Username”\PowerShell

Bash file path to Windows folders:
/mnt/c
/mnt/c/Users/”Windows_UserName”/Downloads
/home/”Linux_UserName

Where PowerShell Open Source folder are located in Bash Subsystem:
/usr/local/bin/PowerShell

Additional Information:
Information about installing Ubuntu Desktop in Windows Bash:
— See link for info: https://github.com/Microsoft/BashOnWindows/issues/637

 

PowerShell – Useful Windows Bash commands to remember

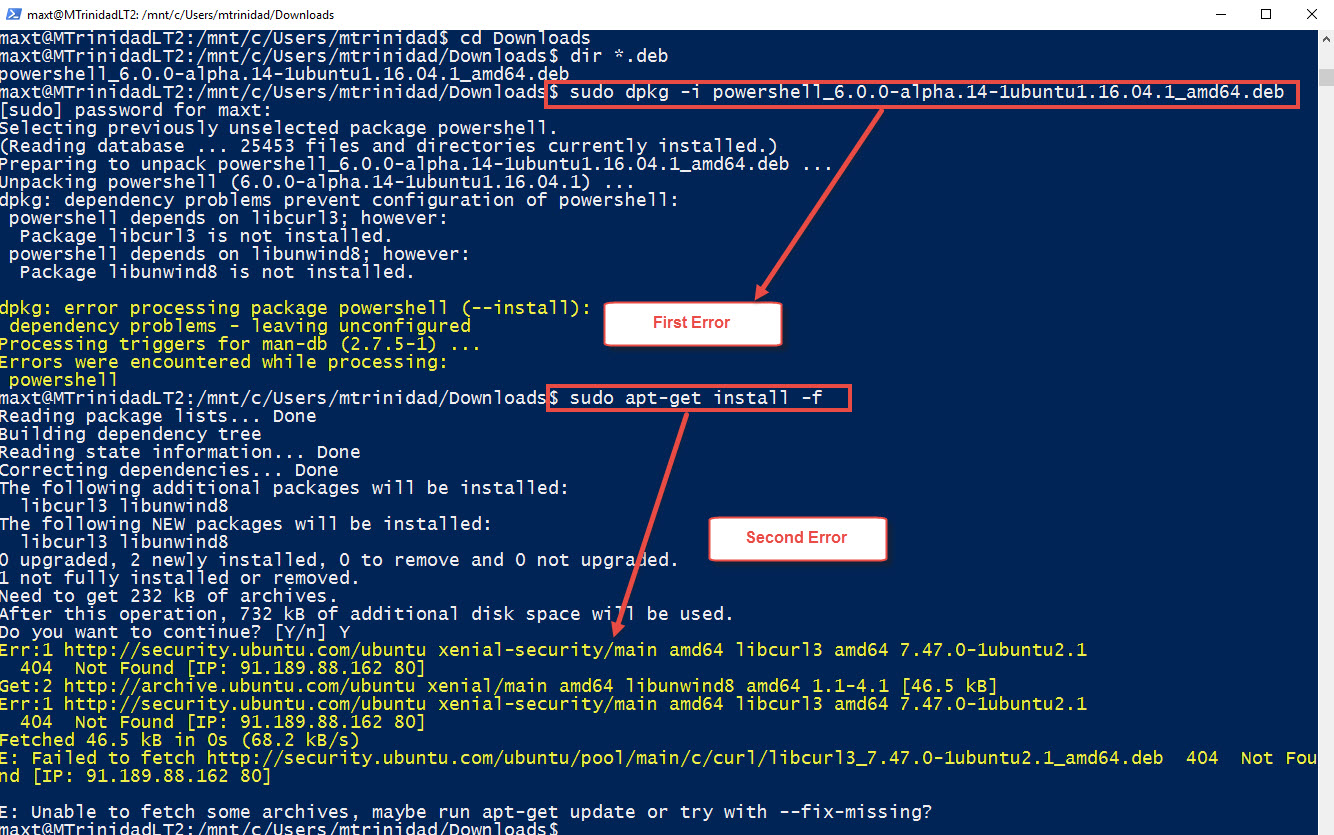
This is for Linux Newbies when working with both Linux Ubuntu 16.04.01 and Windows Bash (which is based on Ubuntu 16.04.1). Please, get use the execute the following commands at least weekly as updates will be available frequently. And, specially before installing the next new release of PowerShell Open Source.

Look for PowerShell Open Source releases at: https://github.com/PowerShell/PowerShell

Follow these steps on a “Clean” Windows 10 Bash subsystem:

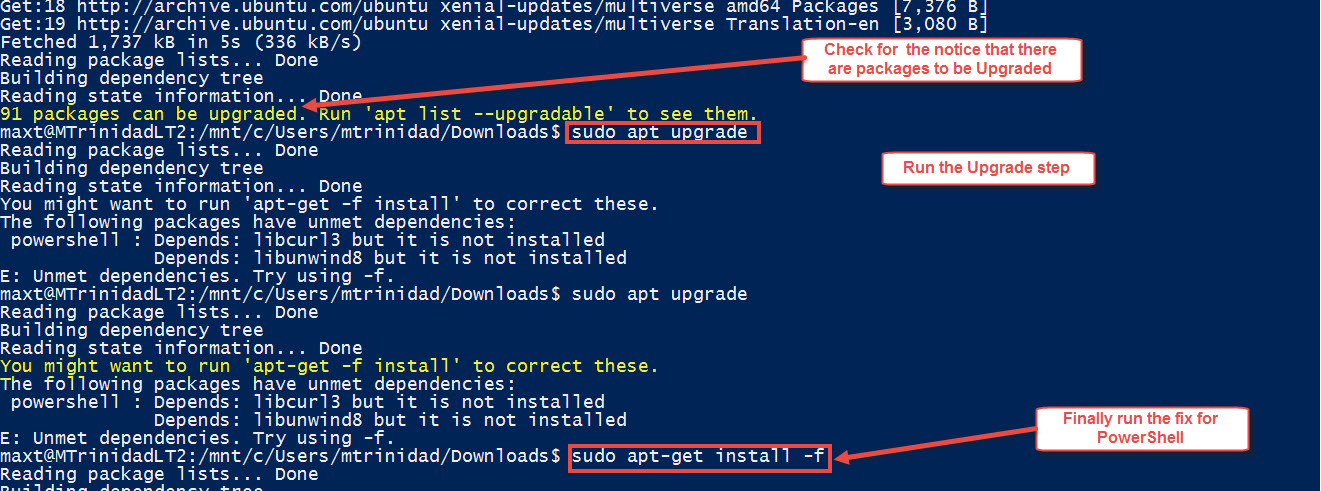
1. Run updates available:

[sourcecode language=”bash”]
$ sudo apt update
[/sourcecode]

2. After the update there might be upgrade available, so list all upgradable components:

[sourcecode language=”bash”]
$ apt list –upgradable
[/sourcecode]

3. If there’s a list of upgradable components then proceed with the upgrade step:

[sourcecode language=”bash”]
$ sudo apt upgrade
[/sourcecode]

When installing PowerShell Open Source after a clean Windows Bash installation. Follow the Github instructions as the installation will end in errors. You must run the following command:

[sourcecode language=”bash”]
$ sudo apt-get install -f
[/sourcecode]

But still, if it ends in error, try again the following commands on order:

[sourcecode language=”bash”]
$ sudo apt update
$ sudo apt upgrade
$ sudo apt install -f
[/sourcecode]

You’ll notice the error will be cleared.

Also, be patience when e executing ‘sudo apt upgrade’ as this command will take a little time to complete.

One important thing, pay close attention the either Linux and Windows Bash messages when executing these commands as they will give valuable information. These messages will provide the hint on what to do in case of errors.

Running PowerShell Open Source

Now you can proceed to run powershell from Windows Bash. But it’s not there yet, you’ll still experience the screen issues when executing commands. This has been already noted in Github and they are still working on it.

So, the workaround still applies: http://www.maxtblog.com/2016/10/running-powershell-in-windows-10-bash-workaround/

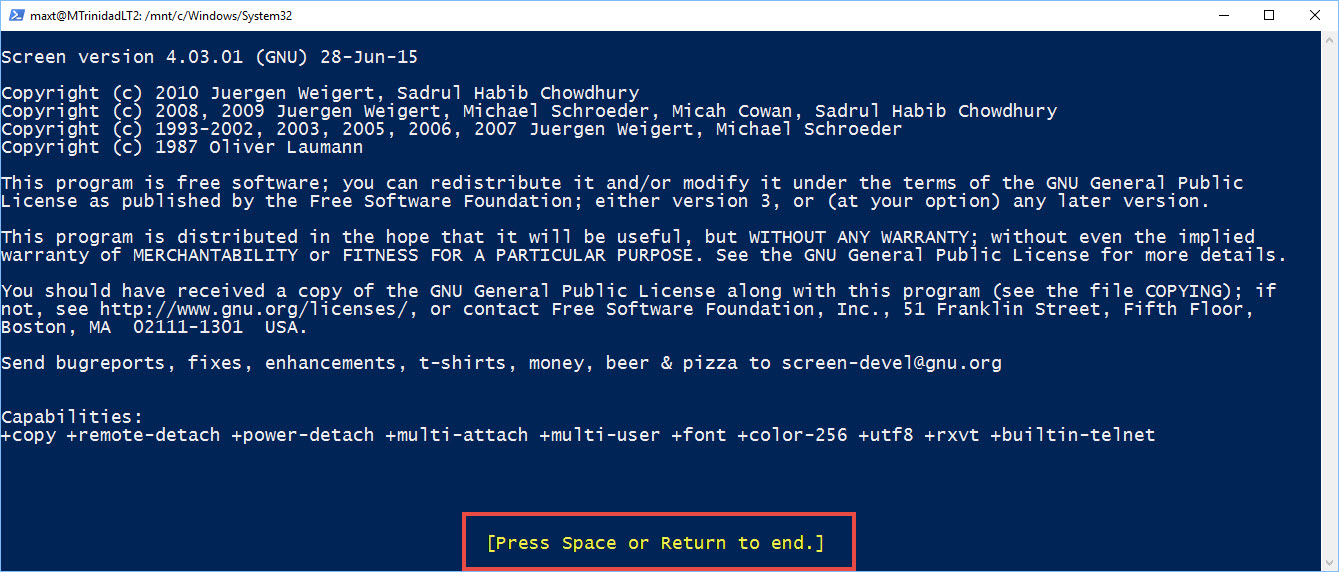
For a quick console test, try using ‘screen‘ but need to run as ‘root’ privilege :

[sourcecode language=”bash”]
$ sudo screen
[/sourcecode]

Here are some remediation to caveats with PowerShell when using ‘screen‘.

Important shortcut keys to remember:

1. Use CTRL-A & ESC – for PGUP/PGDN or ARROW UP/DOWN.
2. Use CRTL-L – to CLEAR the screen.

Also, caution, if you run any Linux command from PowerShell it will not terminate and you’ll need to close your session.

The workaround is the save the results of the Linux command to a PowerShell variable and the display the result.

For example, run in PowerShell prompt:

[sourcecode language=”PowerShell”]
PS c:\Windows\system32> $x = dh -h; $x;
[/sourcecode]

Now, if you run the linux command in PowerShell without saving to a variable, then you’ll get the session hung. To force PowerShell to get out of the hung state use CRTL-A and then CRTL-C. This will return to the Linux prompt(#).

Remember to exit ‘screen‘ by typing ‘exit‘ a few times until you get to the user ($) bash prompt.

So, with these few shortcuts, at least you should be able to work with PowerShell Open Source in Windows Bash console. I know its a little tedious but it will be rewarding at the end.

Just give it a shot, and keep learning PowerShell!

PowerShell Open Source Alpha14 and SQL Server for Linux CTP 1.1 are out!

This is Great! Microsoft keep delivering updates before Christmas just to keep us busy and excited.

To download the latest PowerShell Open Source just go to the link below:

https://github.com/PowerShell/PowerShell

Just remember to remove the previous version, and any existing folders as this will be resolved later.

To download the latest SQL Server vNext just check the following Microsoft blog post as the new CTP 1.1 includes version both Windows and Linux:

SQL Server next version Community Technology Preview 1.1 now available

And, don’t forget the check out the release notes as Microsoft SQL Server team has done an excellent job in providing documentation:

https://docs.microsoft.com/en-us/sql/linux/sql-server-linux-release-notes

For those interested in how SQL Server became to Linux, check the following Microsoft Blog posts:

SQL Server on Linux: How? Introduction

http://arstechnica.com/information-technology/2016/12/how-an-old-drawbridge-helped-microsoft-bring-sql-server-to-linux/

Additional Tools in the Horizon

Just an FYI on some tools that recently caught my attention from Jet Brain:

1. PyCharm Community Edition (free) – Python Develoment IDE Tool available for both Windows and Linux.
2. DataGrip – SQL Developer IDE Tools for working with Databases (including SQL Server). Also available for both Windows and Linux.

And, of course, we can’t forget of Microsoft VS Code. This lightweight coding IDE works great in both Windows and Linux:

https://code.visualstudio.com/


PowerShell Open Source – Windows PSRemoting to Linux with OpenSSH

I have to admit that I was waiting for this for some time. Finally, PowerShell 6.0.0-Alpha_13 can do remoting between Windows to Linux. This is Awesome!

microsoft-loves-linux

I’m going to give you the top-to-bottom scope in order to avoid going back-and-forth between link. So, it’s all here and including tips and print-screens.

Instructions for Windows OpenSSH installation

[sourcecode language=”dos”]
cd ‘C:\Program Files\OpenSSH’
[/sourcecode]

  • Install sshd and ssh-agent services by using the following command line:

[sourcecode language=”powershell”]
powershell -executionpolicy bypass -file install-sshd.ps1
[/sourcecode]

  • Setup SSH host keys (this will generate all the ‘host’ keys that sshd expects when its starts).

[sourcecode language=”powershell”]
.\ssh-keygen.exe -A
[/sourcecode]

winlinuxremoting_07_2016-12-02_11-23-28

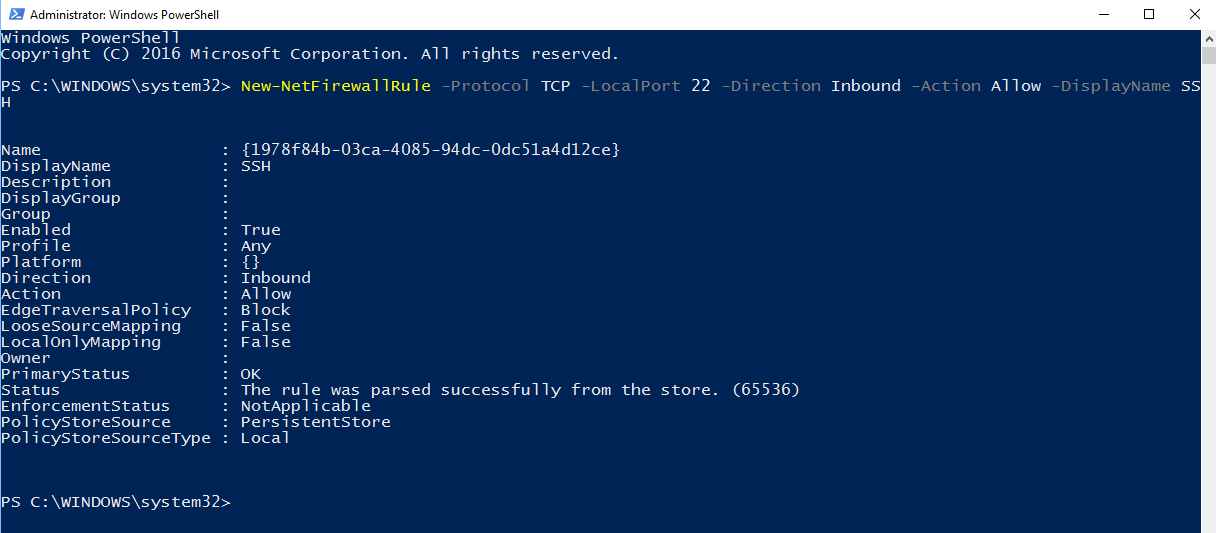
  • Open Firewall (Windows PowerShell 5.x) Server: (This command works in Windows 10)

[sourcecode language=”powershell”]
New-NetFirewallRule -Protocol TCP -LocalPort 22 -Direction Inbound -Action Allow -DisplayName SSH
[/sourcecode]

winlinuxremoting_08_2016-12-02_11-23-28

  • Or for a Workstation:

[sourcecode language=”powershell”]
netsh advfirewall firewall add rule name=’SSH Port’ dir=in action=allow protocol=TCP localport=22
[/sourcecode]

winlinuxremoting_10_2016-12-02_11-23-28

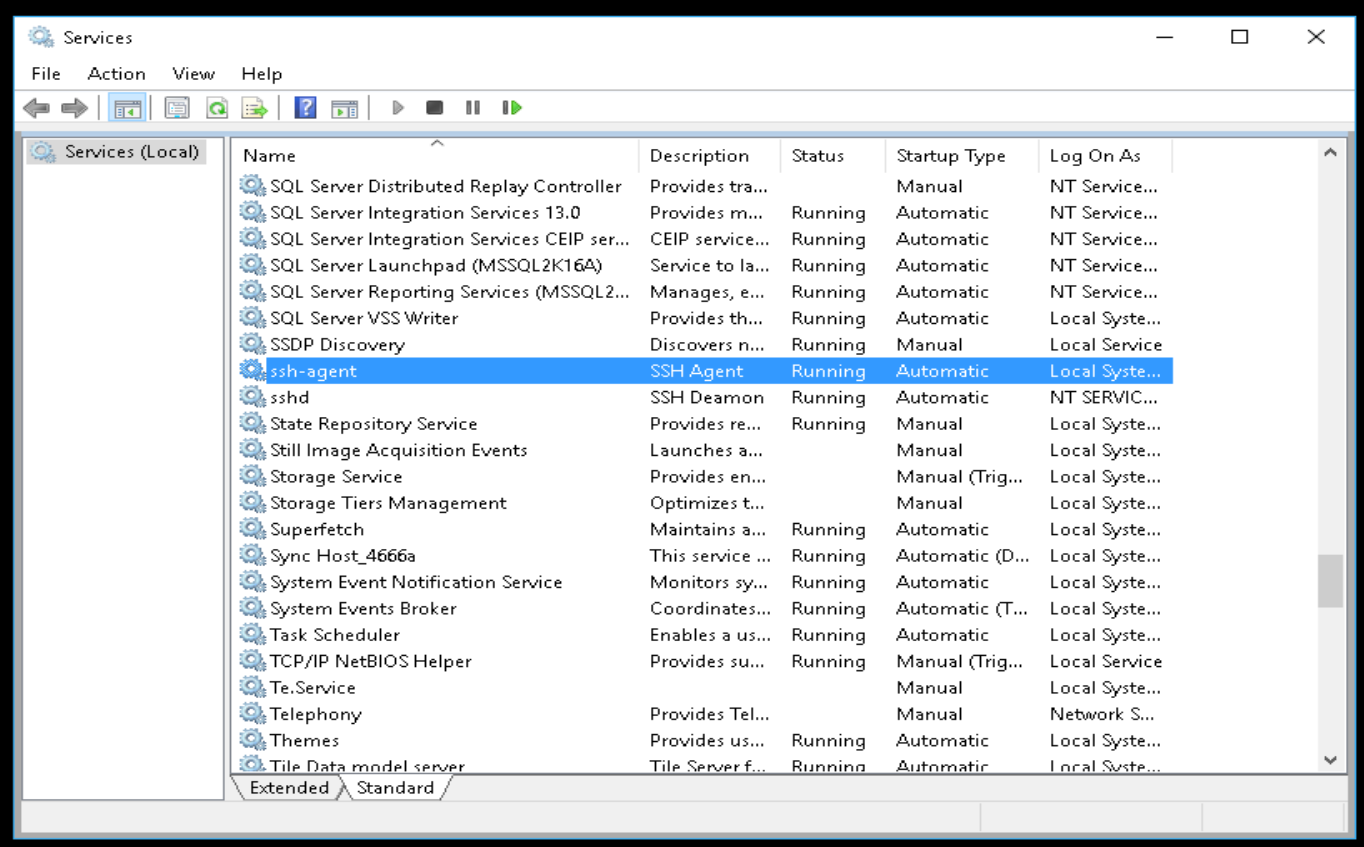
  • Then, to set sshd in auto-start mode and open up firewall:

[sourcecode language=”powershell”]
Set-Service sshd -StartupType Automatic
Set-Service ssh-agent -StartupType Automatic
[/sourcecode]

winlinuxremoting_06_2016-12-02_11-23-28

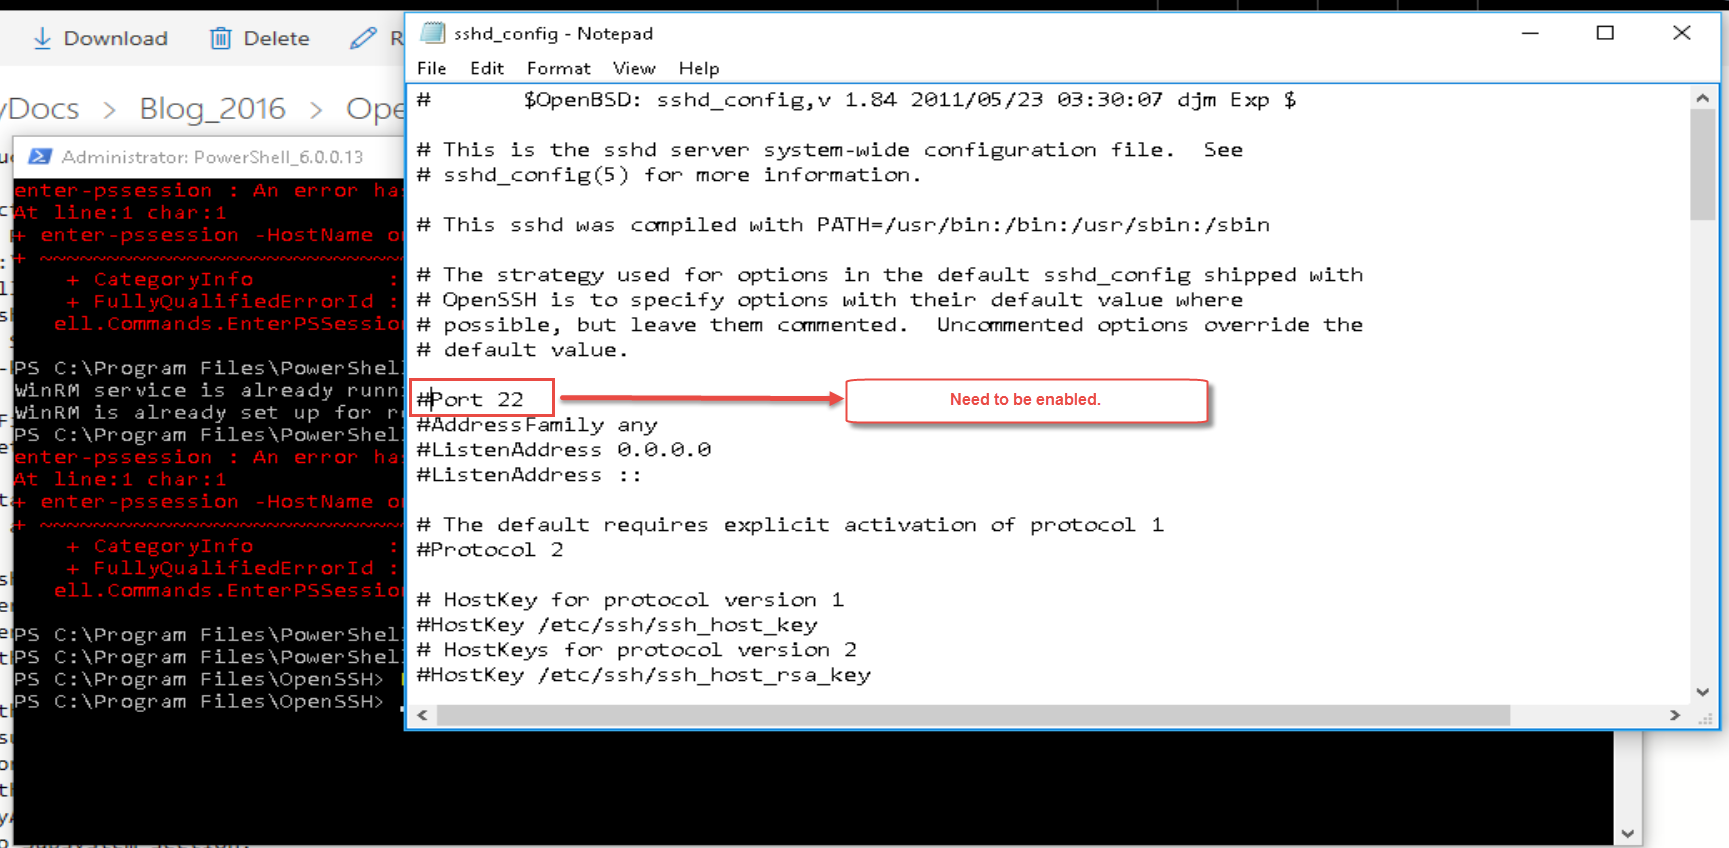
  • Edit the sshd_config file at the location where you installed Win32 Open SSH and make sure to enabled the following lines:
    Port 22
    PasswordAuthentication yes
    RSAAuthentication yes
    PubkeyAuthentication yes

winlinuxremoting_02_2016-12-02_11-23-28

Also, add the following line to the Subsystem section:
Subsystem powershell C:/Program Files/PowerShell/6.0.0.13/powershell.exe -sshs -NoLogo -NoProfile

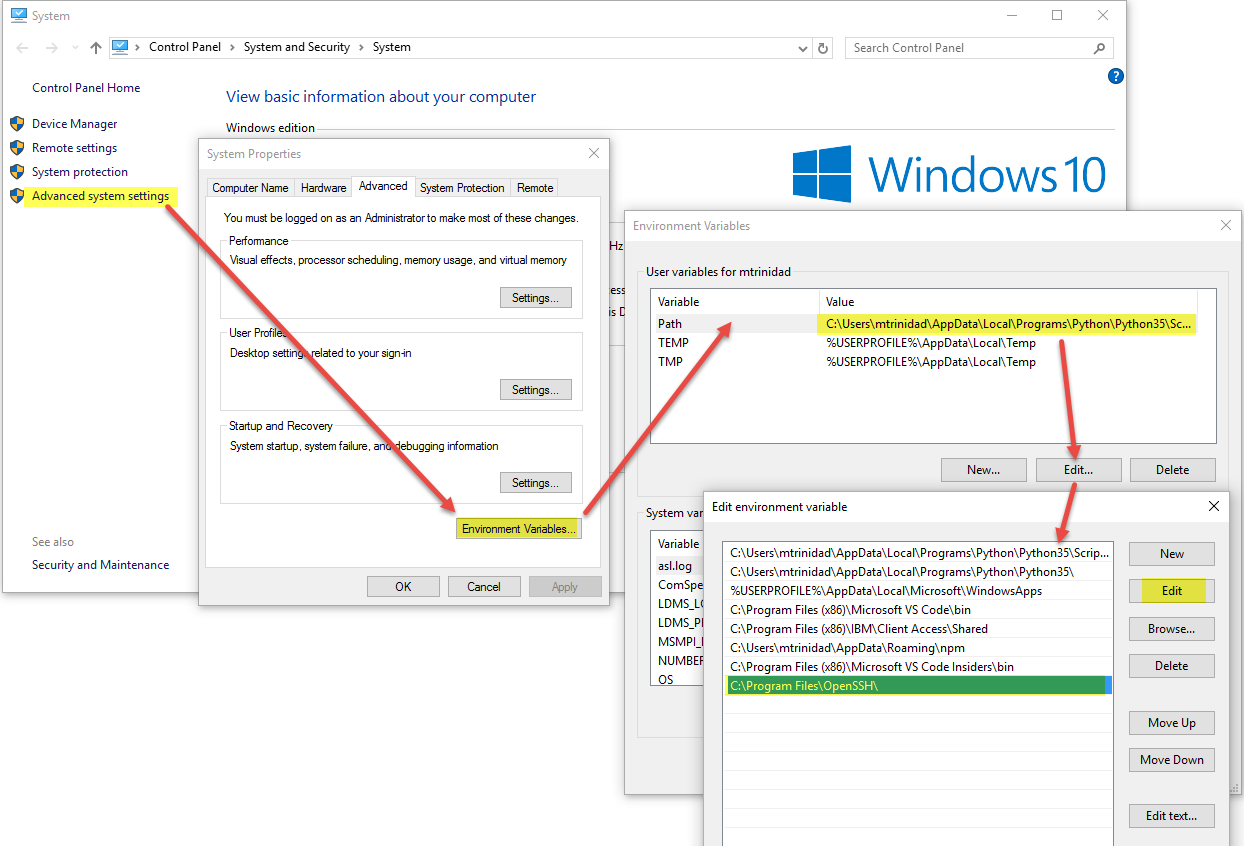
Finally, you must add the following line in the system path: “C:\Program Files\OpenSSH”

winlinuxremoting_09_2016-12-02_11-23-28

Failure to add this path line will cause the following error because it can’t execute sshd.exe:

winlinuxremoting_03_2016-12-02_11-23-28

If there’s a need to restart Windows SSHD services, just use the following PowerShell commands:

[sourcecode language=”powershell”]
Stop-Service sshd
Start-Service sshd
[/sourcecode]

Instructions for Ubuntu SSH installation:

  • Download using Ubuntu apt repository using sudo:

[sourcecode language=”powershell”]
$ sudo apt install openssh-client
$ sudo apt install openssh-server
[/sourcecode]

  • Make changed to Ubuntu sshd_config file to enabled some lines below:

[sourcecode language=”powershell”]
$ sudo gedit /etc/ssh/sshd_config
[/sourcecode]

  • Again, make sure to enabled the following lines:
    PasswordAuthentication yes
    RSAAuthentication yes
    PubkeyAuthentication yes
  • Add the following line to the Subsystem section:
    Subsystem powershell powershell -sshs -NoLogo -NoProfile

When done, in Ubuntu, just restart sshd service :

[sourcecode language=”bash”]
sudo service sshd restart
[/sourcecode]

If you want to verify Ubuntu SSH is working, just type the following command:

[sourcecode language=”bash”]
ps -A | grep sshd
[/sourcecode]

This should display a line showing sshd. If is blank, then is not on.

Connecting Linux to Windows

This is strange but, more likely, you will get an error the first time you try to connect. Just try the second try and it will work.

[sourcecode language=”powershell”]
Enter-PSSession -Hostname earth2 -Username max_t
[/sourcecode]

winlinuxremoting_11_2016-12-02_11-23-28

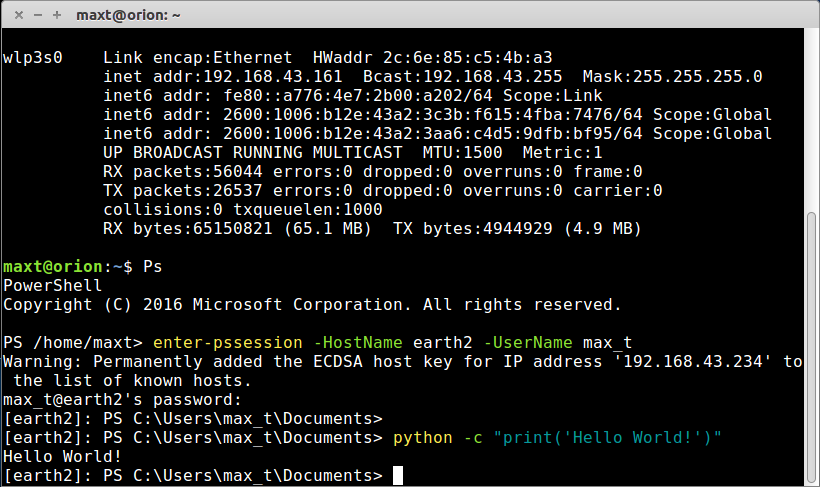
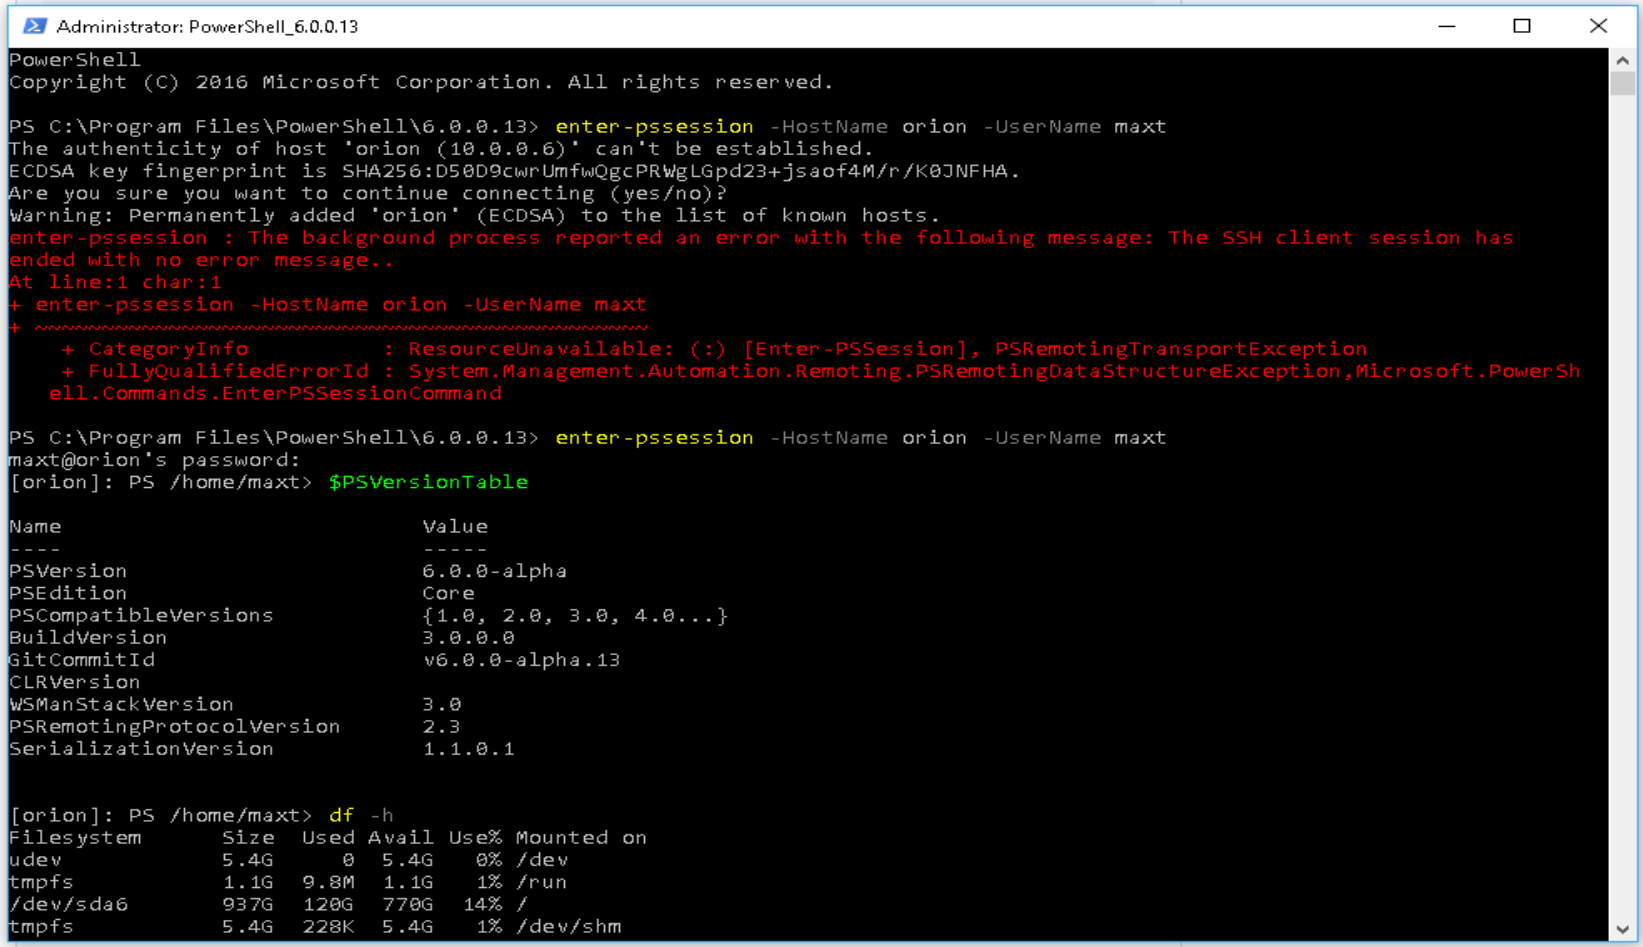
Connecting Windows to Linux

Again, I’ve seen the same behavior. It will fail the first time and the it will work.

[sourcecode language=”powershell”]
Enter-PSSession -Hostname orion -Username maxt
[/sourcecode]

winlinuxremoting_05_2016-12-02_11-23-28

What’s next?

After all have been tested, you can now connect from Windows to a Linux system. Then, you can execute your Linux commands from the Linux PowerShell session at your Windows Desktop. Is that amazing!!

Keeping things Simple!

Additional tips

This tips may not hurt to do:
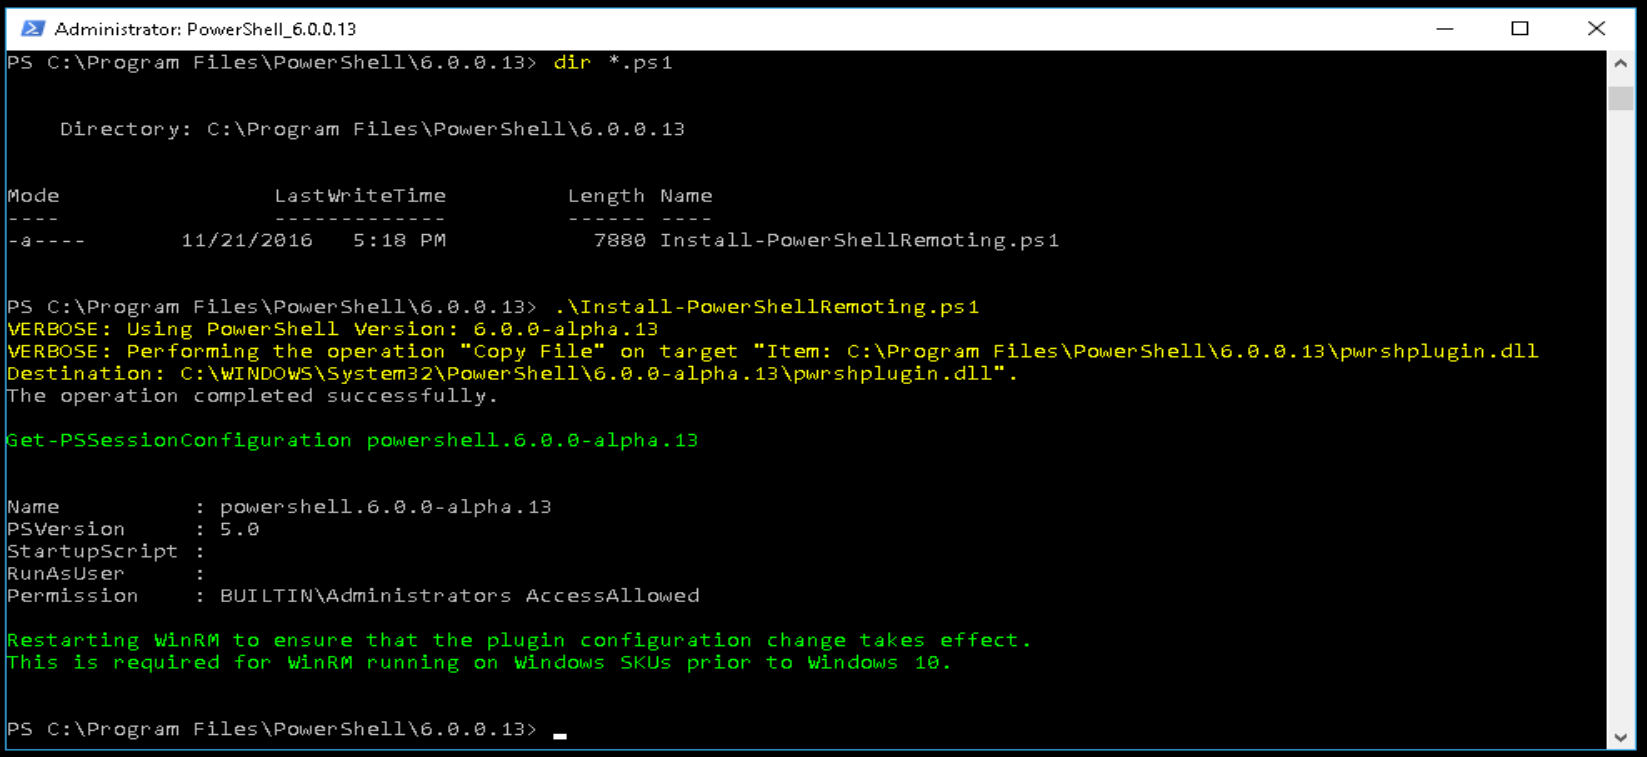
1. winrm quickconfig
2. Run the ./InstallPsRemoting.ps1

winlinuxremoting_04_2016-12-02_11-23-28

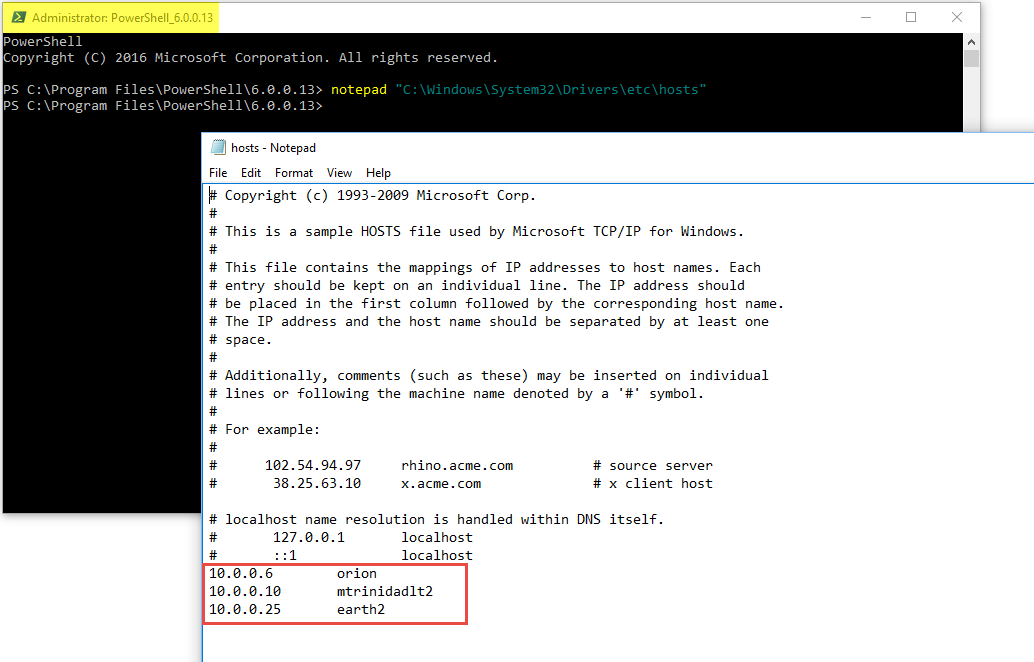
Also, if you don’t have a domain set up, then set a workgroup environment, and adding the IP-Addresses, computer names for either Windows and Linux host file:
In Windows the *hosts file can be found under “C:\Windows\System32\Drivers\etc“, and in Linux Ubuntu can be found under “/etc/hosts“.

winlinuxremoting_12_2016-12-02_11-23-28

The editors need to be open “Run as Administrator” in order to make changes to this file. In Windows, open Powershell “Run as Administrator” the execute notepad:

[sourcecode language=”powershell”]
notepad C:\Windows\System32\Drivers\etc\hosts
[/sourcecode]

In Linux, use the sudo then the editor of choice;

[sourcecode language=”bash”]
sudo gedit /etc/hosts
[/sourcecode]

I’m hoping this information will get you all going in doing PowerShell Remoting between Windows and Linux.

Additional Resource Information

OpenSSH Instructions at:
https://github.com/PowerShell/Win32-OpenSSH/wiki/Install-Win32-OpenSSH
https://github.com/PowerShell/PowerShell/blob/309bf603f9aff9009dce7e725d42b2d4f99f58c9/demos/SSHRemoting/README.md

For Ubuntu questions:
https://help.ubuntu.com/community