Getting BizTalk information with PowerShell

As I keep venturing into Biztalk, here’s how you can start using PowerShell to access your BizTalk objects with just a few lines of code and (for now) using one of the BizTalk .NET assemblies that’s loaded during the installation.

In the following example, I will create a PowerShell .NET object containing information about my BizTalk Application Artifacts. Please, pay attention to these sample code. There’s lots of information in it.

Open a PowerShell Console prompt, and type (or copy/paste) the following code:

[sourcecode language=”powershell”]

## – Load the following Assembly:
[System.Reflection.Assembly]::loadwithPartialName("Microsoft.BizTalk.ExplorerOM");

## – Create a new empty variable to stored the .NET information:
$BTSexp = New-Object Microsoft.BizTalk.ExplorerOM.BtsCatalogExplorer;

## – Now, this line will connect to your Biztalk Local instance:
$BTSexp.ConnectionString = "Server=.;Initial Catalog=BizTalkMgmtDb;Integrated Security=SSPI;";

[/sourcecode]

Now, keep in mind, you need to execute this block of code in your BizTalk server box, or use PowerShell Remoting feature. To look into the newly created object ‘$BTSexp’, use the “Get-Member” command to expose all the .NET object stored in it. You’ll notice both Properties, and Methods:

[sourcecode language=”powershell”]

$BTSexp | Get-member;

[/sourcecode]

As you can see, few line of code,  you got a lot of information about you BizTalk box. Try the following lines to list all our send box:

[sourcecode language=”powershell”]

$BTSexp.Sendports

[/sourcecode]

This line will display all properties and its content on the screen. Now, using the “Get-Member” (or “GM”) command, you can select from these list some of the properties you want to display on screen:

[sourcecode language=”powershell”]
## – List all Biztalk .NET object properties and methods:
$BTSexp.SendPorts | gm;

## – Display some of the selected properties:
$BTSexp.SendPorts | Select Application, name, Status | format-table -auto;

## – The End
[/sourcecode]

Oops!! Notice our result is not exactly correct. Our ‘Application’ values are showing with a long .NET Namespace, and our status column got truncated from the list. The ‘Application’ property is another .NET object that contains more information, and is only accessible if you use the ‘Foreach’ loop condition to get to it.

To fix this oneliner, we need to create a loop block so we can go deep into the .NET object of ‘Application’ and extract that information. The example below I added an “if” statement to search for all SendPorts containing the ‘TransportType’ for FTP’s:

[sourcecode language=”powershell”]

## – Load the following Assembly:
[System.Reflection.Assembly]::loadwithPartialName("Microsoft.BizTalk.ExplorerOM");

## – Create a new empty variable to stored the .NET information:
$BTSexp = New-Object Microsoft.BizTalk.ExplorerOM.BtsCatalogExplorer;

## – Now, this line will connect to your Biztalk Local instance:
$BTSexp.ConnectionString = `
"Server=.;Initial Catalog=BizTalkMgmtDb;Integrated Security=SSPI;";
## – Looping through each item in the SendPorts object and display
## – it in the PowerShell console:
$y = 0;
foreach($item in ($BTSexp.SendPorts))
{
if($item.PrimaryTransport -ne $null)
{
if($item.PrimaryTransport.TransportType.Name -match "FTP|Nsoftware SFTP")
{
Write-host "[$($y.ToString("000"))]`t$($item.Application.name)`t$($item.PrimaryTransport.TransportType.Name)`t$($item.Name)";
$y++;
}
}
};

[/sourcecode]

Well, we are getting better now but we can make it look nicer. Adding a few more lines we change the code to store the values generated into a PowerShell PSObject. Finally, we can generate a better formatted result:

[sourcecode language=”powershell”]

## – Load the following Assembly:
[System.Reflection.Assembly]::loadwithPartialName("Microsoft.BizTalk.ExplorerOM");

## – Create a new empty variable to stored the .NET information:
$BTSexp = New-Object Microsoft.BizTalk.ExplorerOM.BtsCatalogExplorer;

## – Now, this line will connect to your Biztalk Local instance:
$BTSexp.ConnectionString = `
"Server=.;Initial Catalog=BizTalkMgmtDb;Integrated Security=SSPI;";

## – Initialize variables:
$y = 0; [Array] $MyNewObject = $null;

#Add each result into our New object:
$MyNewObject = foreach($item in ($BTSexp.SendPorts))
{
if($item.PrimaryTransport -ne $null)
{
if($item.PrimaryTransport.TransportType.Name -match "FTP")
{
#Building your PowerShell PSObject item:
$newPSitem = New-Object PSObject -Property @{
seq = $y.ToString("000");
Application = $item.Application.name;
PortType = $item.PrimaryTransport.TransportType.Name;
Port = $item.Name;
};
#To display PSObject item values while processing:
$newPSitem;
$y++;
}
}
};
$MyNewObject | Select seq,Application,PortType,Port | ft -auto;

[/sourcecode]

Now, we’ve created a new PowerShell object with our selected properties, and with a new output that looks Great!. Just Try It in your box!!

The above script will list all FTP related ports. Here’s another the same code PowerShell script for listing all SendPorts on your BizTalk Server:

[sourcecode language=”powershell”]

## – Load the following Assembly:
[System.Reflection.Assembly]::loadwithPartialName("Microsoft.BizTalk.ExplorerOM");

## – Create a new empty variable to stored the .NET information:
$BTSexp = New-Object Microsoft.BizTalk.ExplorerOM.BtsCatalogExplorer;

## – Now, this line will connect to your Biztalk Local instance:
$BTSexp.ConnectionString = `
"Server=.;Initial Catalog=BizTalkMgmtDb;Integrated Security=SSPI;";

## – Initialize variables:
$y = 0; [Array] $MyNewObject = $null;

## – Initialize variables:
$y = 0; [Array] $MyNewObject = $null;

#Add each result into our New object:
$MyNewObject = foreach($item in ($BTSexp.SendPorts))
{
#Building your PowerShell PSObject item:
$newPSitem = New-Object PSObject -Property @{
seq = $y.ToString("000");
Application = $item.Application.name;
PortType = $item.PrimaryTransport.TransportType.Name;
Port = $item.Name;
};
#To display PSObject item values while processing:
$newPSitem;
$y++;
};
$MyNewObject | Select seq,Application,PortType,Port | ft -auto;

[/sourcecode]

Now, you can get a list of all your sendPorts. Don’t be afraid to experiment. You are only querying BizTalk objects using PowerShell.

My next blog will show this query use to list all ReceivePorts.

Happy PowerShelling!!

Orlando Code Camp 2012 – Integrating PowerShell into SSIS Script Task session

I took the moment posted the session I’ll be presenting at the Orlando Code Camp 2012 on Saturday March 31.  In this session I’ll be covering PowerShell, XML, Visual Studio Application, and integration these technologies in SQL Server Integration Services.  I’ll be reusing an existing Powershell script in a SSIS Script Task component.

sample PowerShell Script
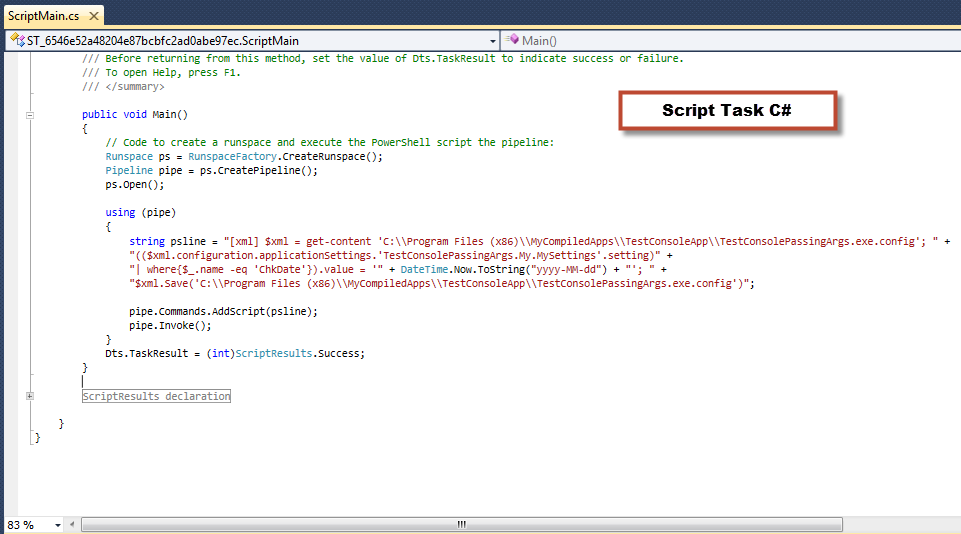
Using the PowerShell script in SSIS Script Task
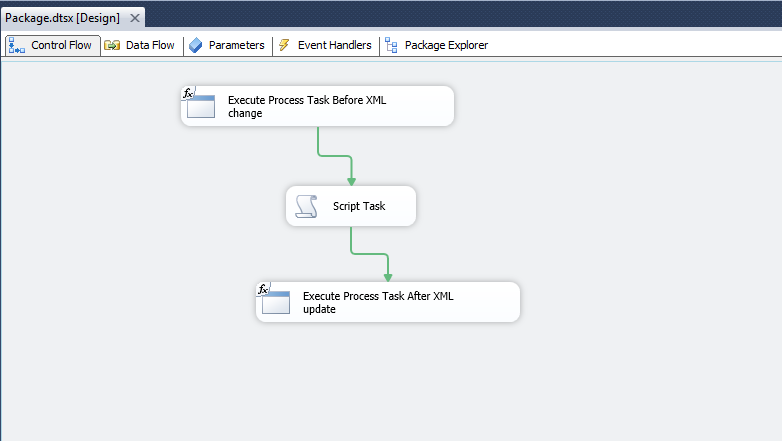
SQL Server 2012 SSIS package
SSIS Script Task section executing the PowerShell code

This session is full sample: XML files, PowerShell scripts, VB/C# code for both Visual Studio and SSIS Script Task showing some basic techniques.

For those attending this event, I hope to see you at my session.

Me, PowerShell, and BizTalk…

For many years, I’ve been a PowerShell enthusiast exposed to Network
Infrastructure and SQL Server technologies.  Now I’ve become a BizTalk
newbie.  And, with my responsibility as a BizTalk Developer, and I attended a BizTalk Server class online.  For my surprise, in one of the modules, instructor talked about a PowerShell Shell script .  I just hope the script hasn’t scare anyone attending the course.

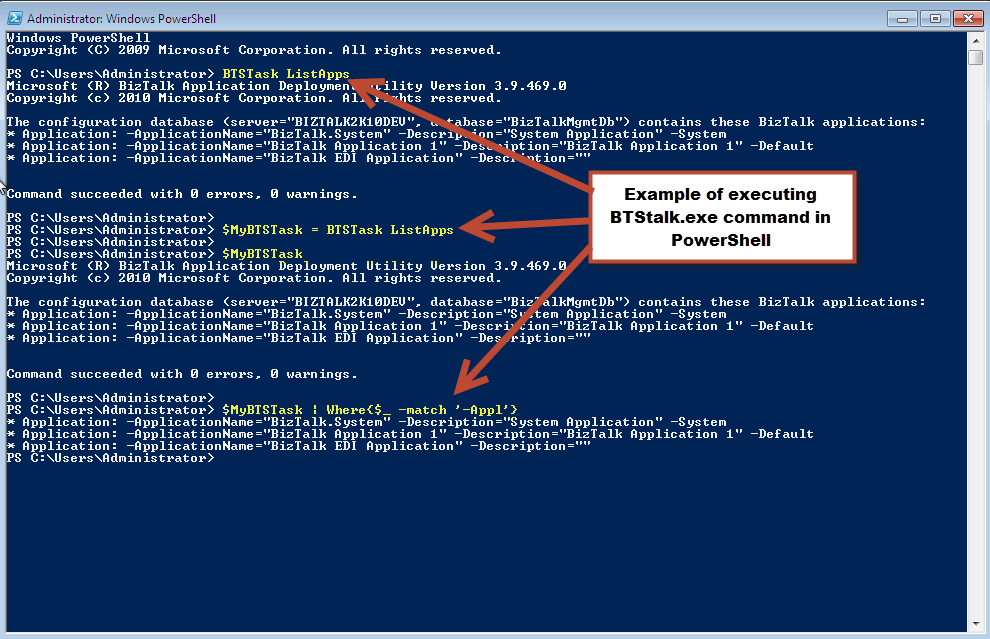
PowerShell is much easier, and fun work once you start using it.  Try to ignore using cmd.exe, and start using PowerShell.   Try it!!   For example try to execute the BTStask.exe command.

The following sample will save the output console results to a PowerShell variable:

[sourcecode language=”powershell”]
$myBTStask = BTStask.exe ListApps
$myBTStask
[/sourcecode]

Notice I’ve create my variable “$MyBTStask”, and now I can  extract some information stored in it.  For example, I only want to list all application information:

[sourcecode language=”powershell”]
$MyBTStask | where{$_ -match ‘-Appl’}
[/sourcecode]

Executing "BTStask.exe" from the PowerShell Console

Now, you can evolved in this simple script into something more sophisticated.

I’m always looking for ways to help me be productive in my  work environment.  So, I found a couple following CodePlex projects, and PowerShell was included:

BizTalk 2010 Web Console: http://abdulrafaysbiztalk.wordpress.com/
PowerShell BizTalk provider: http://psbiztalk.codeplex.com/

And, there’s more codeplex BizTalk project out there.  Also, there’s some very thorough BizTalk Training Kits available from Microsoft, include Videos, Labs, and Virtual machines.  But you will to use  Microsoft Hyper-V Virtualization Technology:

BizTalk Server 2010 Developer Training Kit: http://www.microsoft.com/download/en/details.aspx?id=14865
BizTalk Server 2010 Administrator Training Kit: http://www.microsoft.com/download/en/details.aspx?id=27148

BizTalk Server 2010 ESB Training Kit: http://www.microsoft.com/download/en/details.aspx?id=27151

So, in my case I use my laptop with Windows 8 Server w/Hyper-V 3.0 and it works GREAT!!

Now, I’m used to work with SQL Server so it makes sanse to me to  explore the possibilities of using PowerShell to help with my BizTalk  Administration.  So, I can check for my Biztalk table in my SQL Server  local instance in the following way:

[sourcecode language=”powershell”]
## – Listing your local Databases:
[System.Reflection.Assembly]::loadwithPartialName("Microsoft.SQLServer.SMO")
$MySQL = New-Object(‘Microsoft.SqlServer.Management.SMO.Server’)
$MySQL.Databases | Select Name, owner, Size | Ft -auto
[/sourcecode]

Also, I could list all my SQL Agent jobs with the following generic PowerShell script:

[sourcecode language=”powershell”]
## – Listing your SQL Agent jobs:
[System.Reflection.Assembly]::loadwithPartialName("Microsoft.SQLServer.SMO")
$MySQL = New-Object(‘Microsoft.SqlServer.Management.SMO.Server’)
$MySQL.JobServer.Jobs | Select name, isenabled, lastrundate, lastRunOutcome | ft -auto
[/sourcecode]

As you can see, these little simple oneliners you can give lots of  information about your Biztalk box.  This is all executed on your box  which might bring the question: Can I do execute PowerShell script in  another BizTalk box? And the answer is: YES!! But it all depends if your  IT organization will allow it.

Keep in mind, you need to have the proper permissions to allow you to  access these SQL server box.  In the meantime, if you have your on  Virtual Machine, at least you can practice show management how they can  benefit from using PowerShell.

Happy PowerShelling!!

T-SQL & PowerShell – Another way to Identify Database Snapshots

Just a quick blog on spotting your Database Snaphots. I just couldn’t believe that I’ve been missing creating SQL database snapshots but sometimes having so much work make you blind.  I’ve been using a lot Hyper-V Snapshot features and recently (Thanks to Chad Miller) I got the chance to create and test a few.

So, first we need to create a new db snapshot of my AdventureWorks database using T-SQL Script:

[sourcecode language=”SQL”]
CREATE DATABASE AdventureWorks_dbSnapShot_0001 ON
( NAME = AdventureWorks_Data, FILENAME =
‘C:\Program Files\Microsoft SQL Server\MSSQL11.MSQLDENALICTP3\MSSQL\DATA\AdventureWorks_Data_0001.ss’ )
AS SNAPSHOT OF AdventureWorks;
GO
[/sourcecode]

Now, I go to SSMS and verify my new database snapshot exist by going into the ‘Object Explorer’ and looking under ‘Database Shashots’ folder.

Using T-SQL

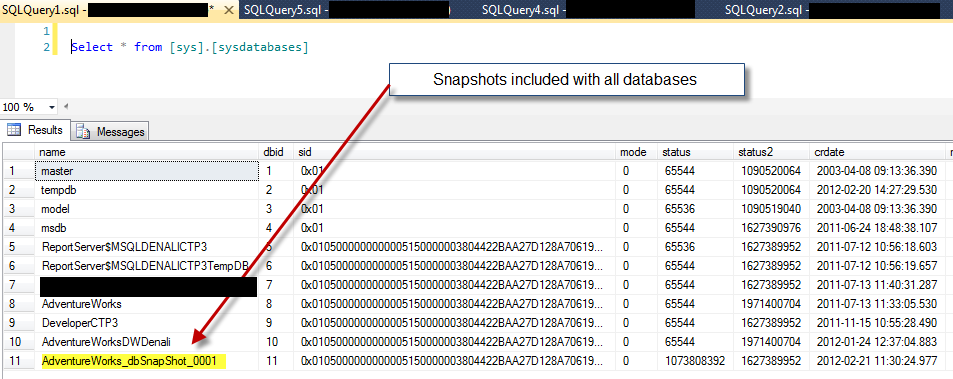
If I use the following T-SQL command to list all my databases:

[sourcecode language=”SQL”]
Select * from [sys].[sysdatabases]
[/sourcecode]

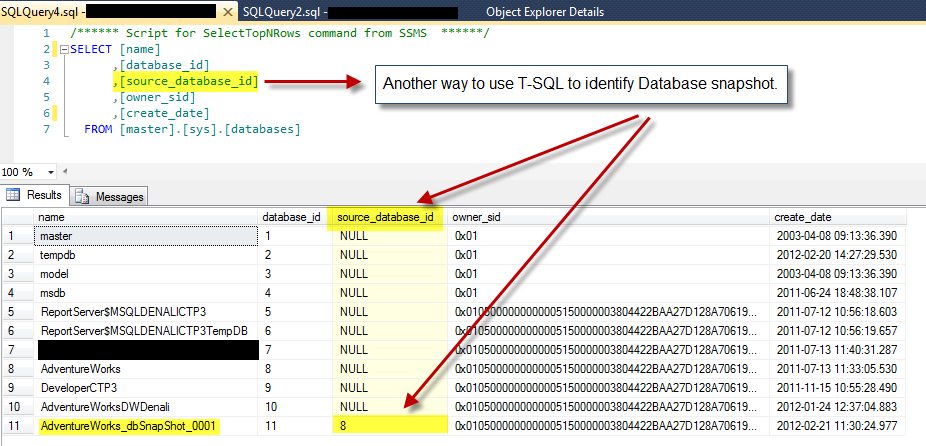
I will get all of them listed including the snapshots. So, here’s another way to use T-SQL to identify all database snapshots. For that, I’m going to do a select and use from the Master db the view named “[sys].[databases]”:

[sourcecode language=”SQL”]
SELECT [name]
,[database_id]
,[source_database_id]
,[owner_sid]
,[create_date]
FROM [master].[sys].[databases]
[/sourcecode]

In this result, pay attention to the “[source_database_id]” column. Notice that this column is mostly “null” except when if it has a value. This value will match the “[Database_ID]” column. So, you can use this to identify database snapshots.

Using PowerShell

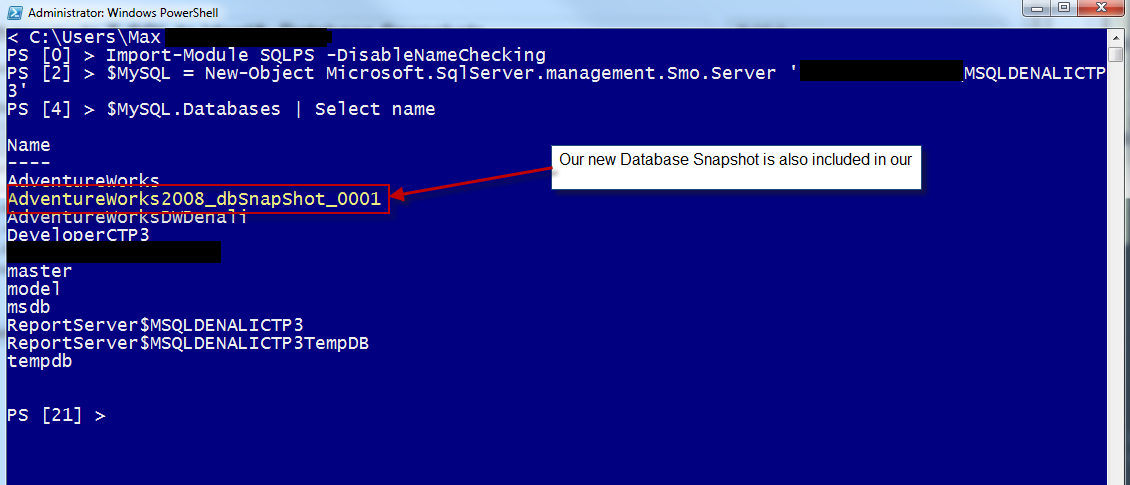
Now, let’s take a look on how to use PowerShell to identify database snapshots using SMO. In the following code I’m listing all databases but snapshots are also included.

[sourcecode language=”PowerShell”]
Import-Module SQLPS -DisableNameChecking
$MySQL = New-Object Microsoft.SqlServer.management.Smo.Server ‘YourServername\InstanceName’
$MySQL.Databases | Select name
[/sourcecode]

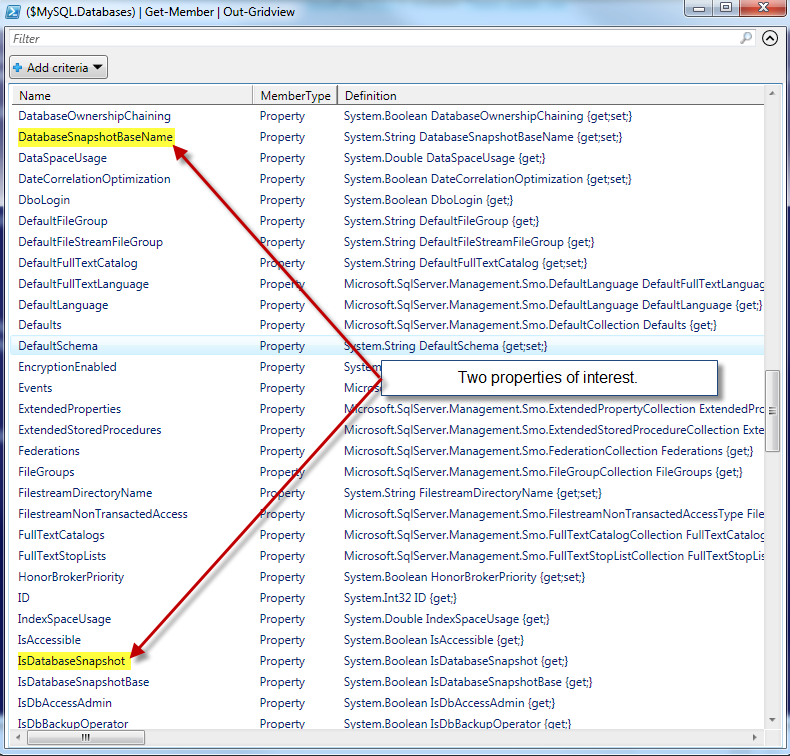
So, in order to identify the database snapshot I need to look deeper into our .NET database object. Using the “Get-Member” command I can see what’s object are available.

[sourcecode language=”PowerShell”]
($MySQL.Databases) | Get-Member | Out-Gridview
[/sourcecode]

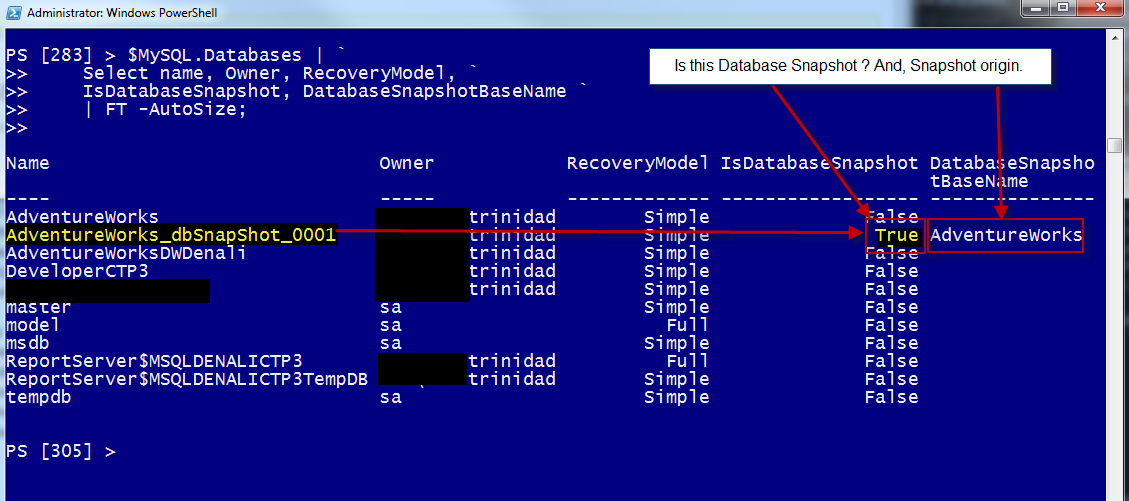
Using the “Out-Gridview” command to view my results a separate popup window, I found two properties of interest:

  1. IsDatabaseSnapshot‘ – which show “true” us if is a snapshot.
  2. DatabaseSnapshotBaseName‘ – which give us the origne of database name of the snapshot.

So, now I can use the following PowerShell commands to show all my databases and identify the snapshots:

[sourcecode language=”PowerShell”]
$MySQL.Databases | `
Select name, Owner, RecoveryModel, `
IsDatabaseSnapshot, DatabaseSnapshotBaseName `
FT -AutoSize;
[/sourcecode]

Conclusion

Using both T-SQL and PowerShell examples, now you have a startup point to spot and take some control over your database snapshots.

Happy PowerShelling!

“Windows 8 PowerShell and Hyper-V 3.0 Preview” Slide deck and samples

Last weekend at the “ITPro Camp Saturday” in Sarasota Forida was great event.  Thanks to everyone for participating, and taking the precious time on a Saturday to learn about new and current technologies.  It was a GREAT!!

Here’s my “Windows 8 PowerShell and Hyper-V 3.0 Preview”presentation and demo scripts use during the session:

Please, don’t hesitate to contact me if you have any questions.

Thanks You!

It’s Just Random: PowerShell – Mistery of Redrum Solved!!

It’s Friday and I’m following Jeffery Hicks idea to have fun with PowerShell.  Well, here’s the mistery of Redrum solved one more time.  Some time ago, I remember seen some code for reversing a string of characters.  Well, here’s the one-liner I use to solve the puzzle:

[sourcecode language=”powershell”]
$str = "Redrum";
[System.Array]::Reverse(([Array]$RevStr = $str.ToCharArray()));
foreach($chr in $RevStr){ $mistery += $chr }
$mistery;
[/sourcecode]

That’s all for now…. Have fun with PowerShell!

QuickBlog: PowerShell Automating your Credentials

Back in January, I did a quick blog about “Use PowerShell to submit SQLServicePack job to multiple Server“, in that script I have PowerShell to always prompt me for credentials.  But, after a while of typing over and over my password, I found to way to automate my credentials.   Yes!  By automating the credential step, I just could schedule the job, and have time to work with something else.

In this example, I’m passing my credential to the “Start-Transfer” command, so I can do my file download to my destination folder.  Here’s the code snippet to accomplish the automation:

[sourcecode language=”powershell”]
## – Automate to create your credential:
$MyUserName = "Domain\Username";
$MyPassword =  ConvertTo-SecureString ‘MyPwd001!’ -asplaintext -force;
$MyCredentials = new-object `
-typename System.Management.Automation.PSCredential `
-argumentlist $MyUserName,$MyPassword;

## – Import the module and start the download process of one file:
Import-Module BitsTransfer;
Start-BitsTransfer `
-Credential $MyCredentials `
-Source ‘http://YoufilesSite/Files/Demo01.zip’ `
-Destination ‘\\YourServer\NetworkSharedFolder\Demo01.zip’;
[/sourcecode]

Ha!  I know what you’re think!  I’m hardcoding my password in the scripts.  So, our possible options would be: 1) you’re the only one running this script (don’t tell your boss),  2) You trust your Network security (humm!), or 3) find the way to encrypt the script so no one can guess the password.

There are products like SAPIEN’s PrimalScript and PrimalForms, that will let you create an executable out of your script, and then you can deploy it to your server.  But, then again, only you can make that decision.  I’m just showing that’s possible in case you need it.

Have fun with PowerShell!

“PowerShell Query for the T-SQL Developer” Slide deck and samples

Once again, Thanks! to Patrick LeBlanc for allowing me to present at today’s (02/15/2012) SQLLunch.com.  It was a Great! turned out with over 60 people attending.  To You All THANKS!!  (Recorded session will be available)

Well, here’s my slide deck presentation, and the sample Demo scripts:

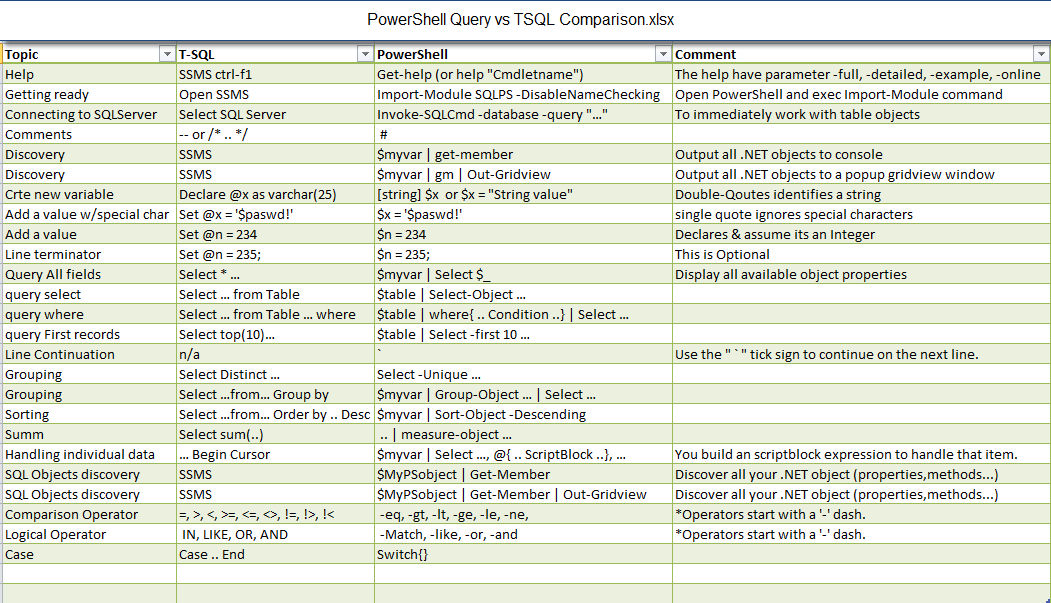
Also, I included the following comparison chart that help in your quest to adopt PowerShell.  This excel file is also included in the zipped file.  This is what I covered today except for “Sum”.

I just realized that this topic could evolved to include a Part II where I could show more on: Group, Sum, Logic, and Functions.  So, later on, I will be posting more information the next “PowerShell Query for the T-SQL Developer” Part II.

Stay Tuned!!

PowerShell Start-Demo now allows multi-lines one-liner

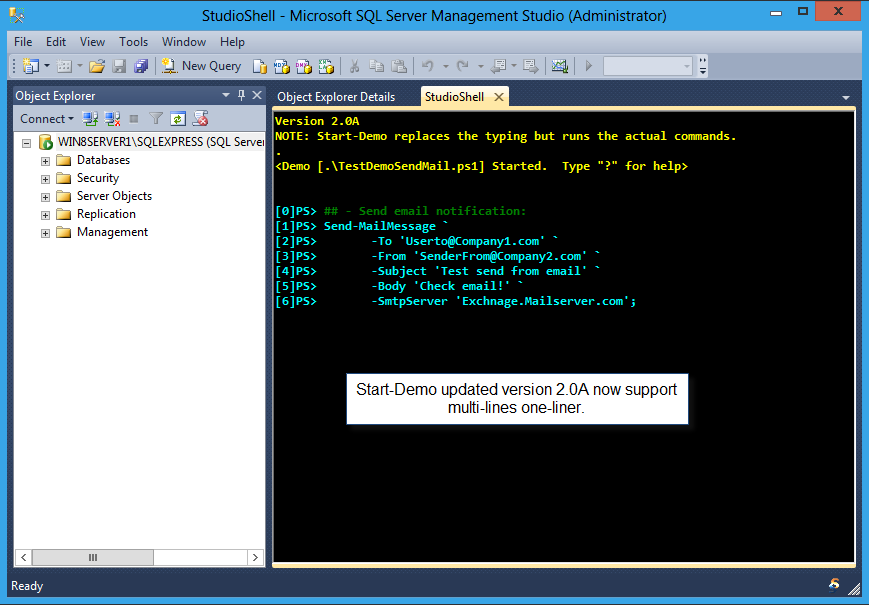
Well, I just couldn’t stop making necessary changes to this great presenter tool.  So, now Start-Demo will process your multi-lines one-liners which this couldn’t be done in the previous version.

So, a good example of a one-liner having line continuation, using the Send-MailMessage cmdlet, where we can use the “`” tick to separate the long command line with its parameters:

[sourcecode language=”powershell”]
## – Send email notification:
Send-MailMessage `
-To ‘Userto@Company1.com’ `
-From ‘SenderFrom@Company2.com’ `
-Subject ‘Test send from email’ `
-Body ‘Check email!’ `
-SmtpServer ‘Exchnage.Mailserver.com’
[/sourcecode]

Here’s an example of how it look like using “Start-Demo” in StudioShell:

And, here’s the updated Start-DemoSS.ps1 Version 2.0A 2.0B (02/12/2012):
(apologies for the previous code posted here. It somehow I posted a bad code but I fix it tonight)

[sourcecode language=”powershell”]
###########################################################################
# Original Version: 1.1
# Updated to Version 2.0B, Maximo Trinidad, 02/12/2012
#————————————————————————–
# Comments:
# 1. Customized the foreground color to Cyan and backgroundColor to Black.
# 2. Created a Dump color to default to White.
# 3. Added to put back the default foreground and background colors.
# 4. Commented out the ‘(!) Suspense’ option because Studio Shell can’t
# handle "$host.NestedPrompt".
# 5. Modify the Help menu to acomodate changes.
# 6. Commented out all "$Host.UI.RawUI.WindowTitle".
# 7. Replaced all "[System.Console]::ReadLine()" with "Read-Host".
# 8. Added an end of results ‘write-host"– Press Enter to continue –"’
# follow with a read-host similate a pause.
#
# Modifications:
# 02/10/2012 – Add section identify oneliners with continuation tick "`".
# 02/10/2012 – Cleanup all unused V1 lines.
# 02/10/2012 – Make code to properly display continuation lines.
# 02/12/2012 – Fix info on Start time and duration.
# 02/12/2012 – Adjust execution message spacing.
#
###########################################################################

function Start-Demo
{
param($file=".\demo.txt", [int]$command=0)

## – Saved previous default Host Colors:
$defaultForegroundColor = $host.UI.RawUI.ForegroundColor;
$defaultBackgroundColor = $host.UI.RawUI.BackgroundColor;

## – Customizing Host Colors:
$host.UI.RawUI.ForegroundColor = "Cyan";
$host.UI.RawUI.BackgroundColor = "Black";
$CommentColor = "Green"
$MetaCommandColor = "Cyan"
$DumpColor = "White"
$otherColor = "Yellow"
Clear-Host

## – setting demo variables:
$_Random = New-Object System.Random
$_lines = @(Get-Content $file)
$Global:starttime = [DateTime]::now
$_PretendTyping = $true
$_InterkeyPause = 100
$Global:Duration = $null

Write-Host -for $otherColor @"
Start-Demo: $file – Start time: $starttime
Version 2.0B (02/12/2012)
NOTE: Start-Demo replaces the typing but runs the actual commands.
.

"@
$continuation = $false;

# We use a FOR and an INDEX ($_i) instead of a FOREACH because
# it is possible to start at a different location and/or jump
# around in the order.
for ($_i = $Command; $_i -lt $_lines.count; $_i++)
{
if ($_lines[$_i].StartsWith("#"))
{
Write-Host -NoNewLine $("`n[$_i]PS> ")
Write-Host -NoNewLine -Foreground $CommentColor $($($_Lines[$_i]) + " ")
continue
}
else
{
# Put the current command in the Window Title along with the demo duration
$Global:Duration = [DateTime]::Now – $Global:StartTime
Write-Host -NoNewLine $("`n[$_i]PS> ")
$_SimulatedLine = $($_Lines[$_i]) + " "

for ($_j = 0; $_j -lt $_SimulatedLine.Length; $_j++)
{
Write-Host -NoNewLine $_SimulatedLine[$_j]

if ($_PretendTyping)
{
if ([System.Console]::KeyAvailable)
{
$_PretendTyping = $False
}
else
{
Start-Sleep -milliseconds $(10 + $_Random.Next($_InterkeyPause))
};
};

} # For $_j
$_PretendTyping = $true

} # else

if($_Lines[$_i] -notmatch ‘`’)
{
#Write-Host "Yes $($_Lines[$_i])" -BackgroundColor white -ForegroundColor red;
$_input = Read-Host;
} #else { $continuation = $true}

switch ($_input)
{
################ HELP with DEMO
"?"
{
Write-Host -ForeGroundColor Yellow @"
——————————————————————————–
Start-Demo – Updated to Version 2.0B (12/12/2012)
Help Running Demo: $file
.
(#x) Goto Command #x (b) Backup (?) Help
(fx) Find cmds using X (q) Quit (s) Skip
(t) Timecheck (d) Dump demo (px) Typing Pause Interval
.
NOTE 1: Any key cancels "Pretend typing" for that line. Use unless you
want to run a one of these meta-commands.
.
NOTE 2: After cmd output, enter to move to the next line in the demo.
This avoids the audience getting distracted by the next command
as you explain what happened with this command.
.
NOTE 3: The line to be run is displayed in the Window Title BEFORE it is typed.
This lets you know what to explain as it is typing.
.
NOTE 4: Although this script is functional try not to "Goto" a continuation
one-liner or it will go to a continues loop. I will correct this sympton
soon. (02/12/2012)
———————————————————————————
"@;
Write-Host "– Press Enter to continue –" -BackgroundColor white `
-ForegroundColor Magenta;
Read-Host; cls;
$_i -= 1
}

#################### PAUSE
{$_.StartsWith("p")}
{
$_InterkeyPause = [int]$_.substring(1)
$_i -= 1
}

#################### Backup
"b"
{
if($_i -gt 0)
{
$_i —

while (($_i -gt 0) -and ($_lines[$($_i)].StartsWith("#")))
{
$_i -= 1
}
}

$_i —
$_PretendTyping = $false
}

#################### QUIT
"q"
{
Write-Host -ForeGroundColor $OtherColor ""
$host.UI.RawUI.ForegroundColor = $defaultForegroundColor;
$host.UI.RawUI.BackgroundColor = $defaultBackgroundColor;
cls;
return
}

#################### SKIP
"s"
{
Write-Host -ForeGroundColor $OtherColor ""
}

#################### DUMP the DEMO
"d"
{
for ($_ni = 0; $_ni -lt $_lines.Count; $_ni++)
{
if ($_i -eq $_ni)
{
Write-Host -ForeGroundColor Yellow "$("*" * 25) >Interrupted< $("*" * 25)"
}
Write-Host -ForeGroundColor $DumpColor ("[{0,2}] {1}" -f $_ni, $_lines[$_ni])
}
$_i -= 1
Write-Host "– Press Enter to continue –" -BackgroundColor white `
-ForegroundColor Magenta;
Read-Host; cls;
}

#################### TIMECHECK
"t"
{
$Global:Duration = [DateTime]::Now – $Global:StartTime
Write-Host -ForeGroundColor $OtherColor $("Demo has run {0} Minutes and {1} Seconds`nYou are at line {2} of {3} " `
-f [int]$Global:Duration.TotalMinutes,[int]$Global:Duration.Seconds,$_i,($_lines.Count – 1))
$_i -= 1
}

#################### FIND commands in Demo
{$_.StartsWith("f")}
{
for ($_ni = 0; $_ni -lt $_lines.Count; $_ni++)
{
if ($_lines[$_ni] -match $_.SubString(1))
{
Write-Host -ForeGroundColor $OtherColor ("[{0,2}] {1}" -f $_ni, $_lines[$_ni])
}
}
$_i -= 1
};

##################### SUSPEND # –> not working in StudioShell: help (!) Suspend (not working)
#
# {$_.StartsWith("!")}
# {
# if ($_.Length -eq 1)
# {
# Write-Host -ForeGroundColor $CommentColor ""
# function Prompt {"[Demo Suspended]`nPS>"}
# $host.EnterNestedPrompt()
# }else
# {
# trap [System.Exception] {Write-Error $_;continue;}
# Invoke-Expression $(".{" + $_.SubString(1) + "}| out-host")
# }
# $_i -= 1
# }
# ——————————————————————————–

#################### GO TO
{$_.StartsWith("#")}
{
$_i = [int]($_.SubString(1)) – 1
$Scriptline = $null;
$continuation = $false;
continue
}

#################### EXECUTE
default
{
trap [System.Exception] {Write-Error $_;continue;};
## – 02/10/2012-> Commented out original line below
# Invoke-Expression $(".{" + $_lines[$_i] + "}| out-host")

## – add section identify oneliners with continuation tick:
[string] $Addline = $null;
if($_lines[$_i] -match ‘`’)
{
#Write-Host " Found tick = $($_lines[$_i])" -ForegroundColor yellow;
$Addline = $_lines[$_i].replace(‘`’,”).tostring()
$Scriptline += $Addline;
$continuation = $true;
}
else
{
$Scriptline += $_lines[$_i].ToString();
$continuation = $false;
};
if($continuation -eq $false)
{
## – Executive:
Write-Host " `r`n`t Executing Script…`r`n" -ForegroundColor $otherColor;
Invoke-Expression $(".{" +$Scriptline + "}| out-host")
}
## – ——————————————————————–
if($continuation -eq $false)
{
Write-Host "`r`n";
Write-Host "– Press Enter to continue –" -ForegroundColor Magenta `
-BackgroundColor white;
$Global:Duration = [DateTime]::Now – $Global:StartTime
Read-Host;
$Scriptline = $null;
};
}
} # Switch
} # for
## Next three list to put backl the console default colors and do a clear screen:
$host.UI.RawUI.ForegroundColor = $defaultForegroundColor;
$host.UI.RawUI.BackgroundColor = $defaultBackgroundColor;
cls;
$Global:Duration = [DateTime]::Now – $Global:StartTime; Write-Host "`r`n";
Write-Host "Start-Demo of $file completed:" -ForegroundColor $otherColor;
Write-Host -ForeGroundColor Yellow $("Total minutes/sec: {0}.{1}, Date: {2}" `
-f [int]$Global:Duration.TotalMinutes, [int]$Global:Duration.Seconds, [DateTime]::now);
} # function
[/sourcecode]

Have Fun with it!