Creating Datagrid GUI in SAPIEN PowerShell Studio

Lets cut to the chase! Here’s a quick way to create Datagrid views using PowerShell Studio.

sapienstudio_00_2016-11-11_14-44-34

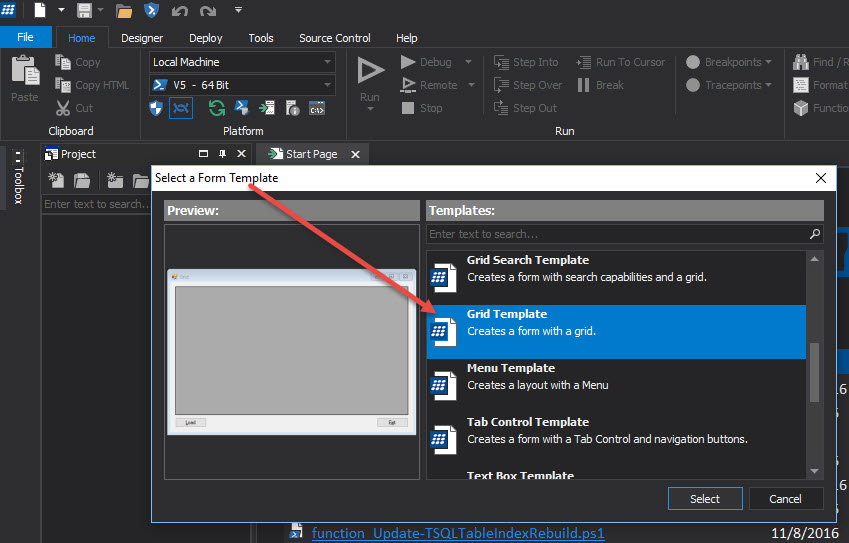
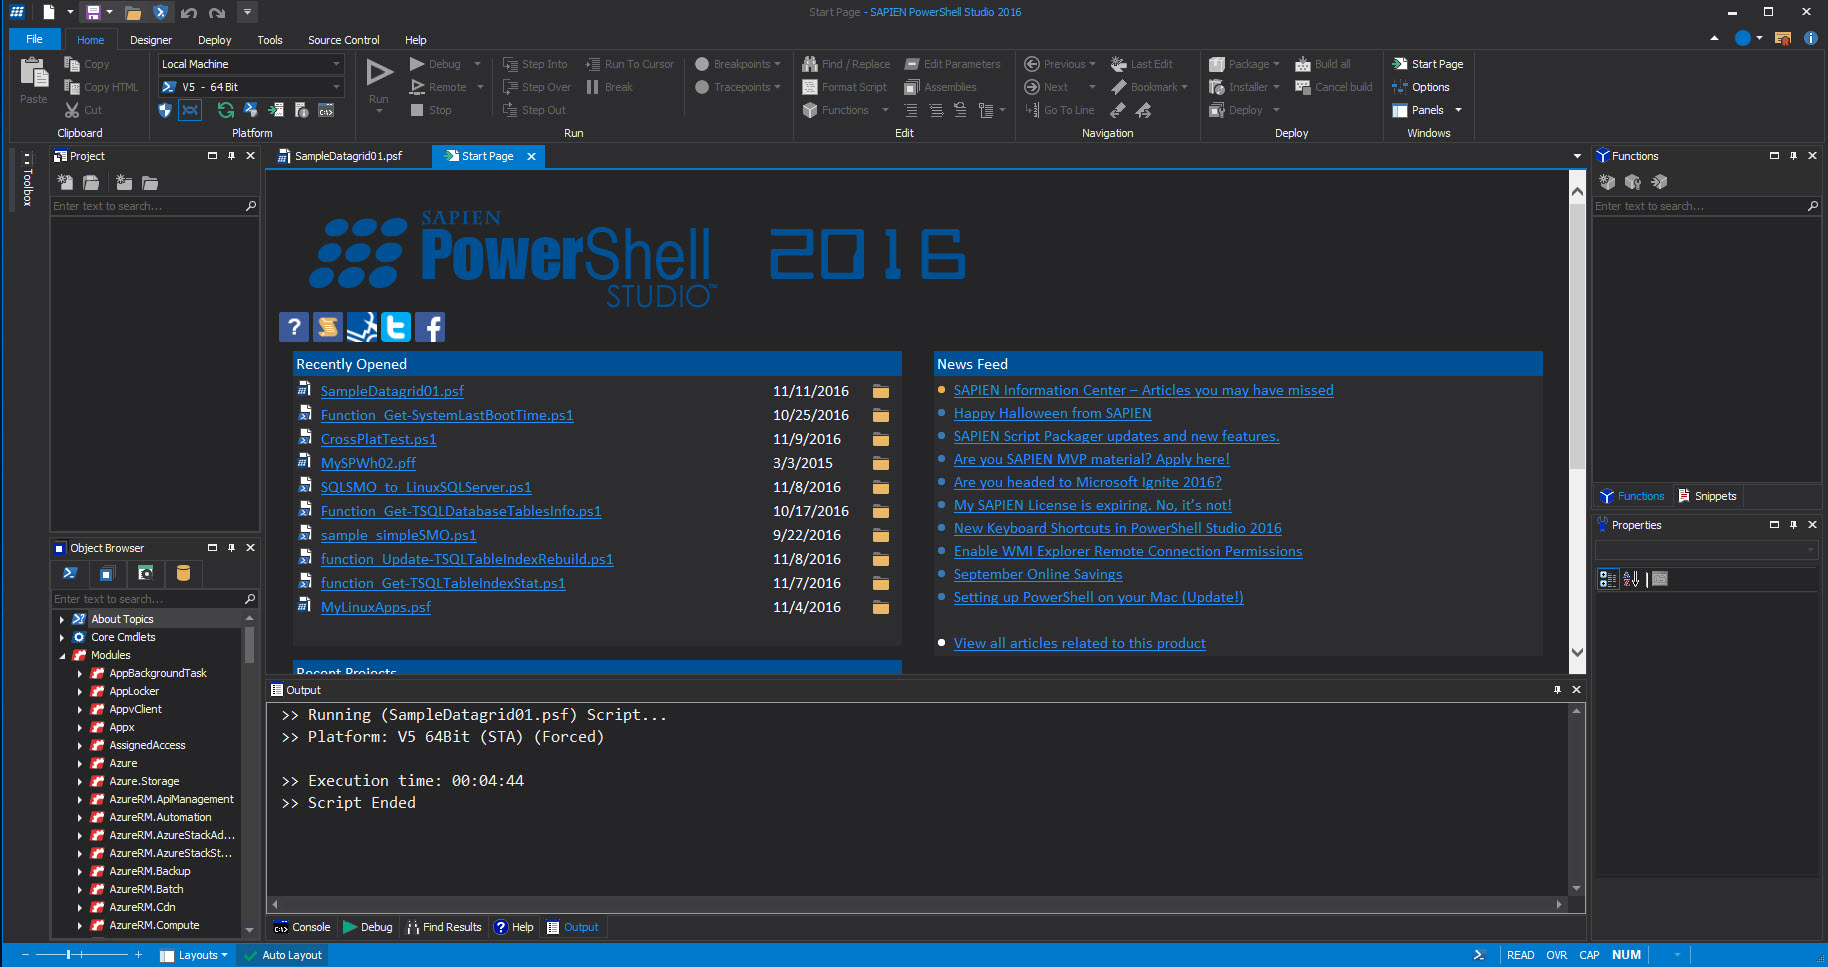
First, take advantage of the forms wizard to start building your GUI application.
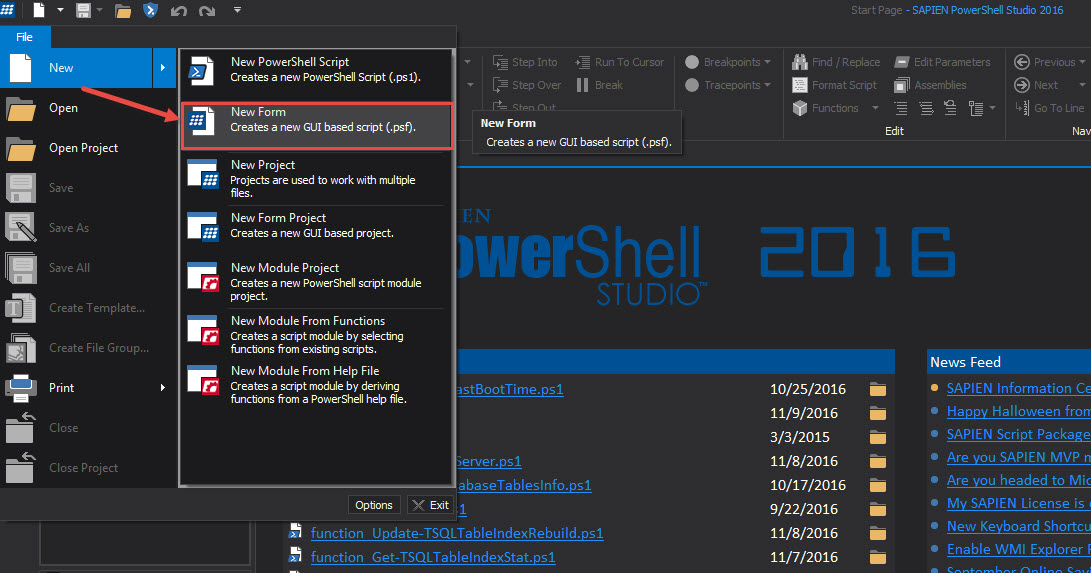
Go to “File” then select “New Form” and Select a template: “Grid Template”.

sapienstudio_01_2016-11-11_14-44-34

sapienstudio_02_2016-11-11_14-44-34

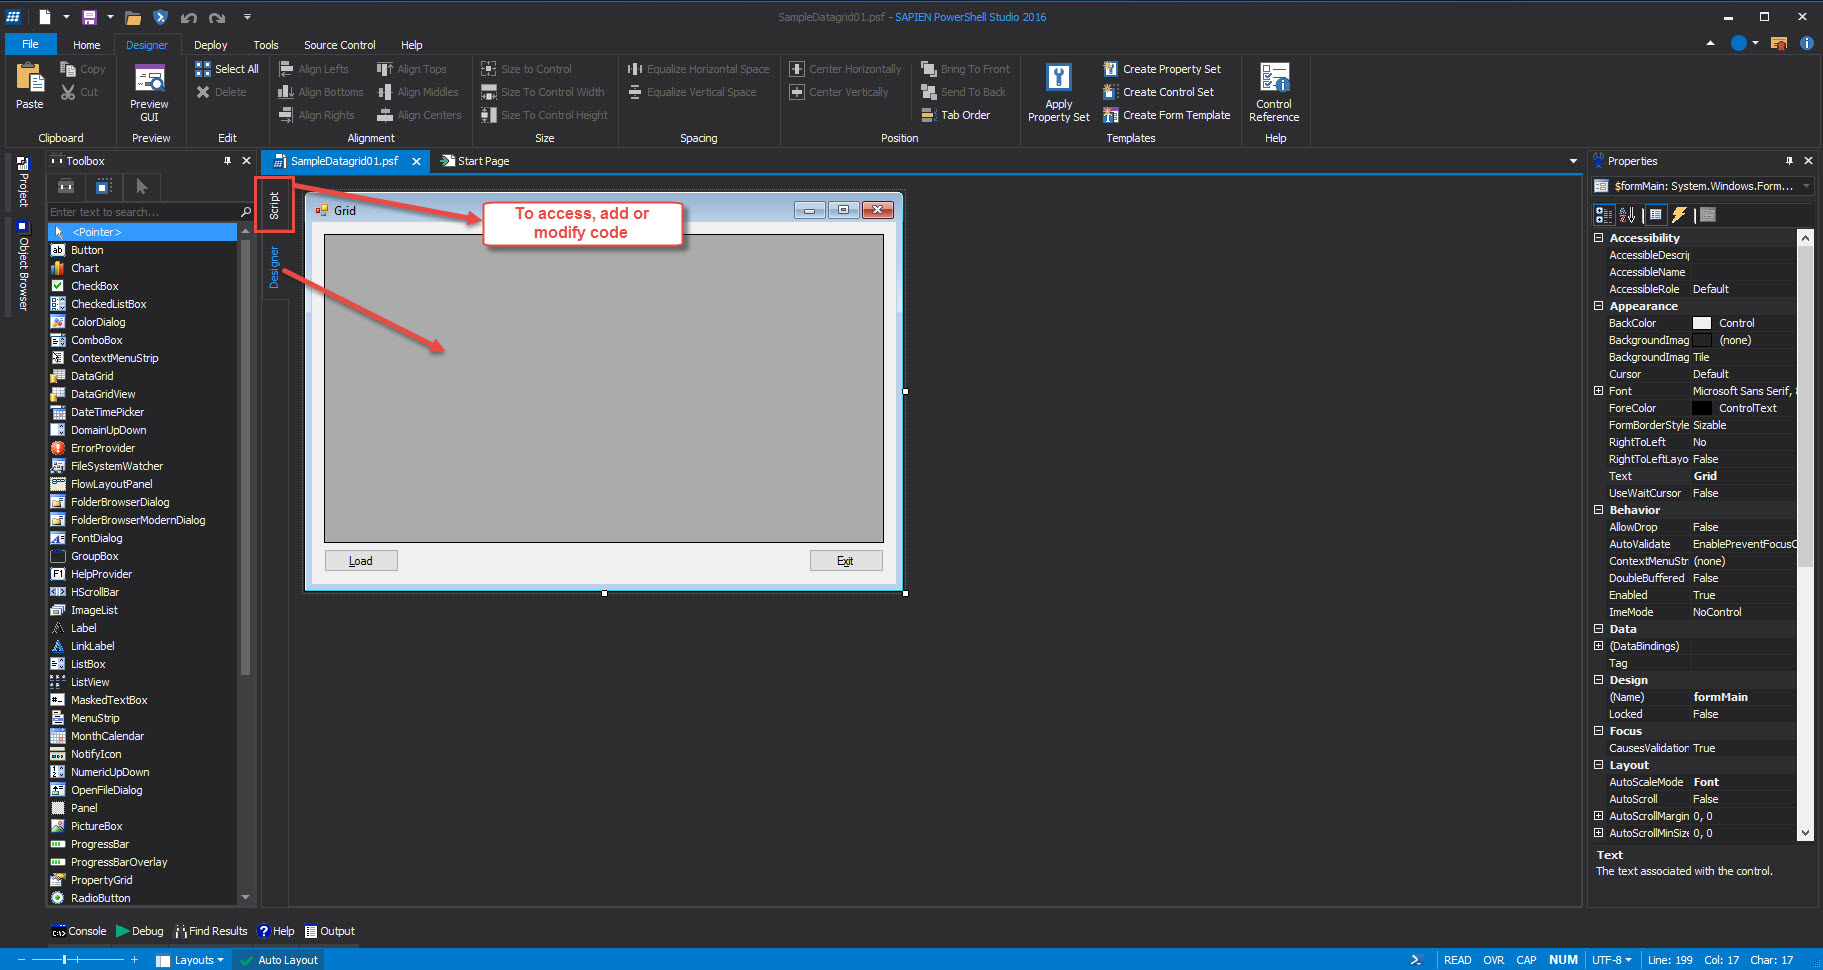
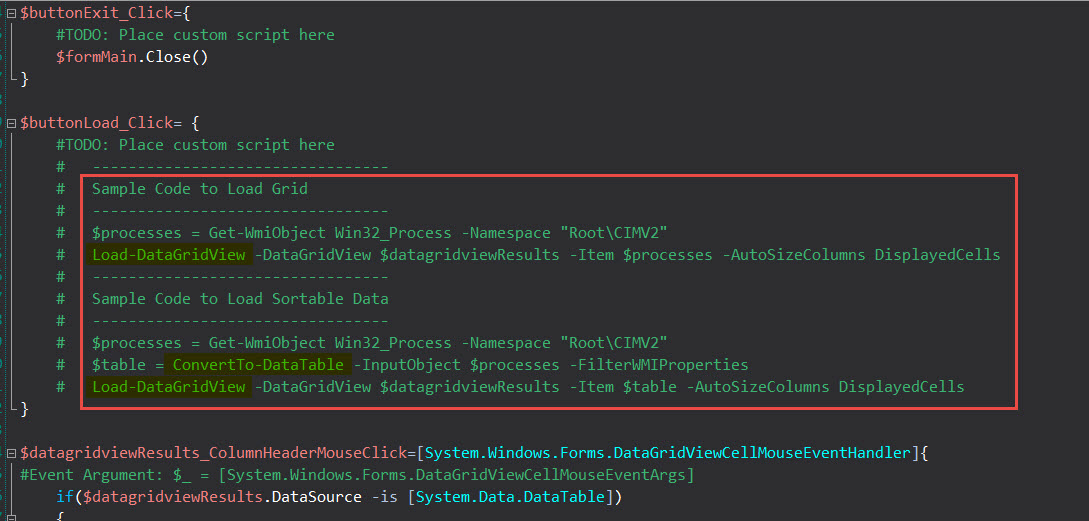
This template already provide us with two buttons: “Load” and “Exit”. Take a look in the script tab and you’ll notice some events been already created for us to use. Also, read the commented lines because it give you a hint in how to populate the datagrid in the form.

sapienstudio_03a_2016-11-11_14-44-34

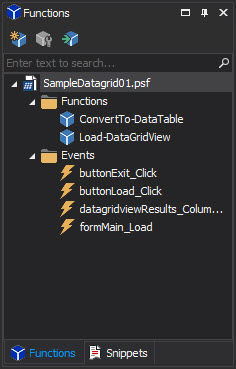
Now, in the commented sample, you’ll find the function “Load-DataGridView” is used to push the data to the datagrid component. This function is located at line #2 in the “#region Control Helper Functions”. Just expand the regions to view the *function:

1. ConvertTo-DataTable
2. Load-DataGridView

sapienstudio_03_2016-11-11_14-44-34

sapienstudio_04_2016-11-11_14-44-34

*Note: these functions are only available when you select the Grid template. They are not available in their Snippets section.

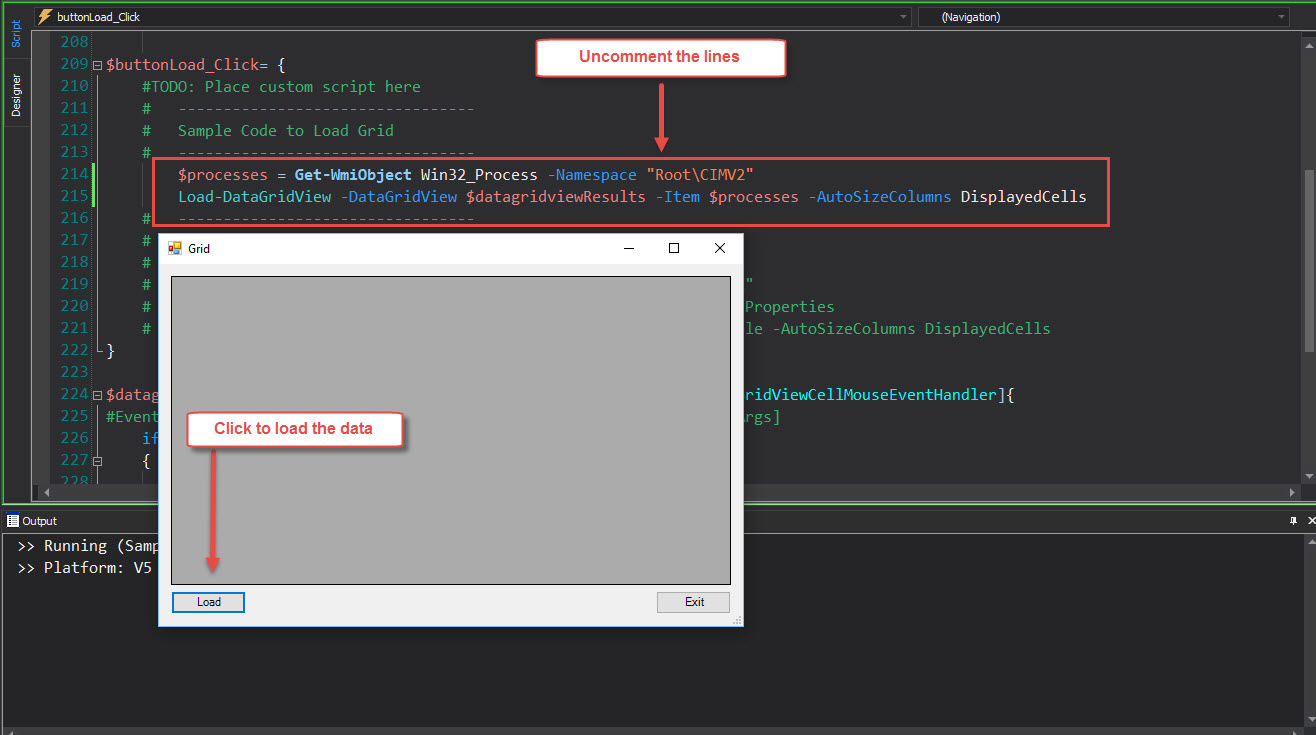
You can go ahead the follow the commented sample to populate the form datagrid. Uncomment the following line and run the application:

[sourcecode language=”powershell”]
$processes = Get-WmiObject Win32_Process -Namespace “Root\CIMV2”
Load-DataGridView -DataGridView $datagridviewResults -Item $processes -AutoSizeColumns DisplayedCells
[/sourcecode]

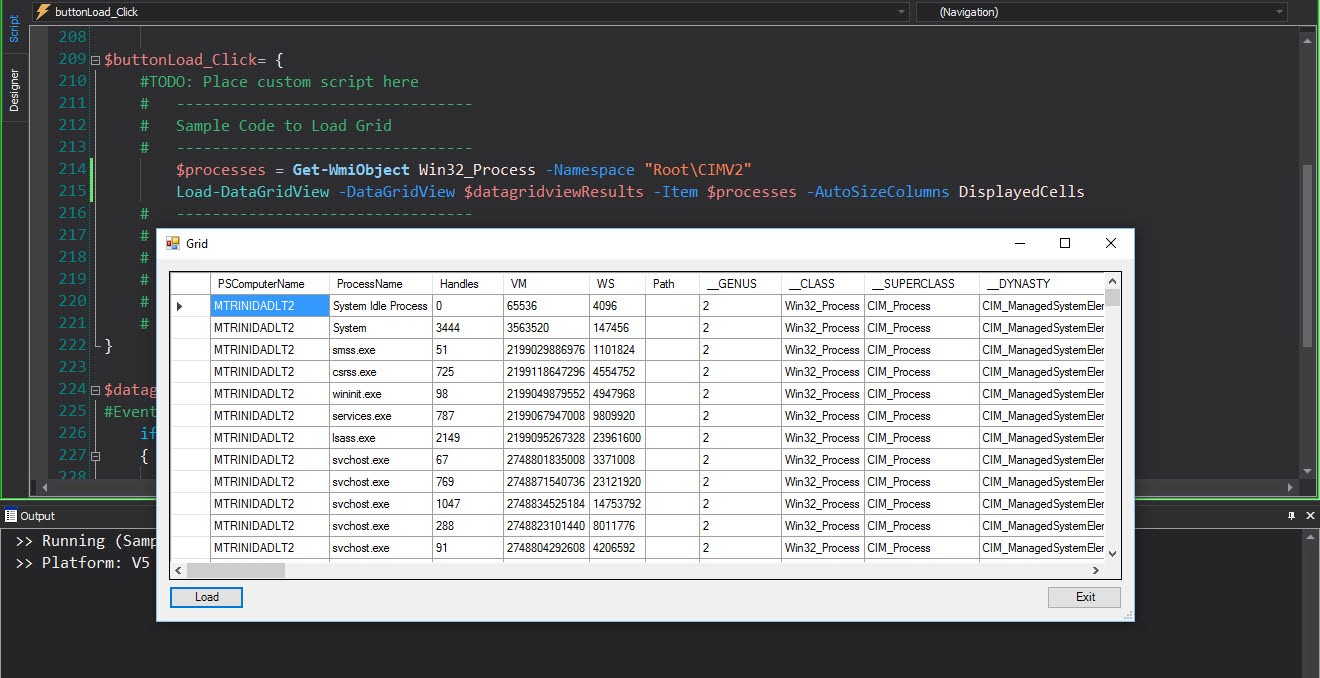
This will load the datagrid with data and you can resize the window application.

sapienstudio_05_2016-11-11_14-44-34

sapienstudio_06_2016-11-11_14-44-34

As you can seen, right from the template you can start building PowerShell Gui’s with SAPIEN PowerShell Studio product.

Download the product for a evaluation:
https://www.sapien.com/software/powershell_studio

More information about PowerShell Studio:
https://www.sapien.com/assets/pdf/PowerShell_STUDIO.pdf

Come and Celebrate PowerShell 10th Anniversary!

I just can’t believe I’ve been hooked to PowerShell since 2006. And, that I can’t stop using it.  This product change my life and it will be with us for a long time.

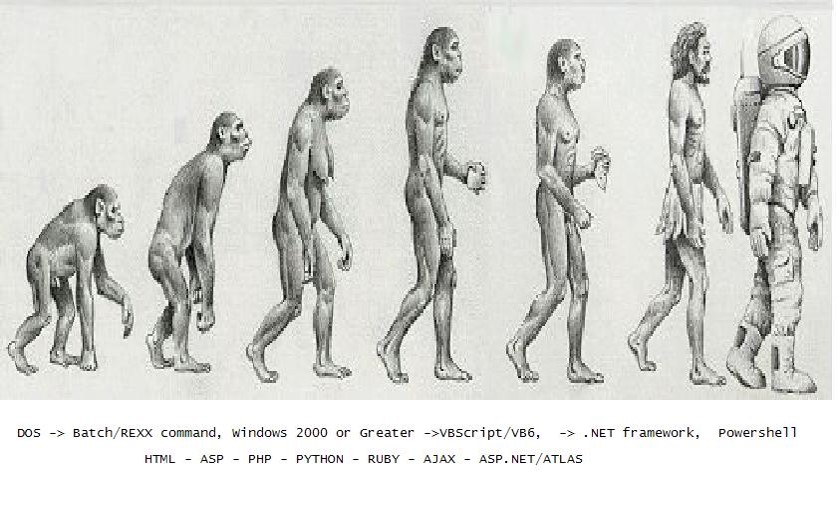
Here’s an image I showed on my first PowerShell presentation back in 2007 and I even build a CD with free resource information.

scritpingpathpowershell

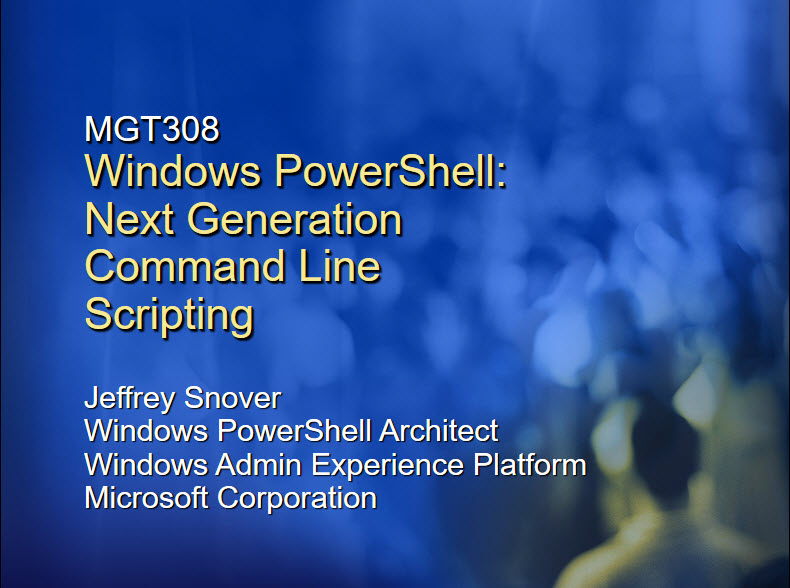
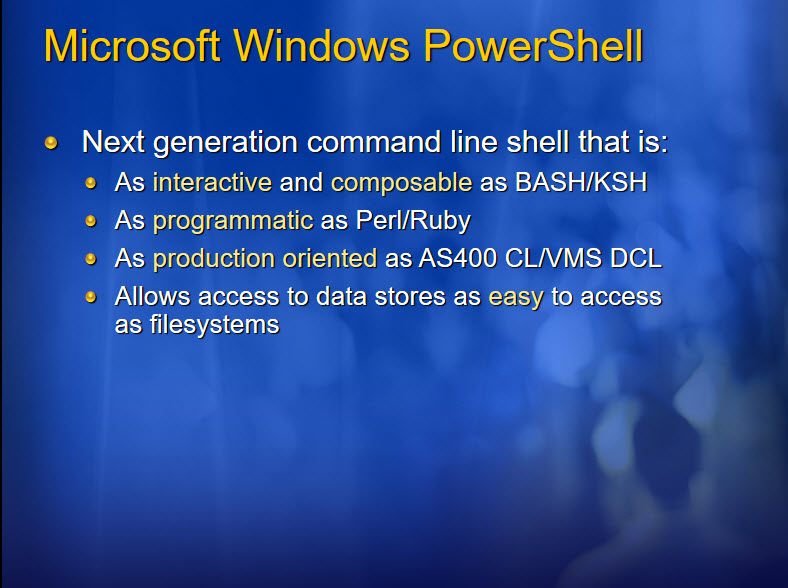
What a accomplishment from Microsoft PowerShell father Mr. Jeffrey Snover! He created PowerShell and nowaday is mostly available in most Operating Systems: Windows, Linux, and Mac OS. Here are a few slide from one of Jeffrey Snover PowerShell webcast back in April 2007.

jsnoverpowershell1

jsnoverpowershell2

I totally got it and I couldn’t stop learning about PowerShell. It did made my work easy thanks to this new .NET Scripting Automation Technology.

Now, let us not forget about all of our existing PowerShell Communities that throughout the years has done an excellent jobs to provide guidance adn direction to everyone wanting to learn PowerShell.

Big KUDOS!!

Join Microsoft PowerShell 10 Years Anniversary Celebration

poshchannel9_2016-11-10_15-30-03

Date: November 14th 2016 (A lond day event)
Where: MSDN Channel 9 – https://channel9.msdn.com/Events/PowerShell-Team/PowerShell-10-Year-Anniversary

powershelllinuxwin_02

Keep Learning about PowerShell!

FLPSUG last meeting November 3rd posted – Windows 10 Bash and PowerShell

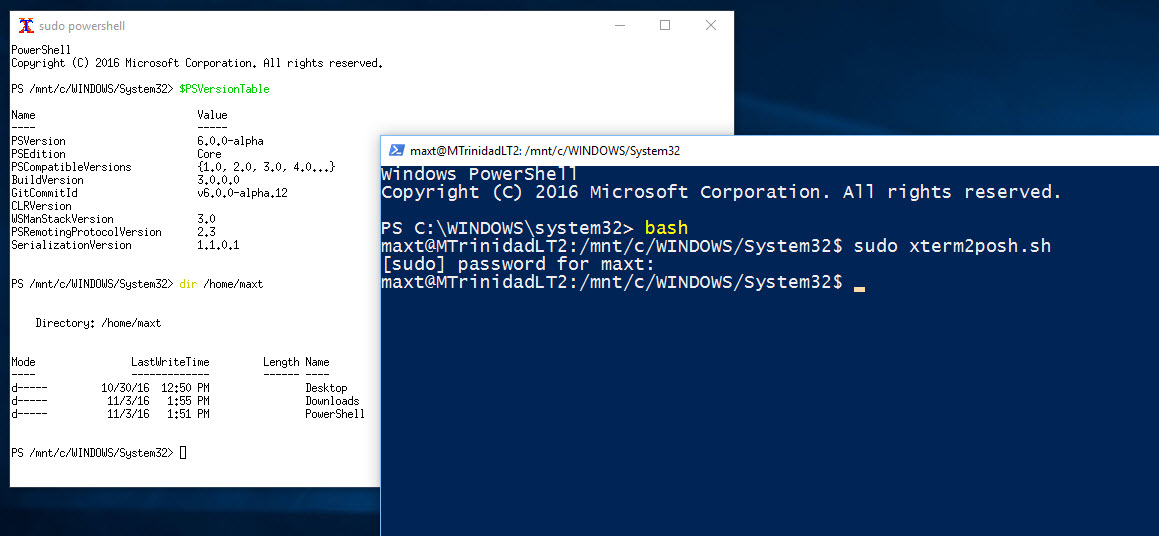
If you missed our online meeting, then here’s the recording.  We’ll be taking a tour into Windows 10 Bash Linux subsystem. I’ll be sharing some tips on how to work with Bash, and the workaround to make PowerShell in side BASH. This is the perfect environment to start learning about Linux while you work in windows. We’ll be take advantage of how-to use cross-platform Open source product(s).

powershelllinuxwin_02

xterm2posh_2016-11-04_10-53-19

Topic: Looking into Windows 10 Bash Linux subsystem and PowerShell

Presentation and demo info: https://1drv.ms/f/s!Akqg632FQ1xUl091qQvhMIYw9Isq

FLPSUG Recorded Monthly Meetings 2016

I took the time to put in a blog all available recorded meeting for this year. All of these videos are loaded in YouTube site for viewing.

Florida PowerShell User Group Monthly Thursday, April 28, 2016
Topic: “Open PowerShell V5 recap and PowerShell Studio 2016”
Speaker: Maximo Trinidad

This is an open session review the latest new of PowerShell v5 and a look at the new SAPIEN Technology “PowerShell Studio 2016”. I will demo some script sample using SQL Server SMO and creating .NET Windows GUI.
PowerShell, Sapien PowerShell Studio

Florida PowerShell User Group Monthly Thursday, May 26, 2016
Topic: “The Essential PowerShell on Error Trapping”
Speaker: Maximo Trinidad

Do you to learn how to trap and document error while running PowerShell scripts? This session will cover the use and how to trap errors in your PowerShell script. We’ll be creating simple script providing some scenarios in trapping errors. At the same time, we are going to end up creating an error report.
PowerShell, Sapien PowerShell Studio

Florida PowerShell User Group Monthly Thursday, September 29, 2016
Topic: “Taking a look at PowerShell Cross-Platform”
Speaker: Maximo Trinidad

PowerShell is Open Source now! Come and see how you could use PowerShell in cross-platform between Windows and Linux sharing scripts to assist in admin task automation.  We’ll spend some time in Linux, and working with some of the editor(s) available for scripting.  Also, I’ll be providing information on how to contribute to  PowerShell Open Source.  This is a demo intensive presentation you don’t want to miss.
Linux PowerShell

My IDERA’s PowerShell Webcast not only for DBA’s

I decided to compiled all of the webcast I did for IDERA Geek Synch from the last two years(2015 – 2016). Free registration and view the webcast: https://www.idera.com/events/geeksync

iderageeksynch

08/10/2016 – Geek Sync Webcast : Learn the PowerShell Essentials on Error Trapping

Join IDERA and Maximo Trinidad as he walks you through how to find and identify errors in your PowerShell script. Do you want to learn how to trap and document error while running PowerShell scripts? This session will cover the use and how to trap errors in your PowerShell script. We’ll be creating simple script providing some scenarios in trapping errors. At the same time, we are going to end up creating an error report.

https://www.idera.com/resourcecentral/webcasts/sqlserver/geeksync/powershell-error-trapping

06/01/2016 – Geek Sync Webcast : The Essential PowerShell Tools for the Database Administrator

In this session Maximo will be showing some available tools the DBA can use along with PowerShell. We’ll be integrating Visual Studio with PowerShell and at the same time using IDERA’s PowerShellPlus editor. At the end, we’ll build an SSIS package solution to execute our PowerShell script. It will be packed with interesting thing to do as well as help you accomplish your automation tasks.

https://www.idera.com/resourcecentral/webcasts/sqlserver/geeksync/powershell-tools-dba

02/25/2016 – Geek Sync Webcast : The Essentials in Building Basic PowerShell Modules

In this session you’ll learn the basics on how-to build PowerShell Modules. Previously, we’ve learned how to create functions with Maximo. This is the next step to collect and group together all your existing functions to build a module. Most important, Maximo will show you where the modules should be stored and how to load them.

https://www.idera.com/resourcecentral/webcasts/sqlserver/geeksync/basic-powershell-module

11/14/2015 – Geek Sync Webcast : The Essentials to Tackling Basic PowerShell Functions

In this session Maximo will demonstrate the creation of a PowerShell function from a one-liner and/or an existing script file in its basic form. This will show the scripting evolution you’ll experience while building your PowerShell scripting skills. At the same time he will be showing you some existing resources already available at your fingertip.

https://www.idera.com/resourcecentral/webcasts/sqlserver/geeksync/powershell-basics

2015 – Geek Sync Webcast : Creating a SQL Server Database Report with PowerShell

This webinar is a deep dive on how to create a SQL Server report using PowerShell and SMO. At the same time, you will learn how to create and work with PowerShell objects, scriptblocks, formatting properties, and generating output results. We’ll be looking into creating a report to identify database properties irregularities. This will be a good start to help begin documenting your SQL Server on the network.

https://www.idera.com/resourcecentral/webcasts/sqlserver/geeksync/creating-sql-server-db-powershell

2015 – Geek Sync Webcast : PowerShell Essentials using SQL Server SMO

This session will provide the PowerShell essential skills to work with SQL Server Management Objects (well known as SMO). Maximo Trinidad will talk about how-to connect to SQL Server (both Windows and SQL Authentication), working with SMO objects, and showing some PowerShell cmdlets that can assist when building the script(s).

https://www.idera.com/resourcecentral/webcasts/sqlserver/geeksync/powershell-essentials-using-sql-server

It’s never late to learn PowerShell!!

Running PowerShell In Windows 10 BASH (workaround)

Yes! It’s possible. There’s a workaround make PowerShell to work in Bash for Windows. The only drawback, you still can’t do a Clear-Host (or clear or cls), at the PowerShell prompt.(yet)

(Updated 11/03/2016):  You can use Ctrl-L to clear the screen while using both ‘xterm’ and ‘screen’ while working at the console only.  At least is better than nothing!
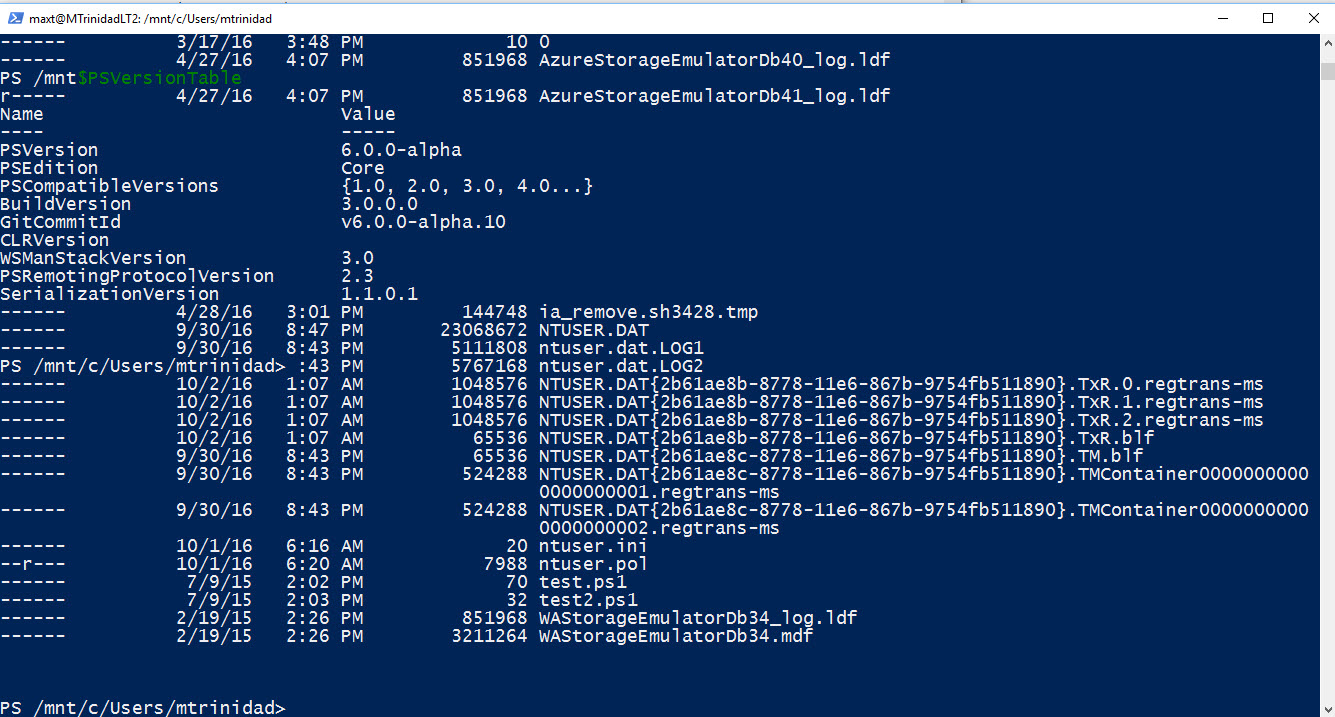
poshbash_01_2016-10-02

The original behavior, and still is, the cursor goes to the top of the screen and it making hard to work.   This issues has been logged in Github PowerShell site:

But, let first install PowerShell for Bash on Windows.

Installing PowerShell

To identify which version of PowerShell to install, you’ll need to find what’s the Windows Bash version. Run the following Linux command:

username@hostname$ cat /etc/issue

poshbash_00b_2016-10-02

This command will show the Linux OS is Ubuntu Bash version is 14.04. Next is to  proceed to Github PowerShell and select to download the Ubuntu 14.04 version: https://github.com/PowerShell/PowerShell/releases/tag/v6.0.0-alpha.10

Look for and click on “powershell_6.0.0-alpha.10-1ubuntu1.14.04.1_amd64.deb” to initiate the download.

Please understand that this file type is *.deb and will only install on the correct Linux OS version. This file will be download to your Windows “Downloads” folder and you won’t be able to execute from Windows File explore.

poshbash_00c_2016-10-02

Now, confirm you downloaded and can see the file under Bash subsystem by doing the following Linux command:

$ ls /mnt/c/Users/mtrinidad/Downloads

poshbash_00d_2016-10-02

To installing the PowerShell version for Ubuntu 14.04, do the following commands:

$ cd /mnt/c/Users/mtrinidad/Downloads
$ sudo dpkg -i powershell_6.0.0-alpha.10-1ubuntu1.14.04.1_amd64.deb
$ sudo apt-get install -f

Now, you can run PowerShell from the Windows 10 BASH prompt. But, it won’t be pretty useful. Yet!

What’s the workaround PowerShell in Bash for Windows

Basically, there are two application you can try:
In my case, I didn’t have to installed these applications.  But, if you need to install either application, the use the following command lines and answer “y” to install:
$ sudo apt-get install screen 
$ sudo apt-get install xterm
Now, there is one more application that might be useful to install using the same command format (see above). Its the GUI editor “gedit”:
$ sudo apt-get install gedit
This is a very practical text editor that remind me of Notepad.  Keep in mind, I’m coming from a Windows Ecosystem.  Of course, Linux expert may go for Vim or Emacs editors.

Xserver for Windows 10

 Two of these applications: xterm and gedit that will need Xserver running in Windows 10.  I’m currently using “VcXsrv” and can be downloaded from: https://sourceforge.net/projects/vcxsrv/
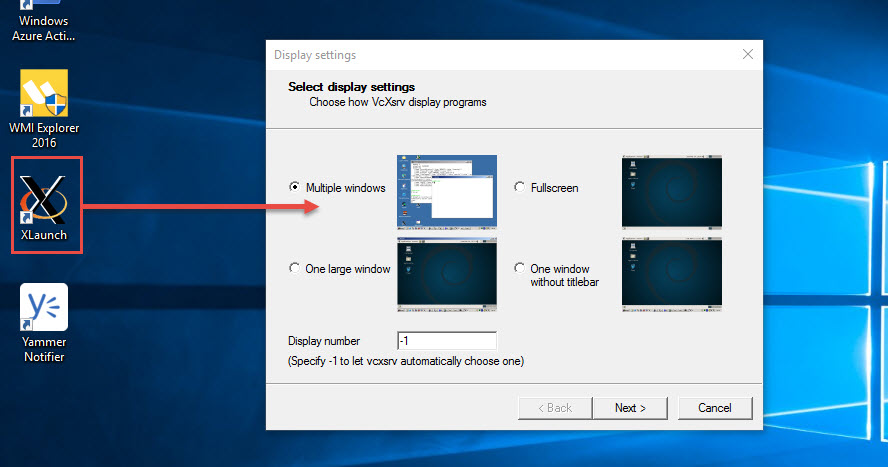
After installation, double-click on the XLaunch icon and select how-to display the program.
poshbash_00e_2016-10-02
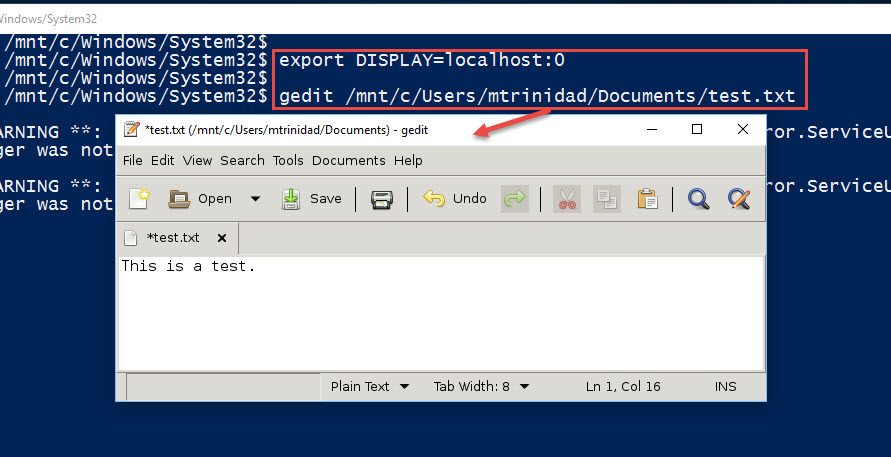
Then, go back to the Bash prompt and type the following command the set the Xserver popup window, follow by the application. In this example will be executing “gedit“.
$ export DISPLAY=localhost:0
$ gedit /mnt/c/Users/mtrinidad/Documents/test.txt
poshbash_00f_2016-10-02
In order to use application(s) in *Xserver, its only one application at the time per Bash console open. In other word, to run two applications, you’ll need to open two Bash console to run each individually.
*Note: You will notice  Warning messages after exiting the application which can be ignored.
poshbash_00h_2016-10-02
Now, we got all we need to start working with PowerShell in Bash for Windows.

PowerShell – Using xterm

Now, to use “xterm“, you’ll need run the Xserver application “VcXsrv” as previously explained. Follow the steps: (In my case, I’m opening PowerShell Console in Administrator mode)

  • Open PowerShell Console (in Administrator mode)
  • Execute Bash
  • Then, at the Bash prompt type: $ export DISPLAY=localhost:0
  • Follow by: xterm

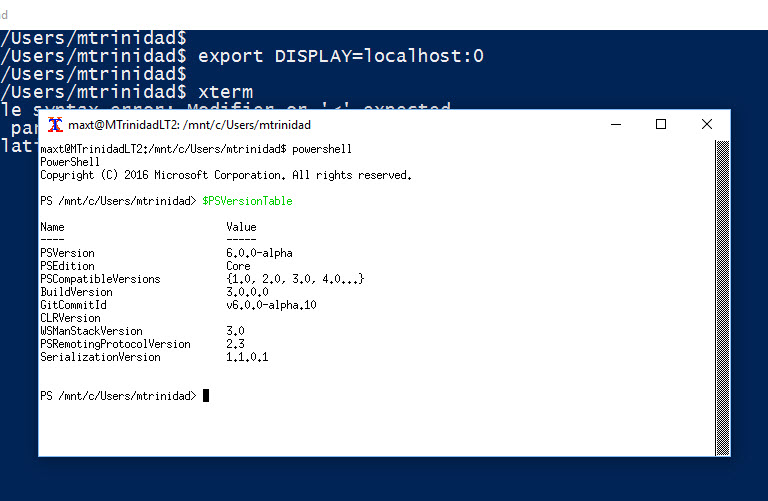
This will open a popup window for xterm application. In the xterm prompt, run powershell and you can start working with PowerShell.

$ powershell
poshbash_00i_2016-10-02

But wait!! You’ll notice that there’s no scroll bar to page up or down. I found the following link that fix the issue and you can enable the scroll bar using the mouse.
http://beforewisdom.com/blog/tech/xterm-with-a-scrollbar/

This is where you use gedit text editor to add the code to make the scroll bar to work with the mouse.
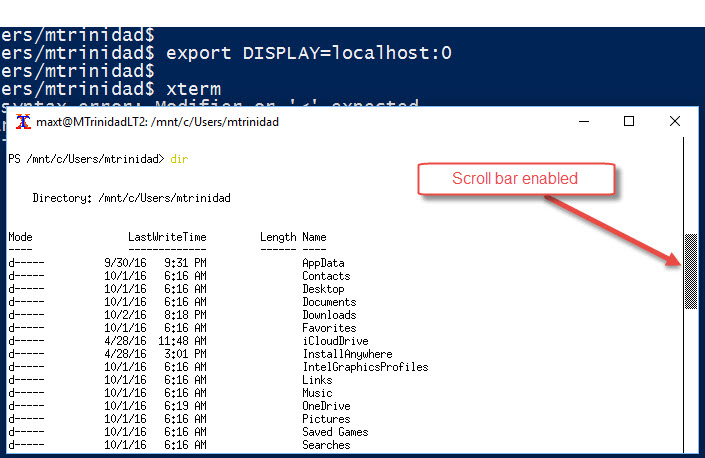
poshbash_00j_2016-10-02

Now you can use PowerShell to xterm application.

PowerShell – Using screen application

This is another workaround to work with PowerShell by using the “screen” application without the need of using Xserver program.

Just open the PowerShell console (in Administrator mode) then type “screen” and press enter.

poshbash_00k_2016-10-02

Oops! This application will need to be executed as super user:

poshbash_00l_2016-10-02

Keep pressing enter to bypass the screen information prompt.
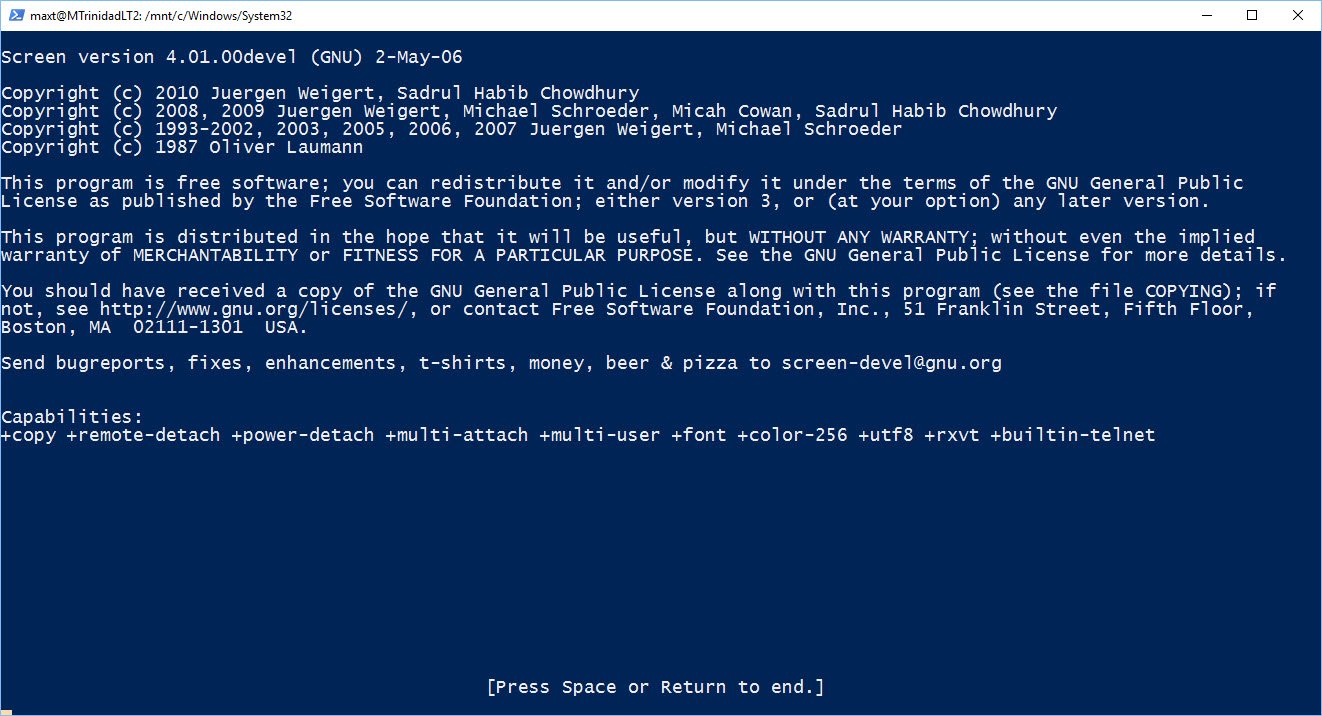
poshbash_00m_2016-10-02

You will ended up at a # prompt, then you can execute PowerShell:

# powershell

And start working with PowerShell. But, again you’ll notice, you won’t be able to scroll up and down (again).  There’s not scroll bar!

Here’s how to fix the “screen” scroll issue: press Ctrl-A and then ESC. Now, the scroll up and down feature will be enabled.
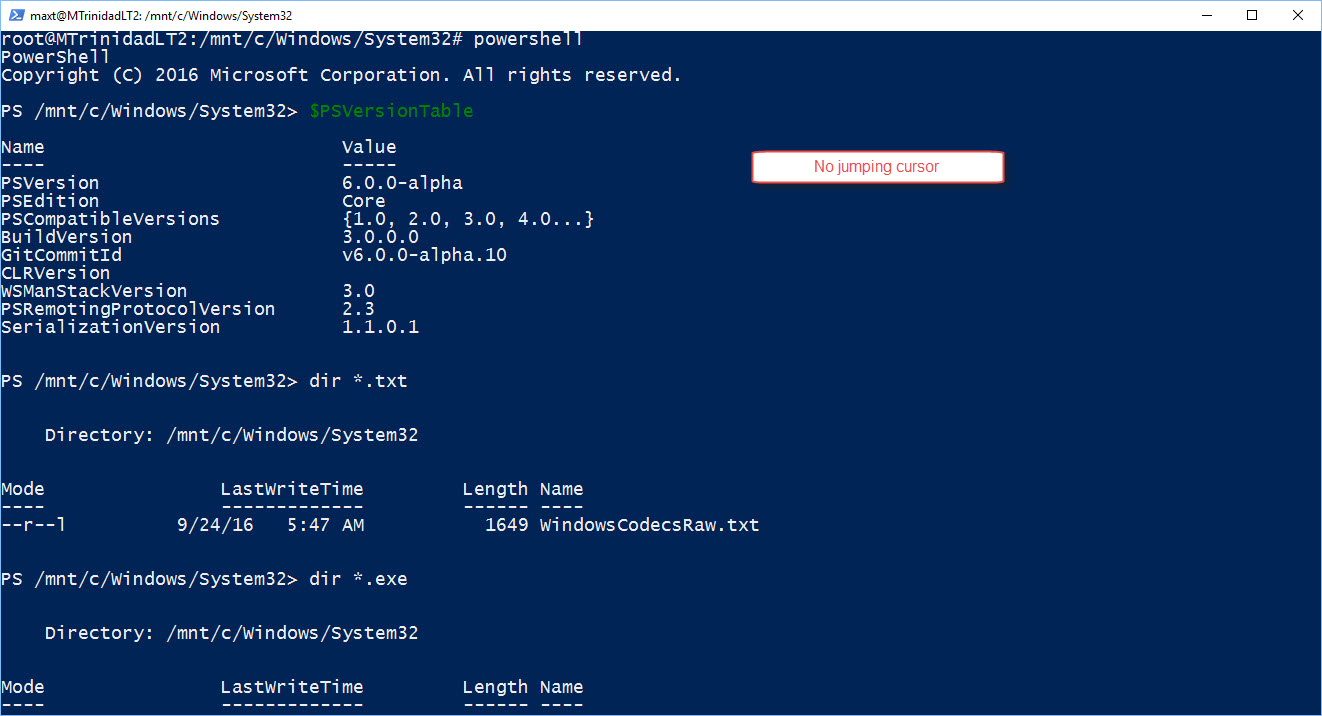
poshbash_00n_2016-10-02

And, at the same time, both the arrows up/down keys are working during the remaining of your session.
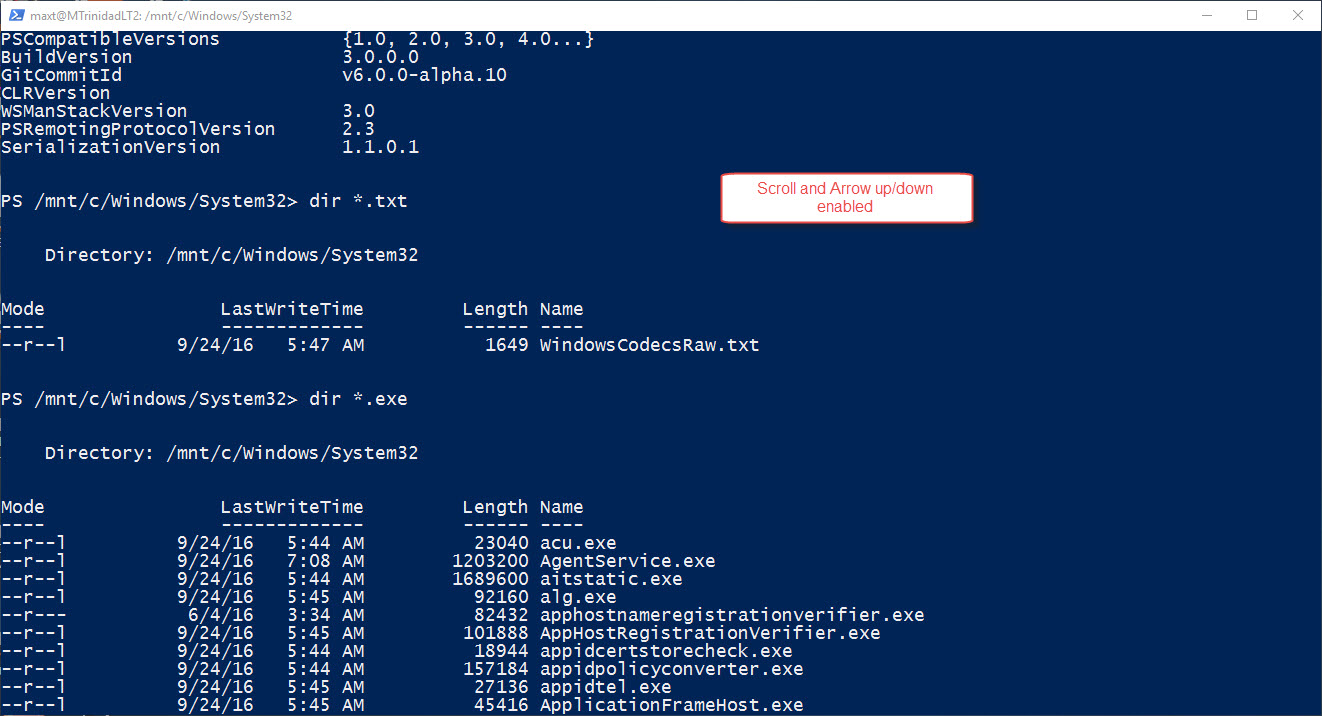
poshbash_00o_2016-10-02

Now, exiting the “screen” application, you will ended up type the “exit” command a few times. About 3 time to get to the starting point.

poshbash_00p_2016-10-02

There’s no excuse not to use PowerShell In Bash for Windows. I have to admit it was little painful to gather this information and work around. But I think is very useful.  This is Awesome!

 Useful Resources

Make sure to check the GitHub incident email threads, mention in the beginning of this blog, which leads to make this workaround possible: #933 and #988, Community contribution made this possible.

Here are some addition links that help me push through this workaround:

** Xterm
http://beforewisdom.com/blog/tech/xterm-with-a-scrollbar/

** screen
http://www.saltycrane.com/blog/2008/01/how-to-scroll-in-gnu-screen/
http://neophob.com/2007/04/gnu-screen-cheat-sheet/

** Finding Linux version:
http://www.lostsaloon.com/technology/how-to-check-and-find-your-linux-os-version/
 

VS Code working with SQL Server

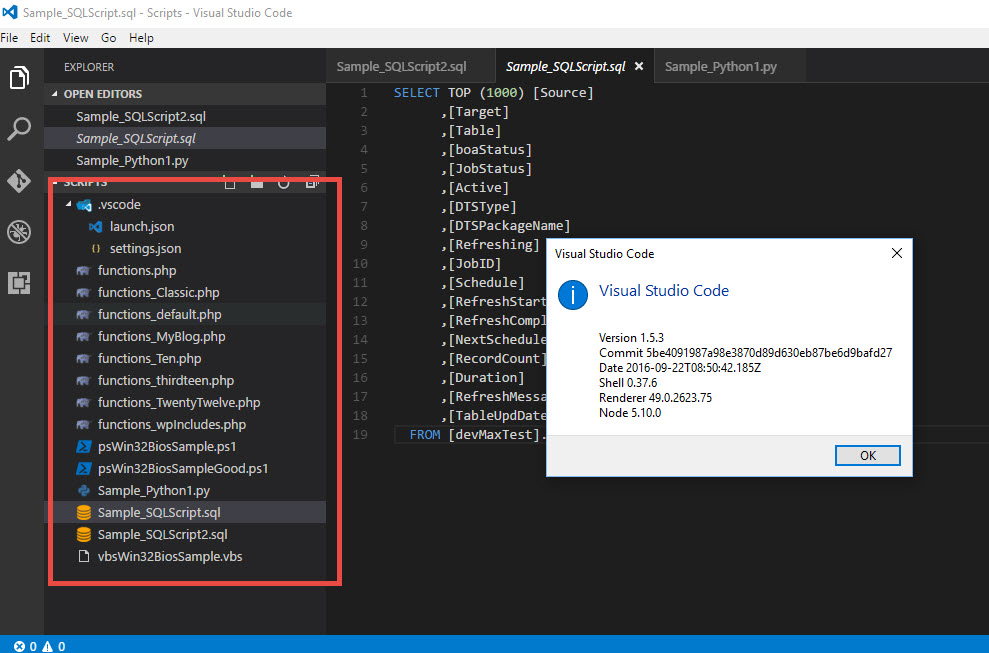
VS Code editor works great and specially when using it in cross-platform environment. So, I decided to try using it connect to one of my SQL Server instance. To configure VS Code editor is simple. Make sure to check my previous blog post for information.

http://www.maxtblog.com/2016/09/vs-code-running-powershell-debug-13/
http://www.maxtblog.com/2016/09/vs-code-running-powershell-code-runner-extensions-23/
http://www.maxtblog.com/2016/09/vs-code-running-powershell-terminal-session-33/

Next we need to look which SQL extension are available. In this case I decided to use “vscode-mssql” extension:

vscodesql_01_2016-09-30

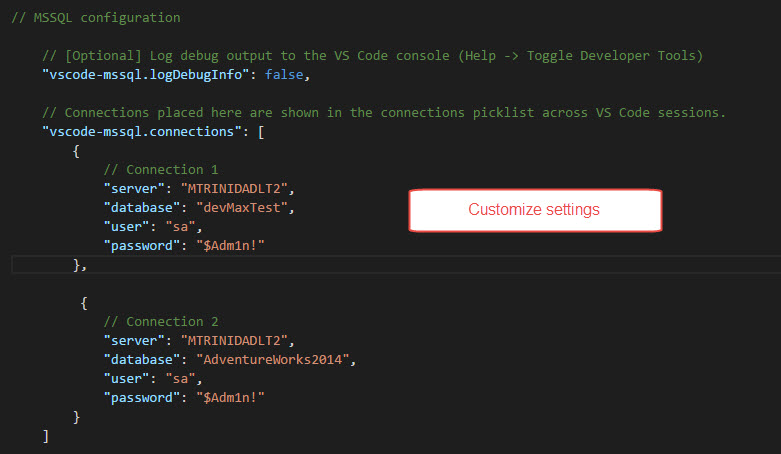
After installing, we need to customized their setting by creating connection(s) to our SQL Server. We do this by opening VS Code “User Preferences” and under “Default Settings.json” we search for the “vscode-mssql” settings to be copied over to our working folder “settings.json” file.

vscodesql_02_2016-09-30

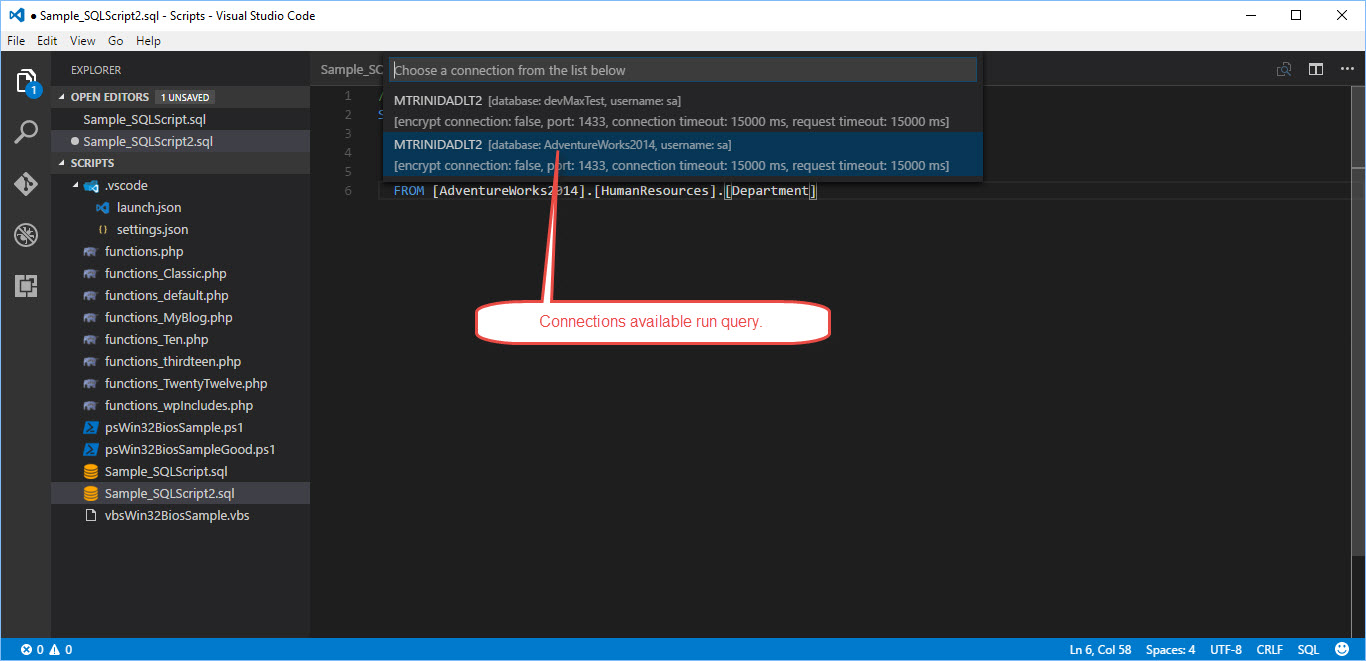
I configure two database connections, which you can choose by pressing Ctrl-Shift-E before it execute the SQL Script.

vscodesql_03_2016-09-30

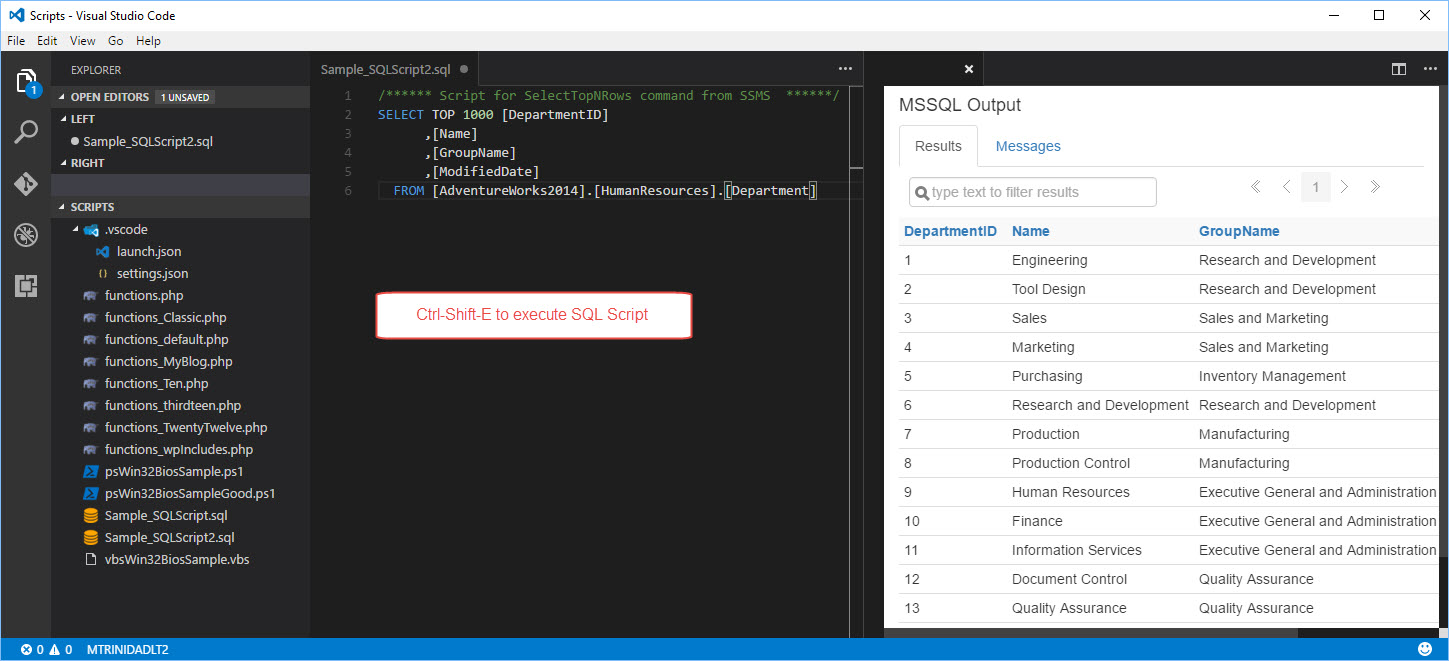
The result from the SQL Script will be displayed on the right side of the editor.

vscodesql_04_2016-09-30

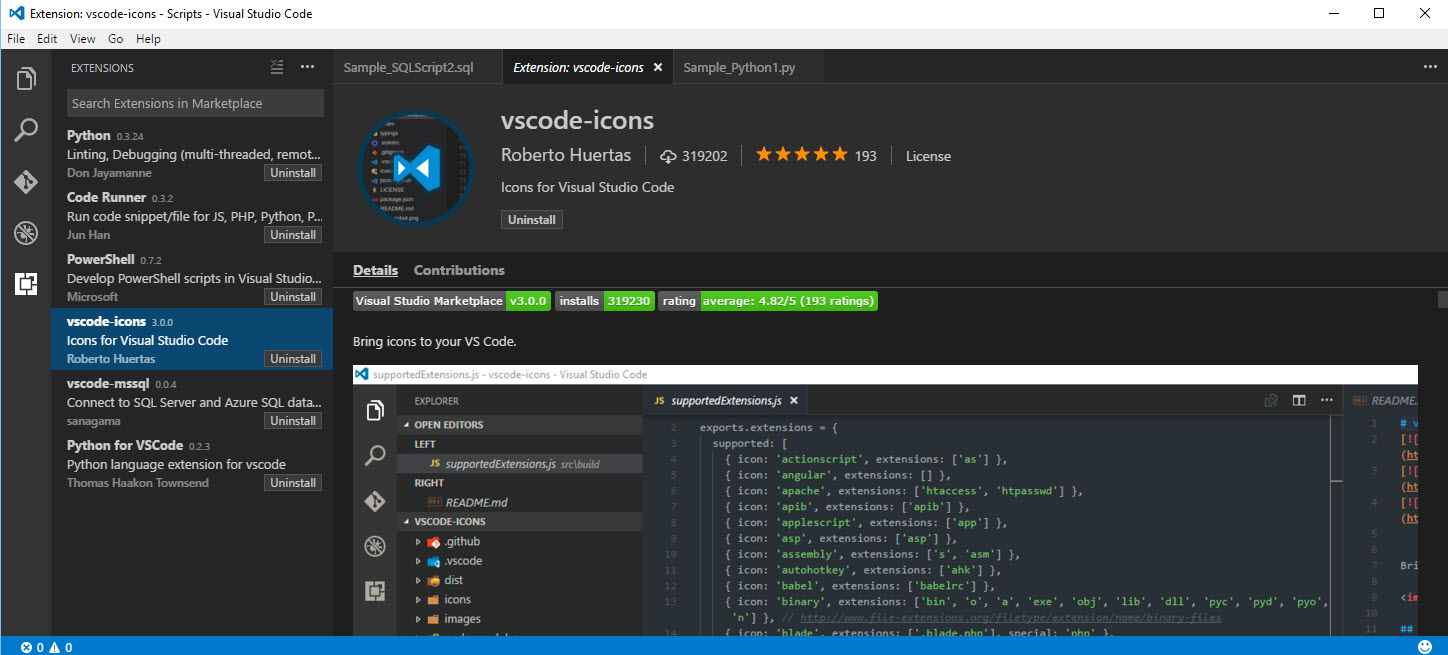
One thing to notice, on VS Code version 1.5.3, there’s an extension called “vscode-icons” which gives nice file icons to the working files.

vscodesql_04a_2016-09-30

vscodesql_05_2016-09-30

PowerShell – SQL Server SMO Drop table in Database

In one of my previous blog, I mention about issue I found with SQL Server 2014 SMO not supporting the *.TruncateData() method. So, while working on one of my company SQL Server migration I need my script to cleanup some tables and I ended up doing a quick script to drop a selected list of tables.

Before we have the script, we need to create the list of tables. Basically, I had previously create two PowerShell objects and use the compare-object cmdlet to identify only the same tables found in both objects.

Then I can proceed to drop tables from the list object labeled $ToDelete:

[sourcecode language=”powershell”]
## – Create compare results of list of tables:
$list = compare-object -ReferenceObject $newSAP -DifferenceObject $oldSAP -IncludeEqual;

## – Save list for future reference:
$list | Where{ $_.sideindicator -eq ‘==’ } | out-file c:\temp\SAP_tablesToDelete.csv;
$list | Where{ $_.sideindicator -eq ‘=>’ } | out-file c:\temp\SAP_tablesMissing.csv;

## – Only get the list of tables to be deleted:
$toDelete = $list | Where{ $_.sideindicator -eq ‘==’ } | Select-Object InputObject;

## – Using SMO steps to work with tables:
$SQLServerInstanceName = ‘TSQLDSP01’; $SQLServerDatabasename = ‘dgSAP’;

## – Connect to SQLServer instance and get table name list:
[system.reflection.assembly]::LoadWithPartialName(“Microsoft.SQLServer.Smo”) | Out-Null;
$SQLSrvObj = new-object(‘Microsoft.SqlServer.Management.Smo.Server’) $SQLServerInstanceName;
$tables = $SQLSrvObj.Databases[$SQLServerDatabaseName].tables;

## – Step to go through tables list and the drop tables:
$global:cnt = 1; [array]$results = $null;
$results = foreach ($t in $tables)
{
## – Loop through tables to be drop:
foreach ($i in $toDelete)
{
## – Chekc each table $t in the $i selected list:
if ($t.name -eq $i.InputObject)
{
## – Drop table process:
## -> $t.Drop();
$r = “[$($global:cnt.ToString(‘000’))] – Sql $($t.name) = Object $($i.InputObject) removed”
Write-Verbose $r -Verbose;
$r; $global:cnt++
};
};

## – Refresh tables object without dropped tablename:
$tables.Refresh();
};
[/sourcecode]

This *script will assist in the third-party application to recreate the tables meeting for our migration.

*Note: Just in case, I commented out the line having the $t.Drop() method.

PowerShell – SQL Server 2014 SMO TruncateData() Workaround

As I was still puzzle why the SMO *.TruncateData() was missing in SQL Server 2014, I needed to find a quick workaround to continue with my data migration.

Of course, here comes T-SQL scripting to the rescue:

[sourcecode language=”sql”]

Truncate Table databasename.schema.tablename
GO

[/sourcecode]

Basically, subtitute the SMO .TruncateData() with few lines of T-SQL statement, and have PowerShell run the code against SQL Server. The script is shown below:

[sourcecode language=”powershell”]
## —————————————– ##
## – Using SMO steps to work with tables:
$SQLServerInstanceName = ‘TSQLDSP01’; $global:SQLServerDatabasename = ‘devMaxText’;
$global:DbSchema = ‘dbo

[system.reflection.assembly]::LoadWithPartialName(“Microsoft.SQLServer.Smo”) | Out-Null;
$SQLSrvObj = new-object(‘Microsoft.SqlServer.Management.Smo.Server’) $SQLServerInstanceName;
$tables = $SQLSrvObj.Databases[$global:SQLServerDatabaseName].tables;

$global:cnt = 1;
foreach ($t in $tables.name)
{
$tsqry = @”
Truncate Table $($global:SQLServerDatabasename).$($global:DbSchema).$($t)
Go
“@;
#$SQLSrvObj.Databases[$SQLServerDatabaseName].ExecuteNonQuery($tsqry);
Write-Verbose “[$($global:cnt.ToString(“0000″))]Truncate Table dgSAP_Old.dbo.$($t) Process” -Verbose;
$global:cnt++;
};
[/sourcecode]

This *script will assist in the third-party application to load date back to the tables for our migration.

*Note: Just in case, I commented out the line having the .ExecuteNonQuery() method.

Linux Sky Application for “Skype for Business”

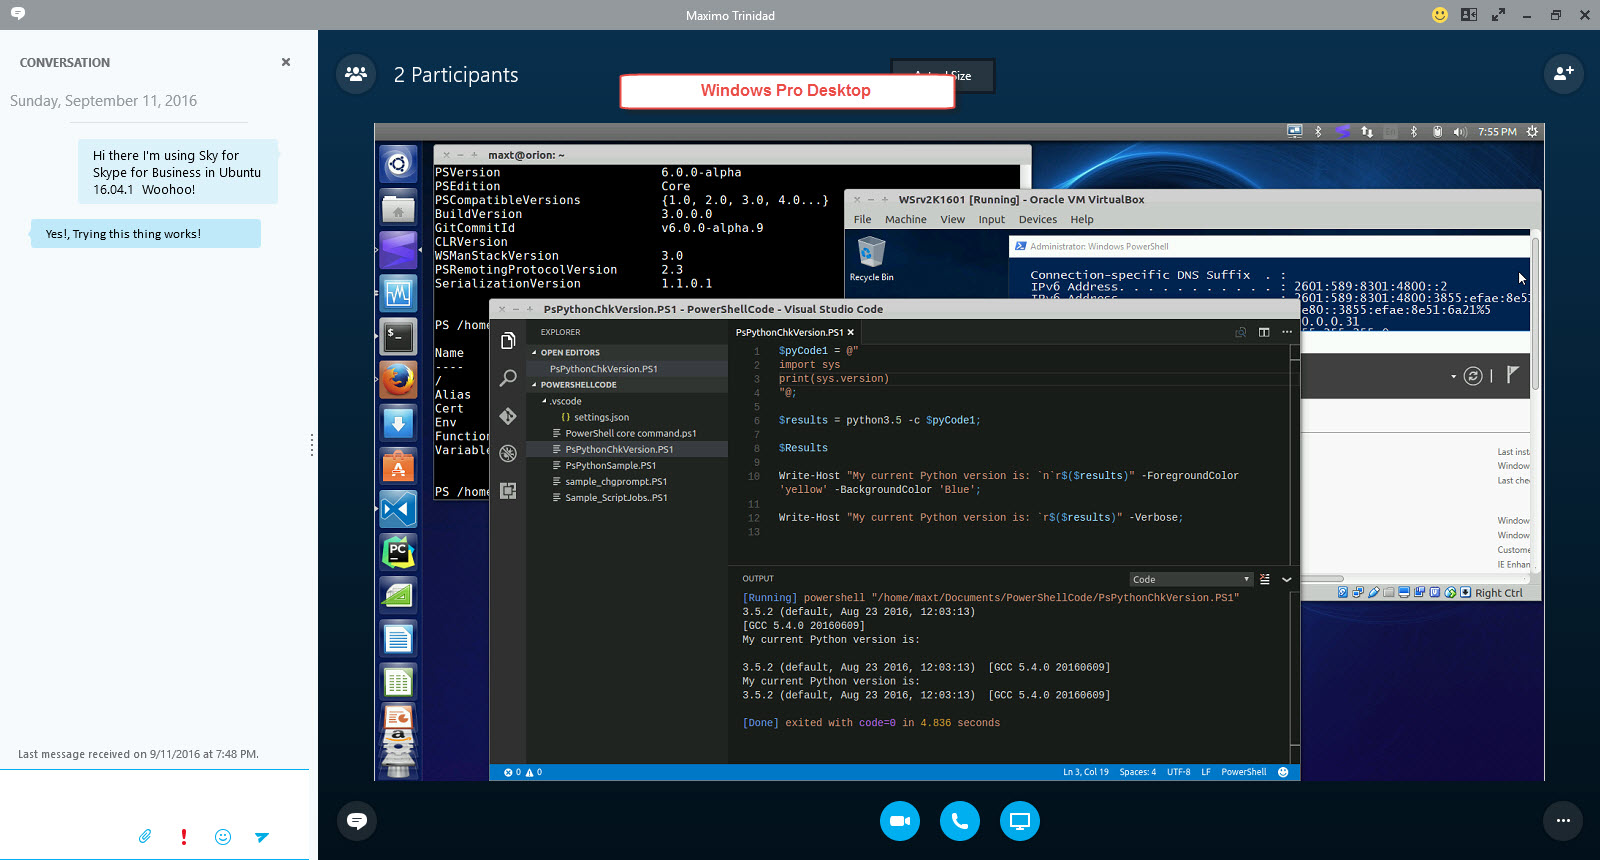
Yes! As started to spend time learning Linux I found this Linux application that allows me to use my Office365 account and share my desktop to other users using “Skype for Business”. I find this very interesting now that I could use this application to setup online presentations right off my Linux system.

sky01

Here’s the link to check it out: https://tel.red/linux.php

But, definitely is oriented for business organization that can afford the paying an annual fee of $45/per user activation. In the meantime, you can test this application which is limited a 2 minute limit on each call or screen share. They will send you a key to use within 24 hours.

Another missing feature, if you compare it to “Sky for Business”, is the session recording capability.  I mean, still is a great Linux app that will connect to you Skype members.

I can tell that their technical support will answer questions promptly and their email response was very good. They can also help and discuss any arrangement in order to get you going.

For now, their application only support domain users. But, I was told, that support for non-domain users will be available soon.

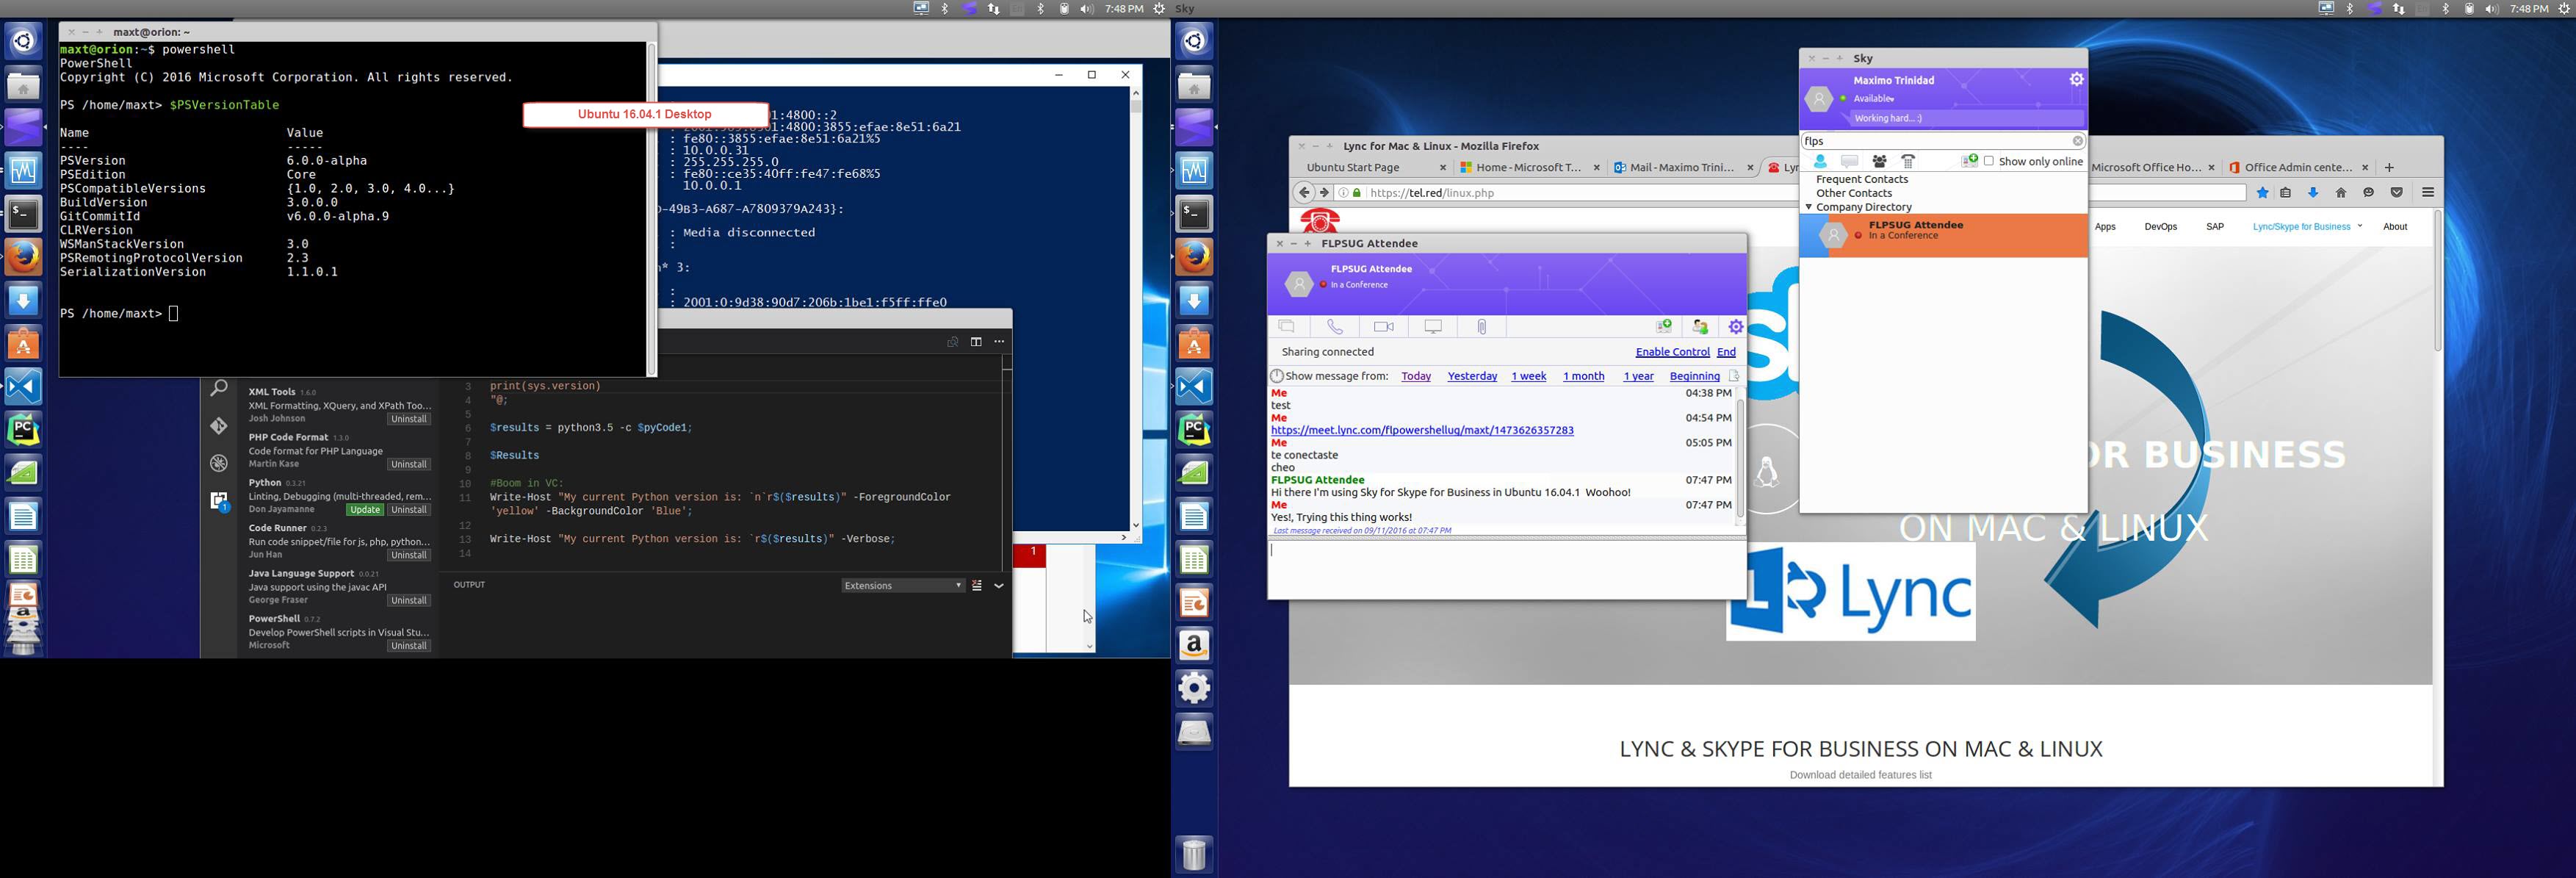
Installation was a challenge for me. Just because I’m not a Linux expert but I manage the figured out what was needed to complete the installation on my Ubuntu 16.04.1 desktop. They offered any Sky installation for various Linux distro.

Check out the images!  I think this product has potential for connecting Windows and Linux users.

ubuntusky

skylinux2_2016-09-11_19-56-21

I’m hoping to be able to at least do one of my Florida PowerShell User Group meeting with this product.