PowerShell – Working with Python and SQL Server

As you all know with the release of PowerShell Open Source and SQL Server on Linux are open doors to cross-platform developments. But is has been going on for awhile as Linux languages like Python, Ruby, Java and PHP has been already available for Windows.

So, all comes down in setting your tools to allows cross-platform development in order to minimize the headaches of tweaking or altering your code between environments.

As PowerShell is the main technology for automation in Windows Datacenters Infrastructure, now becomes clear its importance in other non-Windows Operating Systems. The way I see it, Windows Admin has the advantage with PowerShell as the Linux Admin has the upper hand with Bash/PHP/Python. Here’s where we can collaborate and work with each other.

PowerShell and Python

I’m assumning you have already have installed PowerShell Open Source (powershell_6.0.0-Alpha.xx) as Windows PowerShell already exist.

We need to make sure we install Python in both Windows and Linux environments.
1. Download Python for Windows: https://www.python.org/
2. Select Python version: 2.7 or 3.5 (I’m using Python 3.5)

*Note: My Linux OS is Ubuntu 16.04.1 which already included Python 2.7. So, I have installed Python 3.5.

After the installation, there are a few more steps to do as we’ll be connecting to a SQL Server in any of our environments.

In Ubuntu, to install Python version 3.5 plus needed modules you need to execute the *following ‘bash’ line:

[sourcecode language=”bash”]
$ sudo apt install unixodbc-dev
$ sudo apt install python3
$ sudo apt install python3-pip
$ sudo pip3 install –upgrade pip
$ sudo pip3 install –upgrade setuptools
$ sudo pip3 install –upgrade wheel
$ sudo pip3 install pyodbc
[/sourcecode]

*Note: I’ve notice that sometime doing a “pip3 install –upgrade ..” will fix some issue with modules. But, during any python module installation it will let you know when to run the command.

In Windows, just need to install the module for connecting to SQL Server using Python ODBC

[sourcecode language=”dos”]
c\:> pip3 install pyodbc
[/sourcecode]

Now, you can open Python from any of your Windows Console: DOS, Windows PowerShell, or PowerShell Open Source.

In order to execute *Python 3.5 in Ubuntu, simple type:

[sourcecode language=”bash”]
$ python3.5
[/sourcecode]

*Note: Just an FYI. You can use the “Update-Alternative …” bash command to set the default python to 3.5.

Testing PowerShell and Python

Open any PowerShell Console, on either Windows or Linux, you just type Python at the prompt.

pspythonsql_01_2016-11-28_13-13-33

You will immediately see the Python prompt, and just type the following python code:

[sourcecode language=”python”]
import sys;
cur_version = sys.version;
print(cur_version);
exit()
[/sourcecode]

pspythonsql_02_2016-11-28_13-13-33

Now, in PowerShell, try typing a python code and save it to a PowerShell variable:

[sourcecode language=”powershell”]
C:\WINDOWS\system32> $v = python -c @"
import sys;
cur_version = sys.version;
print(cur_version);
"@;
$v
[/sourcecode]

pspythonsql_03_2016-11-28_13-13-33

As you see, PowerShell and Python interact very well. The same applies in the Linux Ubuntu environment.

Python and SQL Server

For this section we previously installed the python module pyodbc which is needed to connect via ODBC to any SQL Server on the network giving the proper authentication method.

The following sample code can be found this link: https://www.microsoft.com/en-us/sql-server/developer-get-started/python-ubuntu

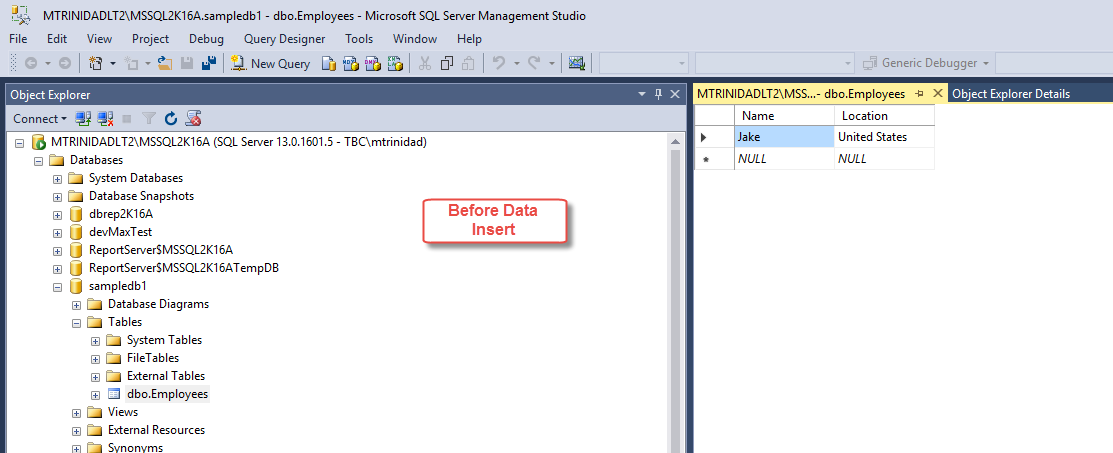
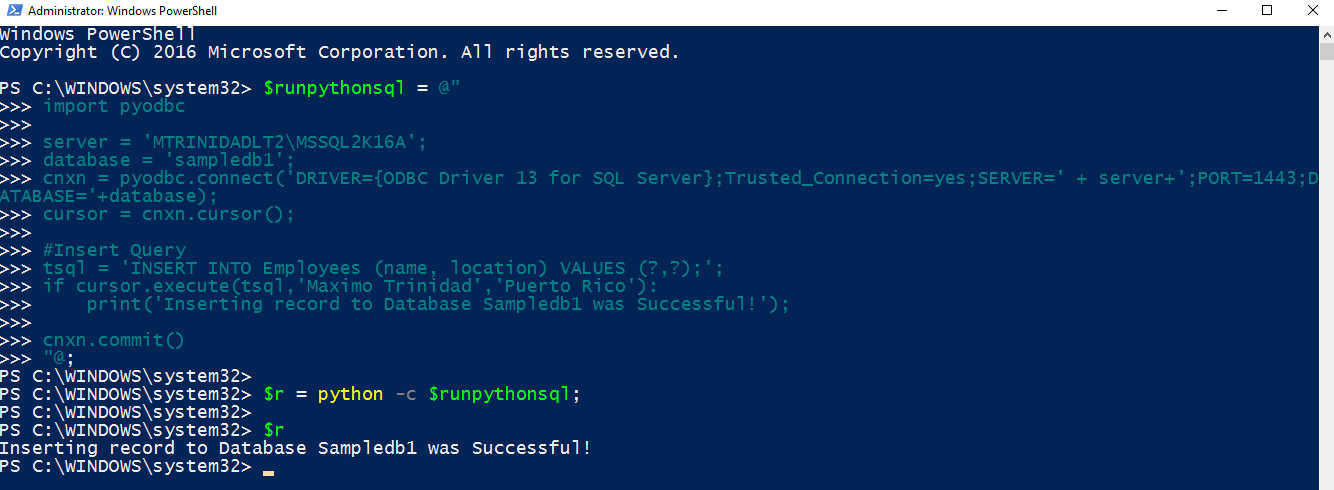
I did slightly modify the python code to add a new record to an existing database. And, to run it within Powershell:

[sourcecode language=”powershell”]
## – Build Here-String variable with Python code:
$runpythonsql = @"
import pyodbc

server = ‘MTRINIDADLT2\MSSQL2K16A’;
database = ‘sampledb1’;
cnxn = pyodbc.connect(‘DRIVER={ODBC Driver 13 for SQL Server};Trusted_Connection=yes;SERVER=’ + server+’;PORT=1443;DATABASE=’+database);
cursor = cnxn.cursor();

#Insert Query
tsql = ‘INSERT INTO Employees (name, location) VALUES (?,?);’;
if cursor.execute(tsql,’Maximo Trinidad’,’Puerto Rico’):
print(‘Inserting record to Database Sampledb1 was Successful!’);

cnxn.commit()
"@;

## – Execute Python code from within PowerShell
$r = python -c $runpythonsql;

## – Display Result of Inserted data:
$r
[/sourcecode]

pspythonsql_04_2016-11-28_13-13-33

pspythonsql_05_2016-11-28_13-13-33

pspythonsql_06_2016-11-28_13-13-33

As you can see, PowerShell and Python can go hand-in-hand. They can be a perfect match cross-platform.

For more information about PYODBC, click on the link: https://github.com/mkleehammer/pyodbc


PowerShell Open Source – Looking into Windows 10 Bash Linux subsystem and PowerShell

This is an FLPSUG October 27th Online meeting that, due to a Windows 10 update issue, had to be rescheduled to November 3rd.

Topic: Looking into Windows 10 Bash Linux subsystem and PowerShell

We’ll be taking a tour into Windows 10 Bash Linux subsystem. I’ll be sharing some tips on how to work with Bash, and the workaround to make PowerShell in side BASH. This is the perfect environment to start learning about Linux while you work in windows. We’ll be take advantage of how-to use cross-platform Open source product(s).  All this and more from Windows 10.

Click to view the video: https://youtu.be/1AJ7ZlZRIj0

poshadv_03_2016-11-26_11-35-07

PowerShell Open Source – Take advantage of ‘#Requires -Version’ and new variables

Now that PowerShell Open Source is evolving, we need taking advantage of some if it features to build cross-platform scripts. Also, a good way to test the script functionality is to use either Linux or Windows 10 Bash environments.

Just keep in mind, for now you won’t be able to run you existing Windows PowerShell scripts or modules in another OS. Unless, you concentrate that write your scripts only using the PowerShell Core module. PowerShell Open Source is evolving.

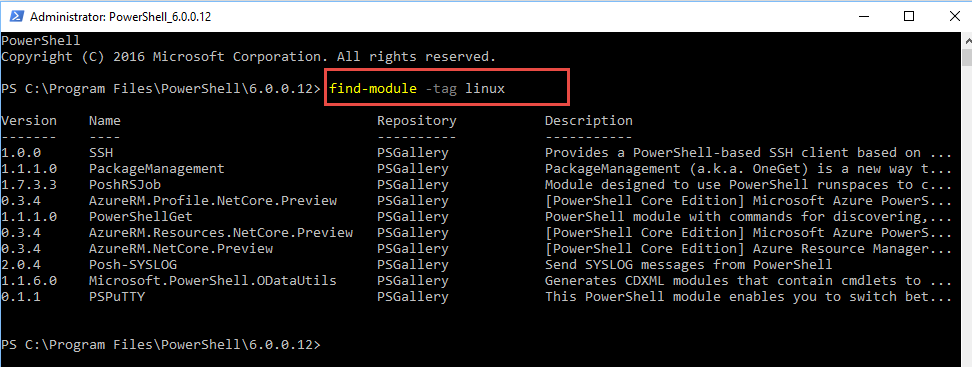
Also, there are already modules available that can be use cross-platform thru PowerShell Gallery, and NuGet. Just make sure to search of Linux or Mac OS scripts.
[sourcecode language=”powershell”]
Find-Module -tag linux
[/sourcecode]

poshadv_01_2016-11-26_11-35-07

Using PowerShell existing features

Now, when creating cross-platform scripts, I found very useful to have the “ #Requires -Version x” statement. This statement is available in all versions of PowerShell.

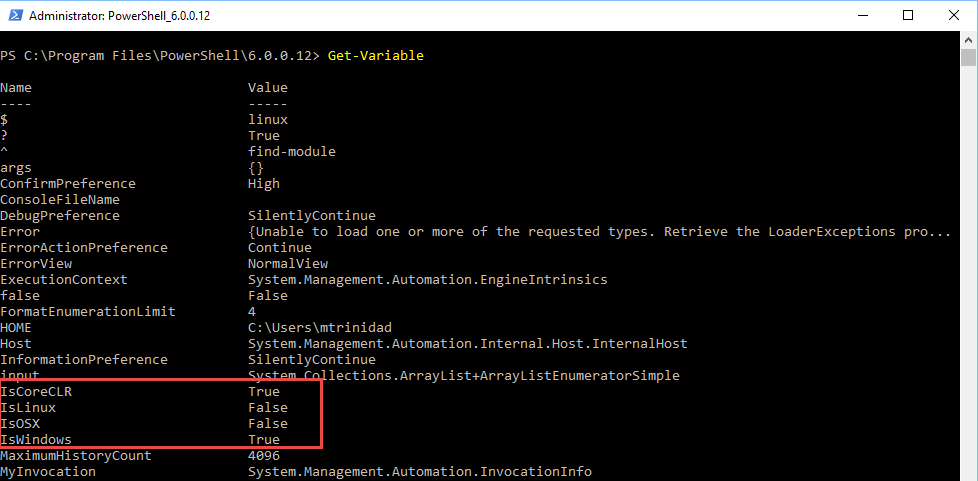
Next, is to take advantage of the new PowerShell Open Source variables:
– IsCoreCLR
– IsLinux
– IsOSX
– IsWindows

poshadv_02_2016-11-26_11-35-07

By just adding a conditional statement (“if”) to check which OS environment you are running the script. This makes it so convenient and portal across multiple OS environments.

Sample Script

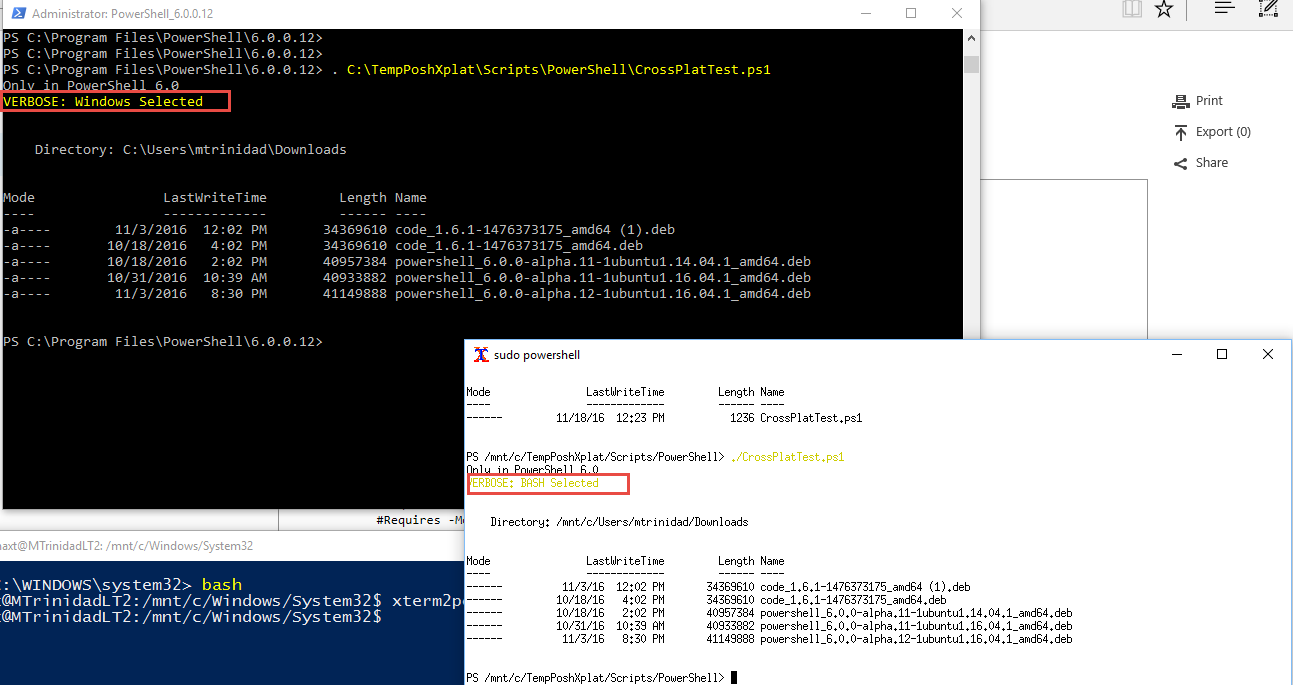
To demostrate, *here’s a sample script for searching Debian packages I use on my Window 10 and Linux systems:

[sourcecode language=”powershell”]
<# .NOTES =========================================================================== Created with: SAPIEN Technologies, Inc., PowerShell Studio 2016 v5.2.129 Created on: 10/31/2016 2:18 PM Created by: Maximo Trinidad Organization: PutItTogether Filename: CrossPlatTest.ps1 =========================================================================== .DESCRIPTION A description of the file. #>

#requires -version 6
function Get-DebianFiles
{
Param (
[string]$FileExtension = “*.deb”
)
write-host “Only in PowerShell 6.0”
if ($IsWindows -eq $true)
{
$PackageLocation = ‘C:\Users\mtrinidad\Downloads’;
Write-Verbose “Windows Selected” -Verbose;
};

if($IsLinux -eq $true)
{
$PackageLocation = ‘/mnt/c/Users/mtrinidad/Downloads’;
Write-Verbose “BASH Selected” -Verbose;
};

Get-ChildItem $PackageLocation -File -Filter $FileExtension -Recurse;
#exit
};

#. C:\TempPoshXplat\Scripts\PowerShell\CrossPlatTest.ps1

## Get-DebianFiles -FileExtension “*.deb”;
Get-DebianFiles -FileExtension “*.deb”;

## ———- end of scripts ———–##
[/sourcecode]

*Note: In order for the ” #Requires -Version..” statement to work, it need to execute from a script file *.ps1. The statement won’t work from inside a function.

The above script is required to run in PowerShell 6 because is using both new variables: IsWindows and IsLinux. Keep in mind, this sample have hardcoded path to where I’ve stored my debian packages and it can be improved more.

poshadv_04_2016-11-26_11-35-07

poshadv_03_2016-11-26_11-35-07

There still a lot of work to be done in both Windows 10 Bash and PowerShell Open Source. The variables to properly identify the OS in non-Windows system hasn’t been implemented yet. But, it will be available sometime soon.

In the meantime, keep exploring, testing, and contributing in Github!
https://github.com/PowerShell/PowerShell

SAPIEN PowerShell Studio – Simple sample using ComboBox in forms

sapienstudio_00_2016-11-11_14-44-34

The Form

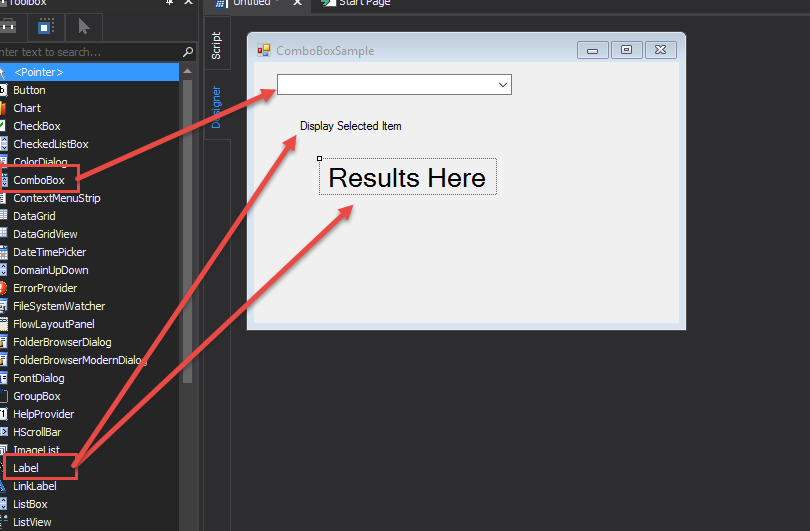
This is a simple form showing the ComboBox component using PowerShell Studio.

sapien_cb_01_2016-11-24_9-16-05

sapien_cb_02_2016-11-24_9-16-05

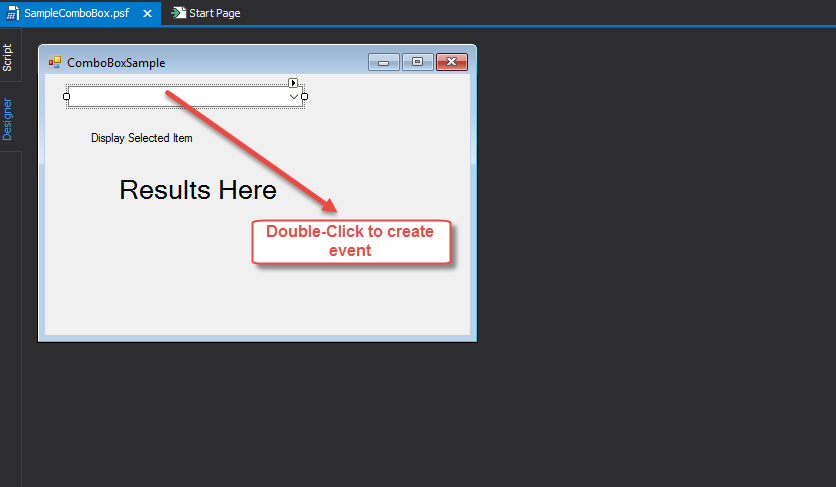
For this sample I’m using a Simple Form in order to add components to it. In this case a ComboBox Component. At the same time we are adding a Label Component which I will use to display the selected item from the ComboBox.

sapien_cb_03_2016-11-24_9-16-05

The Code

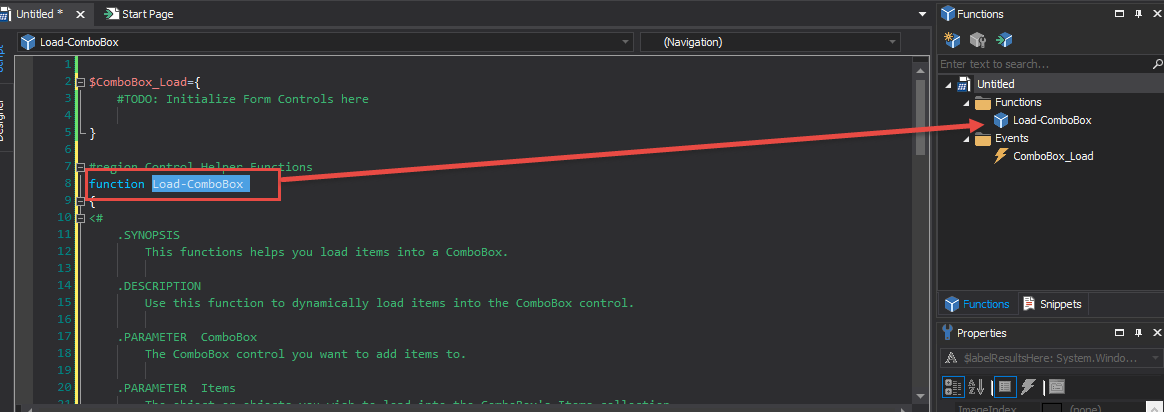
Notice in the “Script” pane, when you create the form and added the ComboBox, it will also add a new function: “Load-ComboBox“.

sapien_cb_04_2016-11-24_9-16-05

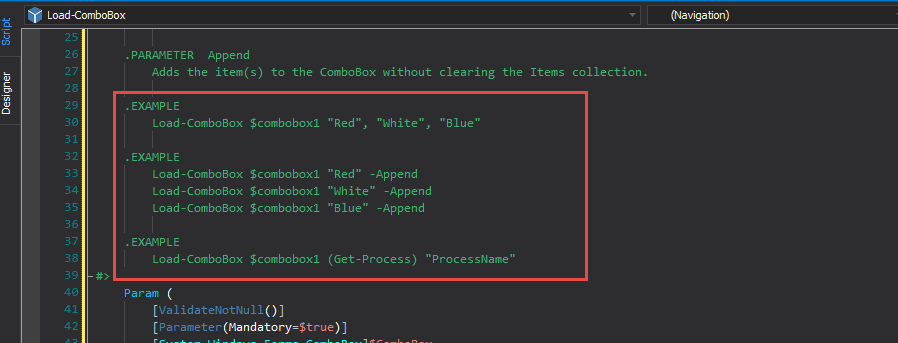
This function,m under commented help, will give you examples on how to load items into the ComboBox component for the form to use.

sapien_cb_05_2016-11-24_9-16-05

This will make your life easy while building your forms.

But, you can provide your own script code to populate the component. Here’s an example code snippet:

[sourcecode language=”powershell”]
## – Custom Code to Load into ComboBox:
[array]$lstItems = ("Server1", "Server2");
$cbPickLstItems.Items.Clear();
$cbPickLstItems.Items.AddRange($lstItems);
$cbPickLstItems.Text = $lstItems[0].ToString();
[/sourcecode]

Of course, you can put the code into a function to keep consistency across the application.

Next, would be to create the code to add items into the ComboBox and compile the application. This code will be added into the “$ComboBox_Load” event. I’m using the SAPIEN already provided “Load-ComboBox” function.

sapien_cb_06_2016-11-24_9-16-05

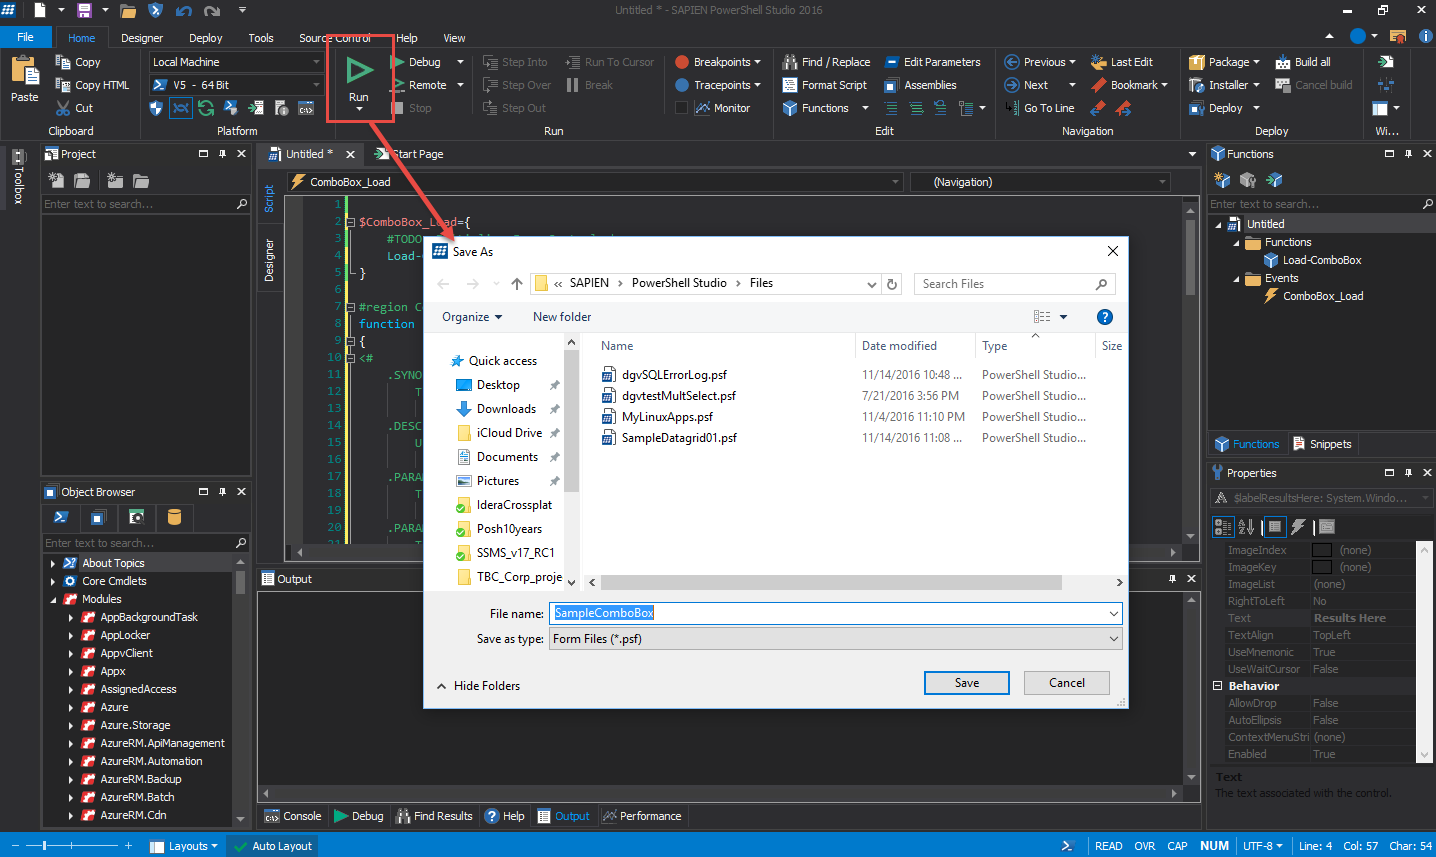
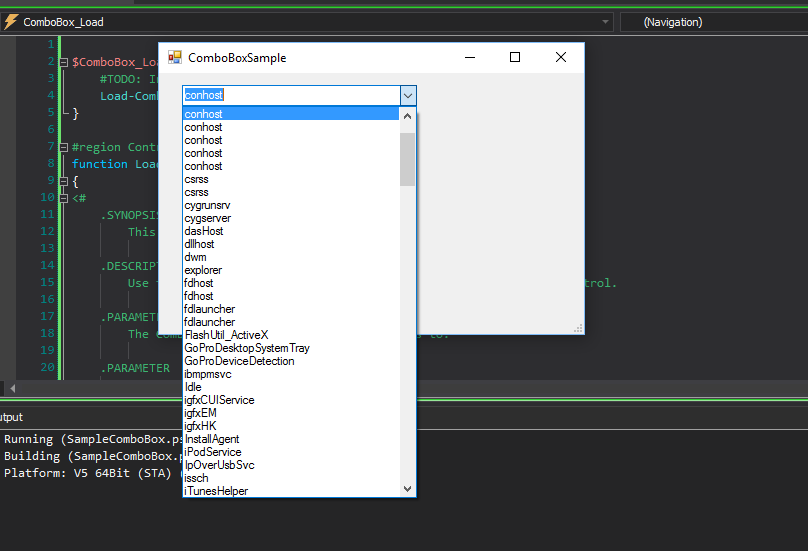
Now, just run the application, save, and see the results.

sapien_cb_07_2016-11-24_9-16-05

sapien_cb_08_2016-11-24_9-16-05

sapien_cb_09_2016-11-24_9-16-05

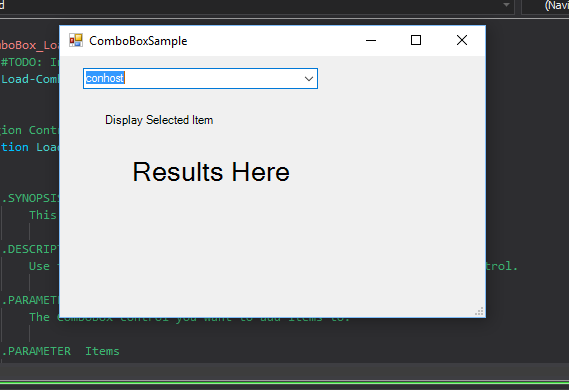
The code we provided will only select the item. You’ll notice the results is not displayed yet.

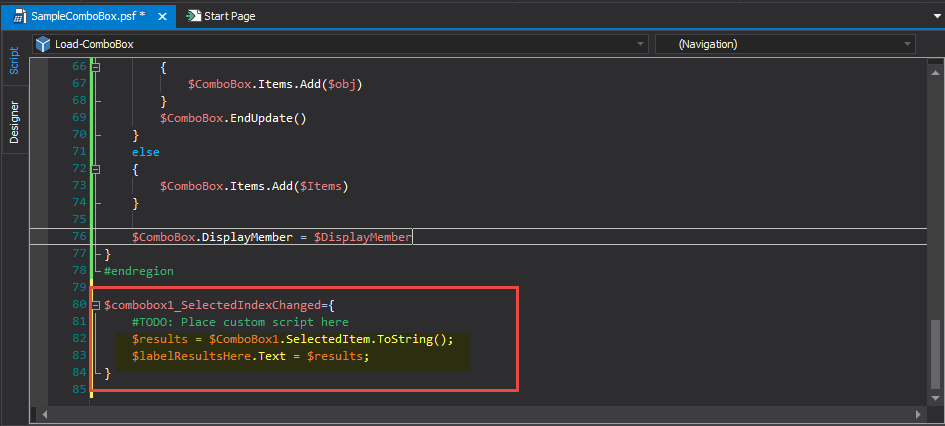
In order to display the selected item we need to add another event called “.._SelectedIndexChanged“.

In order to create this event, go to the form and double-click on the ComboBox component and then we add the following code in the “$combobox1_SelectedIndexChanged” event.

[sourcecode language=”powershell”]
$results = $ComboBox1.SelectedItem.ToString();
$labelResultsHere.Text = $results;
[/sourcecode]

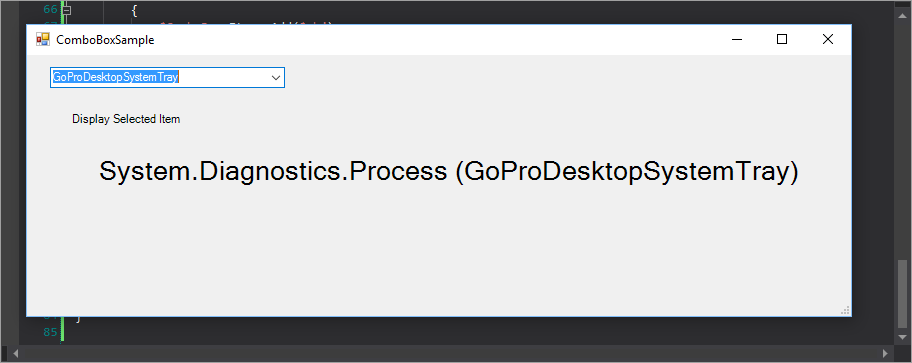
Then, run the application event and we finally see the displayed selected results.

sapien_cb_10_2016-11-24_9-16-05

sapien_cb_11_2016-11-24_9-16-05

sapien_cb_12_2016-11-24_9-16-05

It’s always fun to build quick apps with PowerShell Studio!

PowerShell – OneDrive Script Editing Available

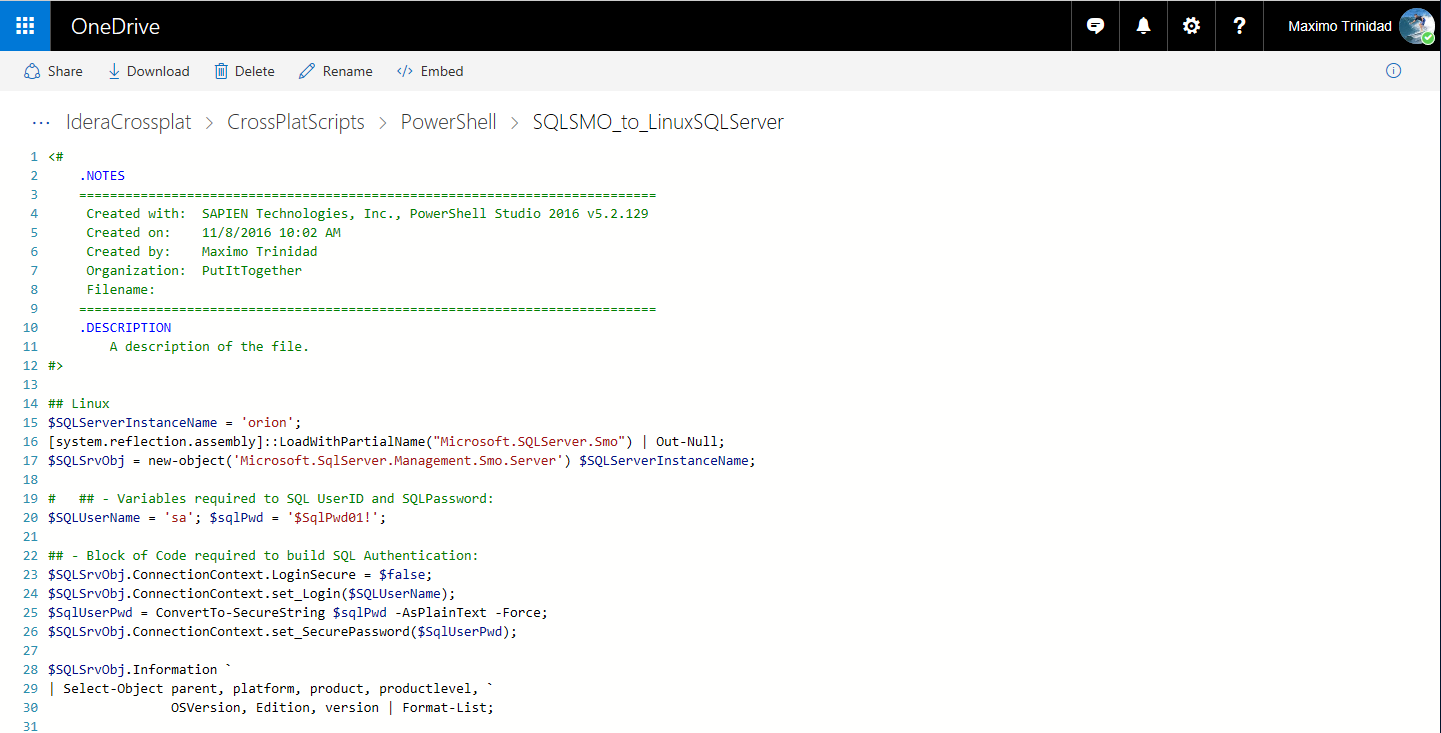
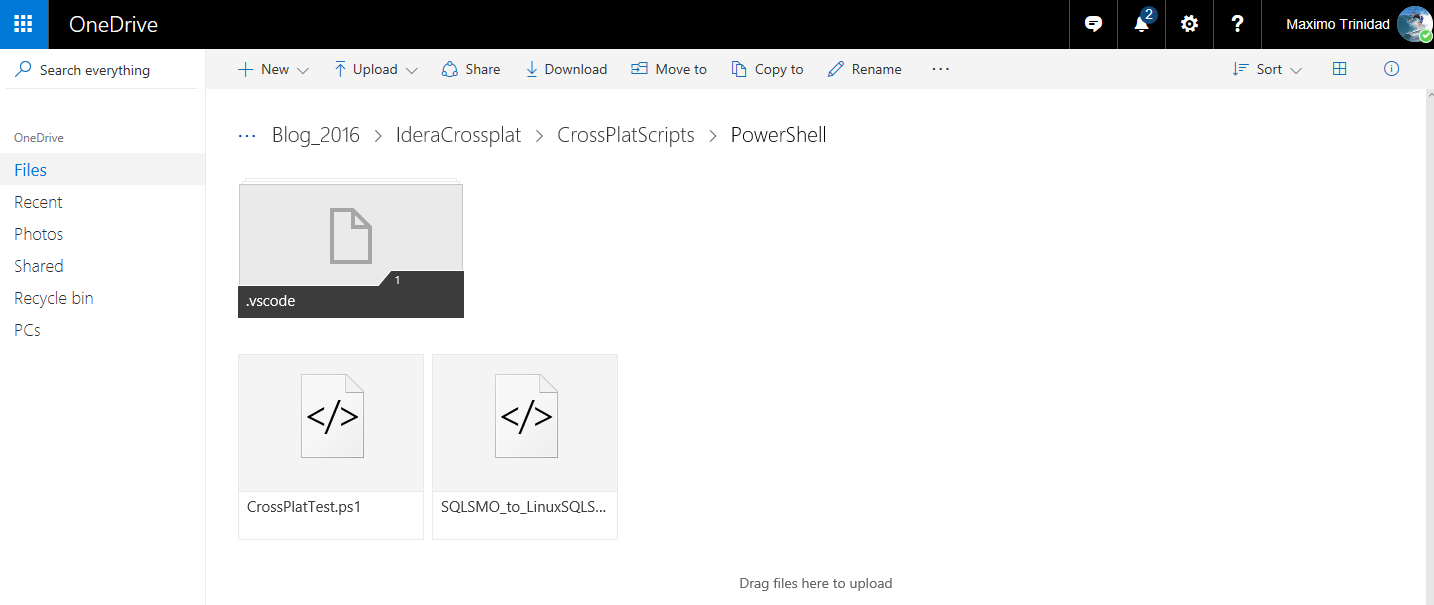
In case you didn’t know, you can edit PowerShell scripts in your OneDrive folder. This makes it ideal for saving your code in the cloud and then access the scripts when needed from anywhere.

psonedrive_01_2016-11-23_19-07-05

psonedrive_02_2016-11-23_19-07-05

You can be very creative, and specially if working across plaform.

Check it out! Give it a try. The only thing you need is to have a Microsoft Outlook web account.

Feel free to experiment!

psonedrive_03_2016-11-23_19-07-05

PowerShell – SSMS v17 RC1 changes in SMO support for SQL Server vNext

v17_rc1_ssms

Download available now. Get it here:
https://msdn.microsoft.com/en-us/library/mt238290.aspx

Yes! The SQL Server Management Studio v17 RC1 is the one updated for SQL Server vNext on Linux. This version brings new properties in SMO object to properly identify SQL Server vNext. So, using previous version of SMO object under Information collection won’t give you the correct information.

wrongplatformgui_2016-11-08_18-29-36

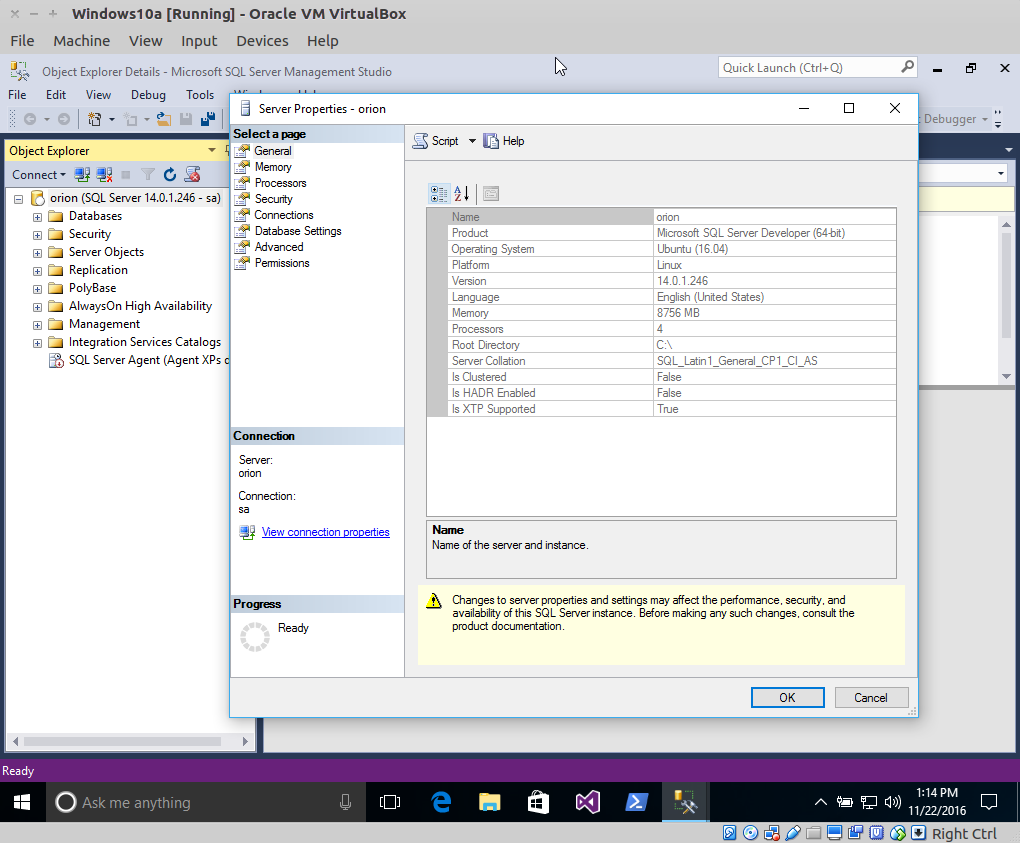
When using SSMS v17 RC1 you’ll get the correct information:

ssms_rc_linux

Also, you will notice the following properties added to the SMO Object “Information” class. Running the following command will give you the total count of properties on the “Information” Class:

[sourcecode language=”powershell”]
($SQLSrvObj.Information | gm -MemberType Properties).count
[/sourcecode]

1. On SQL Server 2014 – “Information” Class has 47 properties.
2. On SQL Server vNext – “Information” Class has 54 properties.

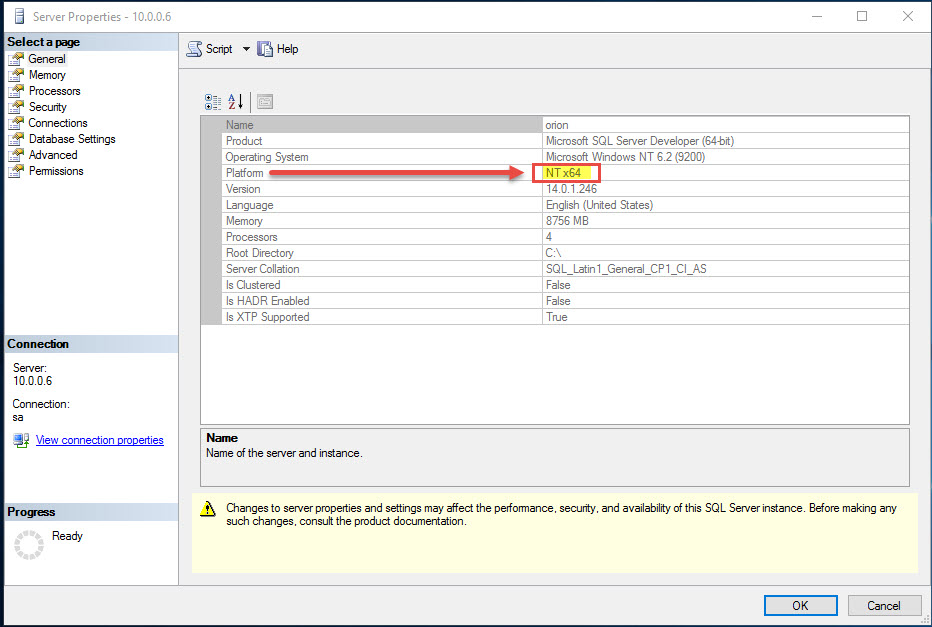
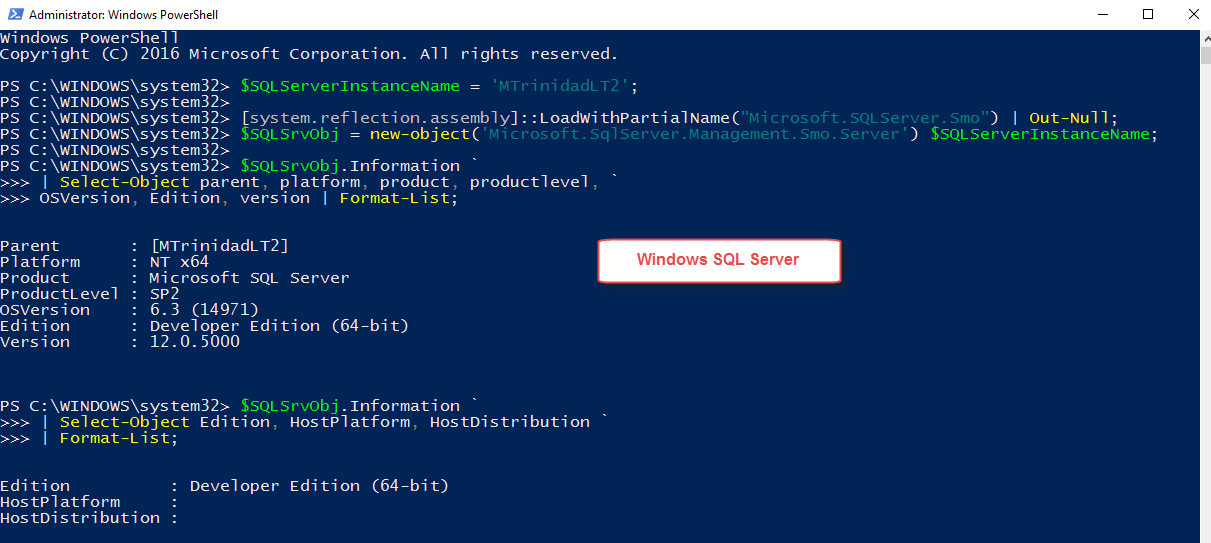
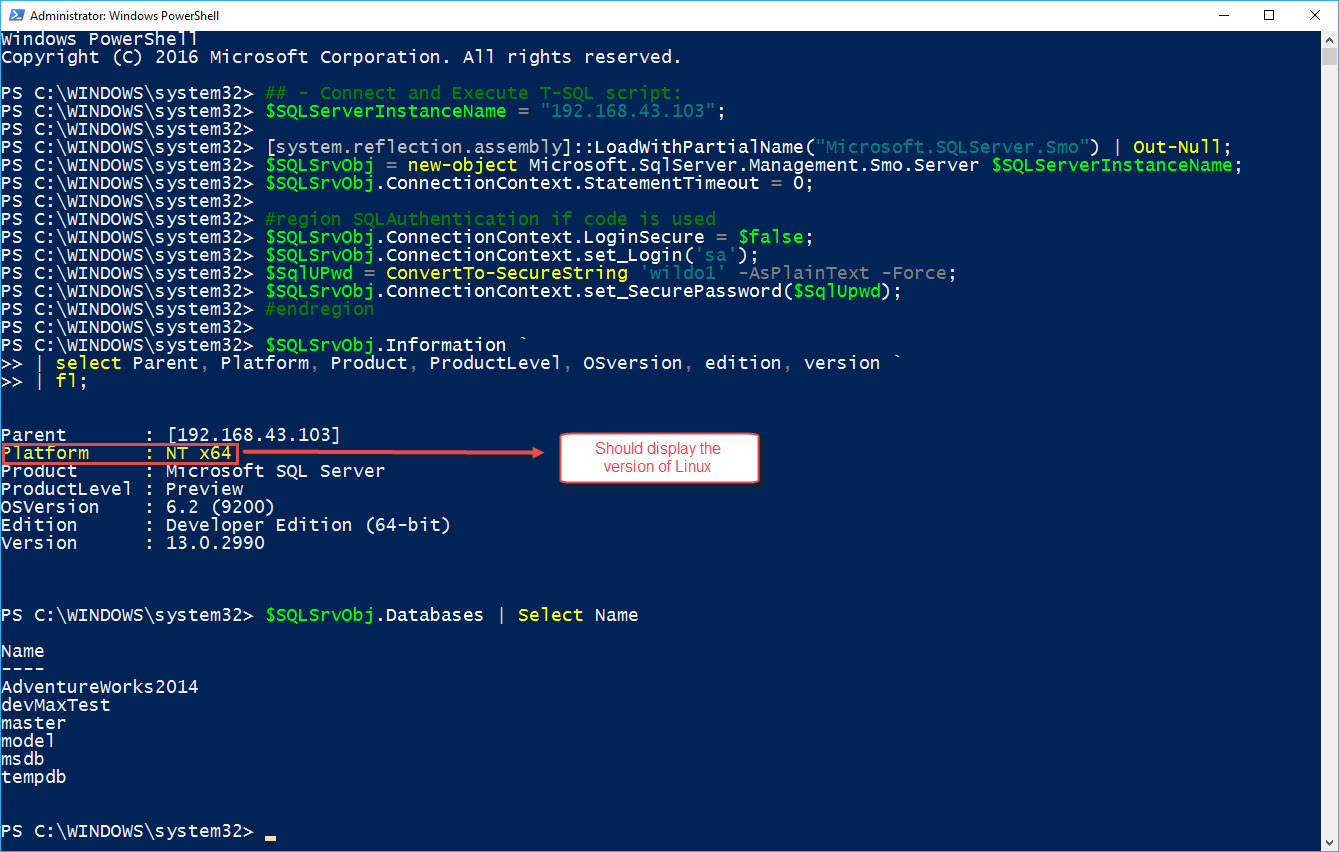
Using a previous version SSMS, in SMO, if we use the “Platform” property to identify a Windows machine as “NT x64”, this won’t work on a Linux machine. it still will show “NT x64” even in the GUI.

powershell2sqlwindows

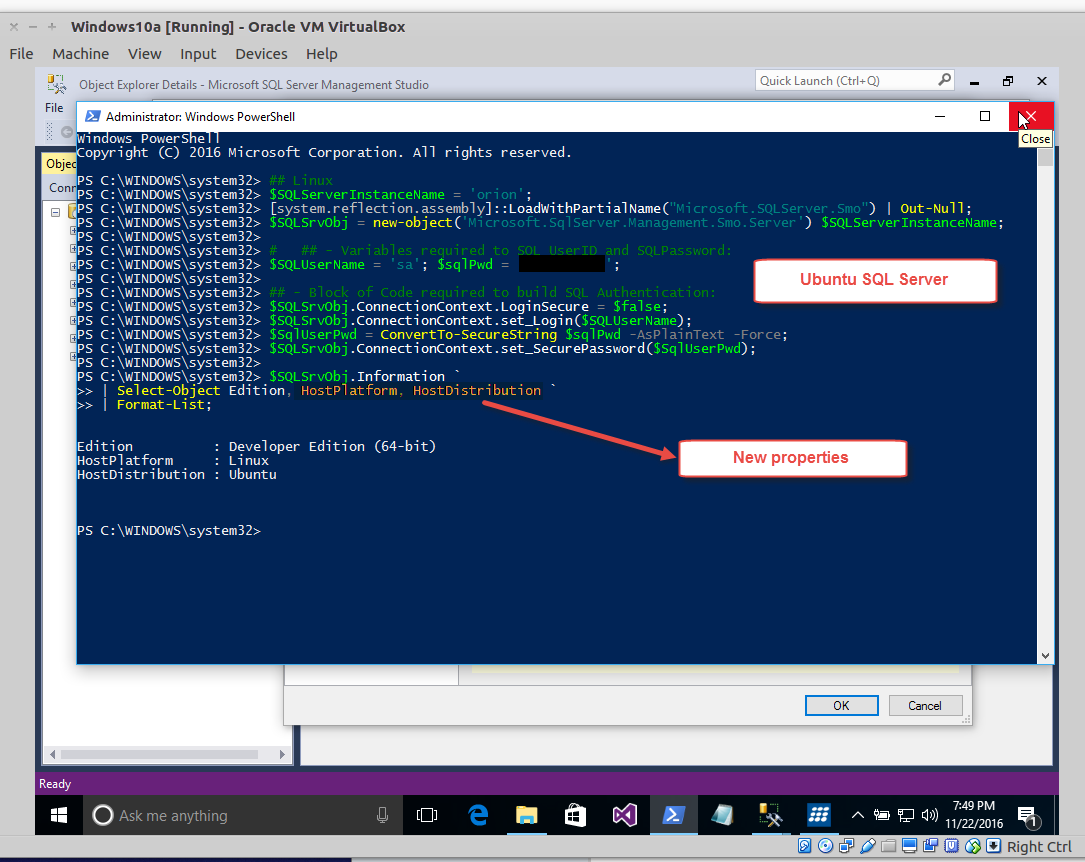
This is why we need to use SSMS v17 RC1. This have the needed changes to SMO to properly identify the Linux platform correctly.

powershell2sqllinux

Below is the list of added properties in the SMO “Information” class:

DatabaseEngineEdition
DatabaseEngineType
HostDistribution
HostPlatform
HostRelease
HostServicePackLevel
HostSku

As you can see, we’ll need to revisit our customs SMO scripts if you need do inventory on our SQL Servers on our infrastructure.

Remember! The fun never stop when you’re learning new stuff!

SQL Server for Linux Cross-Platform Database Restore

Now that SQL Server vNext for Linux CTP1 is available, you want jump in and test you installing existing databases. You may want to use databases with compatibility to SQL Server 2012 and greater. As I’m not a full Linux Admin but this opportunity to setup and use SQL Server on Linux definitely has help stepup to learn about Linux OS.

sqlservervnext_2016-11-16_12-38-22

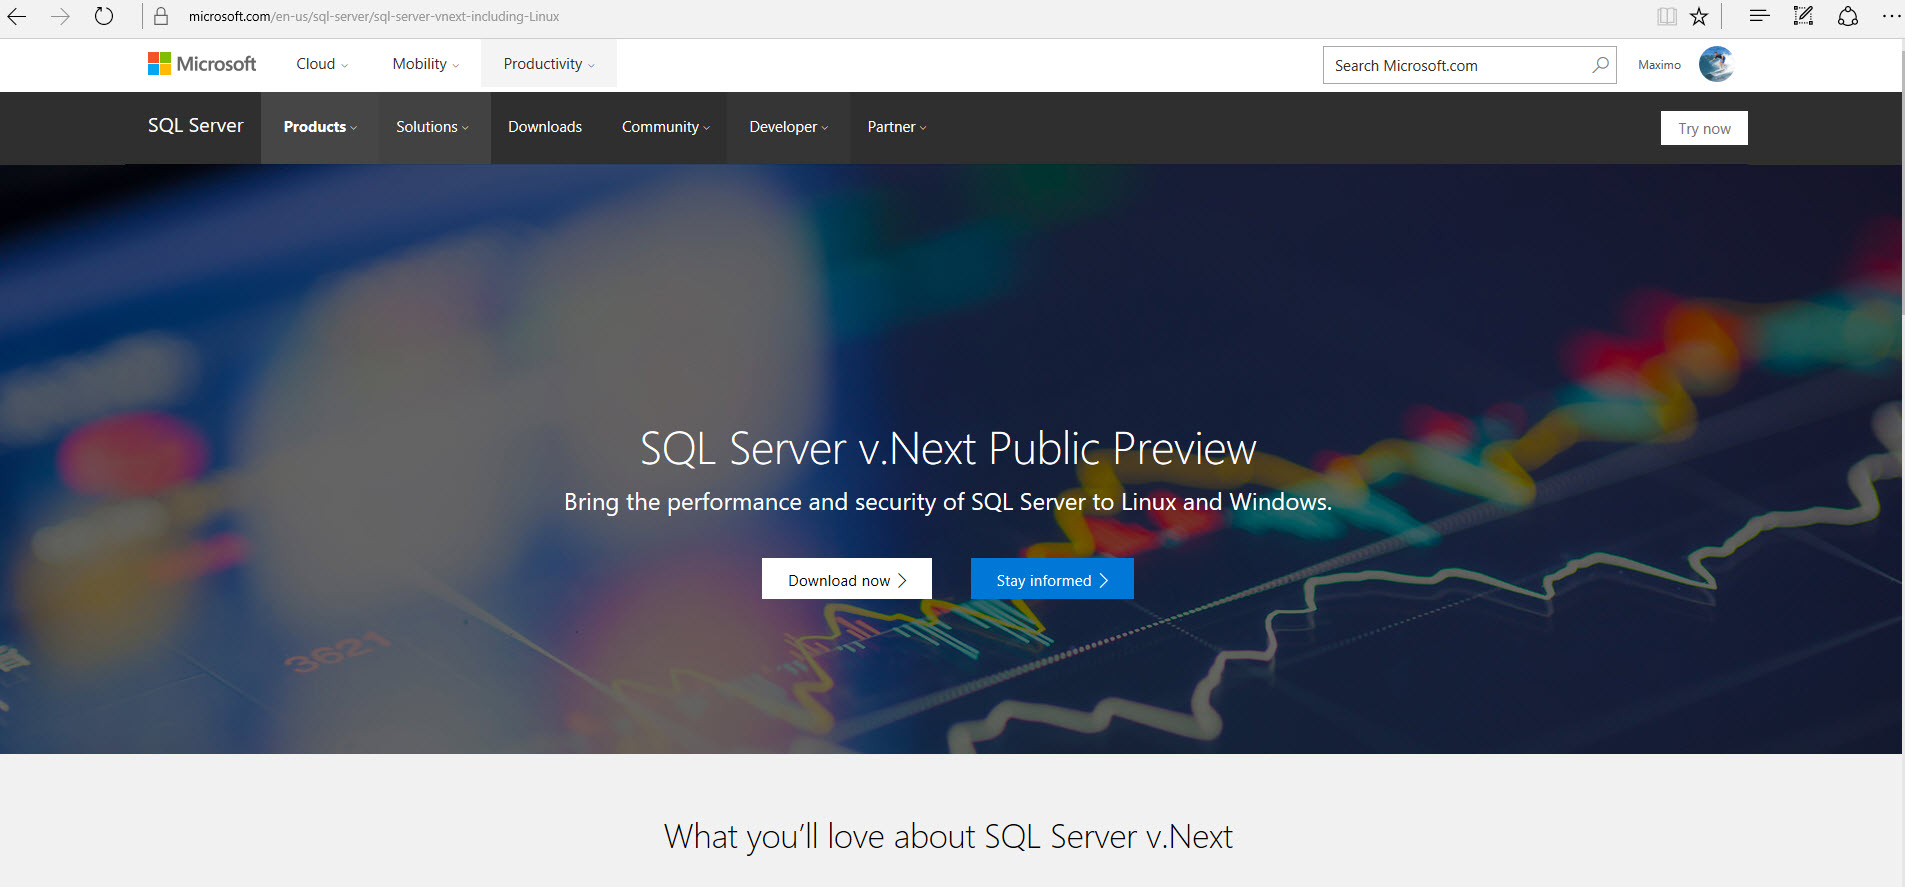
Check out Microsoft SQL Server vNext for Linux page:
https://www.microsoft.com/en-us/sql-server/sql-server-vnext-including-Linux

So, before you start working or trying to restore your Windows SQL Databases to SQL Server on Linux, there are a few things you may need to do. This will involved installing components which are not installed by default when first build your Linux System.

One thing I had to say with confidence! You WILL find all your answer on the internet. Any of the Linux Distro forum have your resolution to any of the issue you may encountered. Also, most of the time you Linux system will tell you (or gives a tip) what do with missing dependencies.

Other than that, there are Linux Application Updater solution to help keep your system up-to-date.

mslinux

Here’s some tips on what’s needed to connect Windows to Linux shared folders in Ubuntu LTS 16.04.1

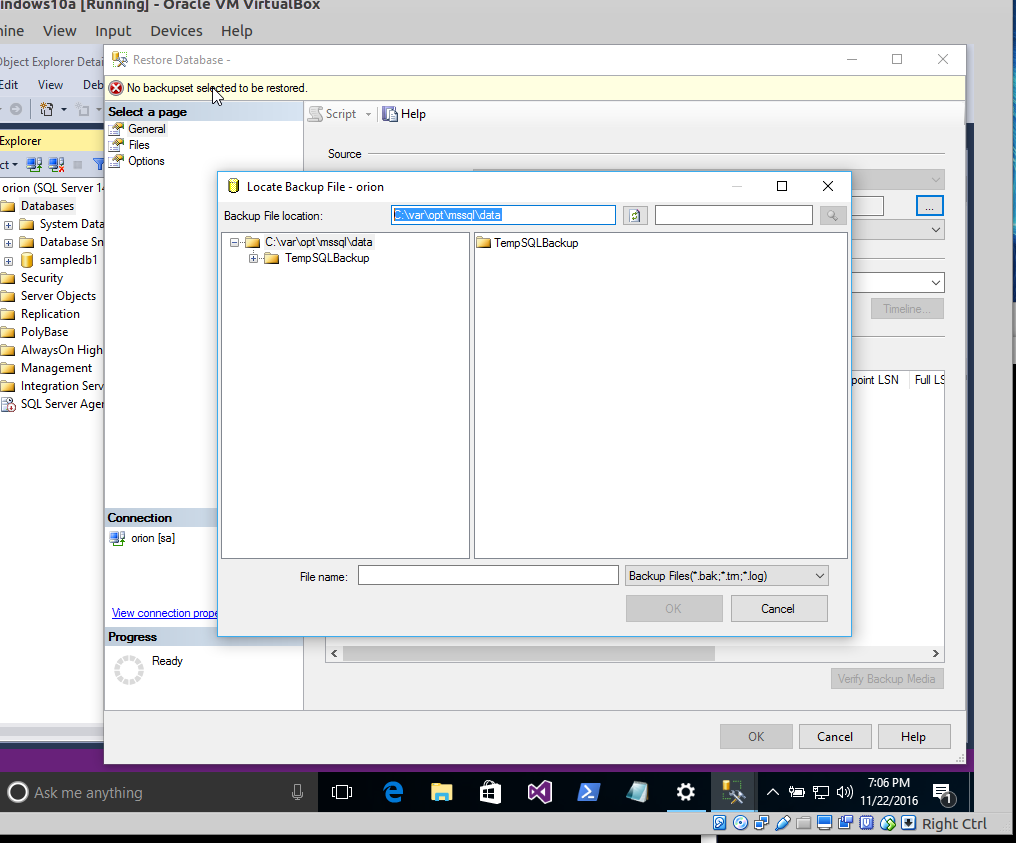
1. understand your SQL Server database Linux path – as you may know this is totally different than you Windows database location. In Linux, your databases will be preferably stored at ‘var/opt/mssql/data‘ which ti will be seem on SSMS as ‘C:\data’ folder and this may change on later builds.

Linux path to SQL Databases = ‘var/opt/mssql/data

Windows in SSMS shows Linux path as = ‘C:\var\opt\mssql\data’  (path corrected for SQL Server CTP1)

ctp1_datafolder

2. Create a Windows Shared folder – This one is easy to do using the Windows Explorer. But, you will need to play with assigning permission. To speed up the processes (for testing) use “Everyone” with Read-Only.

winshared_01_2016-11-18_10-57-56

3. Creating a Linux Shared folder – You could use bash ‘sudo nautilus’ to create the folder using GUI. Or, straight command line:

[sourcecode language=”bash”]
$ sudo su
# mkdir /var/opt/mssql/data/TempSQLBackup
# chmod 777 TempSQLBackup
[/sourcecode]

4. Install Linux application/Libraries/Dependencies – As I mention before, the internet will provide answers to any issues. Here I will provide some to the point solutions:

a. Install samba:

[sourcecode language=”bash”]
$ sudo apt-get install samba
[/sourcecode]

b. *Add your domain name(or workgroup) to samba configuration:

[sourcecode language=”bash”]
$ sudo gedit /etc/samba/smb.conf
[/sourcecode]

*note: Look for -> workgroup = WORKGROUP (or Domain)

c. Restart samba process:

[sourcecode language=”bash”]
$ sudo service smbd restart
[/sourcecode]

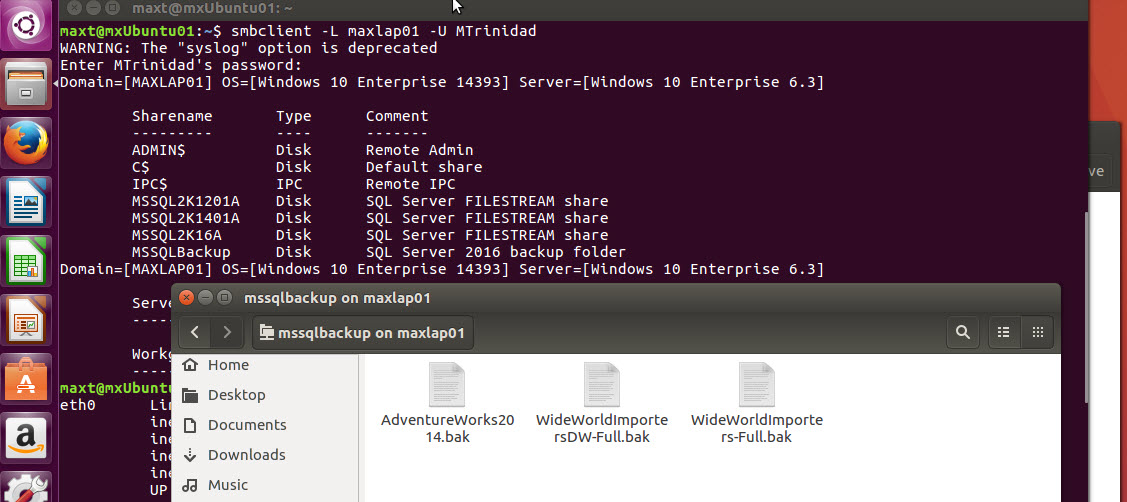
5. Testing Linux can see the Windows Shared folder – Use this command:

[sourcecode language=”bash”]
$ smbclient -L IPAddr_or_Sysname -U UserName
[/sourcecode]

windowssharefolder_linux

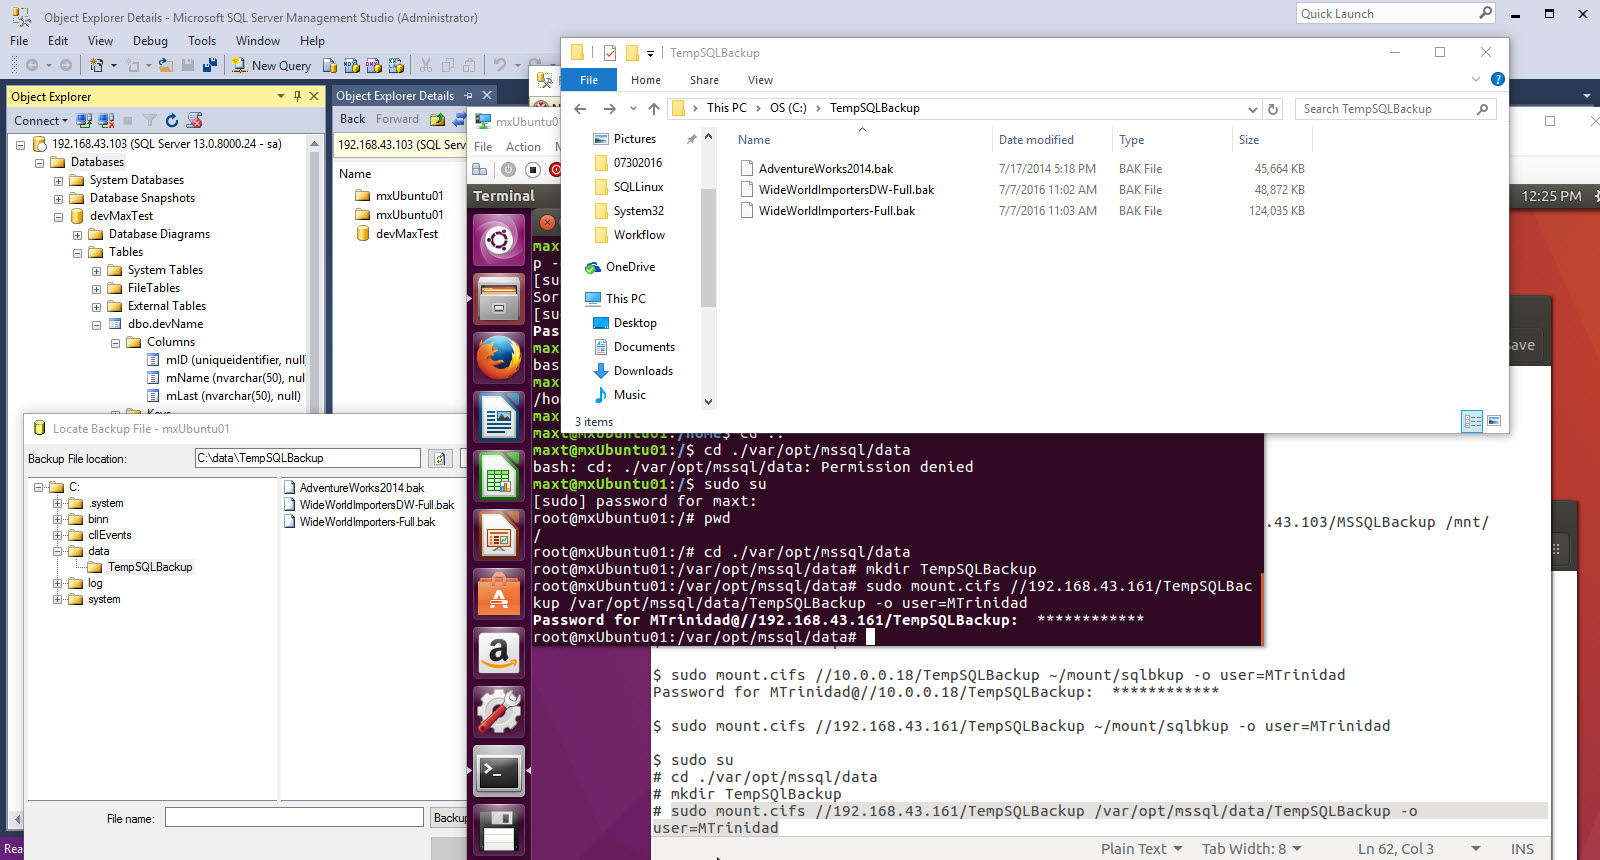
5. Connect to your Linux to Windows Shared folder command: (It will prompt for the user password)

[sourcecode language=”bash”]
$ sudo mount.cifs //10.0.0.31/TempSQLBackup /var/opt/msql/data/TempSQLBackup -o user=max_t
[/sourcecode]

6. Verify you can see the windows backup files on Linux. (use nautilus or bash command)

sqllinux_xplatrestore_01_2016-08-01_12-25-16

Now, we can successfully restore a database from a Windows Shared folder. No need to FTP your Windows backup to Linux FTP site.

Using PowerShell

From your Windows client, Using PowerShell to restore your Windows Database Backup to Linux.  Using the SQL PowerShell cmdlet “Restore-SQLDatabase” available when installing SQL Server Management Studio.
Here’s a sample script:

[sourcecode language=”powershell”]
Restore-SqlDatabase -ServerInstance orion -Database AdventureWorks2014.bak -BackupFile “C:/data/TempSQLBackup”;
[/sourcecode]

Keep in mind, for now you can manage your “SQL Server vNext for Linux” (up to some extend) using either the existing SQL PowerShell cmdlets or buidling your own PowerShell scripts with SMO.

Here’s an example using SMO:

sqllinux_platformmistake_2016-08-17_13-38-44

In above sample, although I have connected to a SQL Server Linux engine, the platform still showing as “NT x64”.  This issue has been addressed and will be corrected soon.

So, try running your Windows PowerShell scripts against your SQL Server Linux systems.

Keep Learning PowerShell!!

SQL Server vNext for Linux CTP1 is available now.

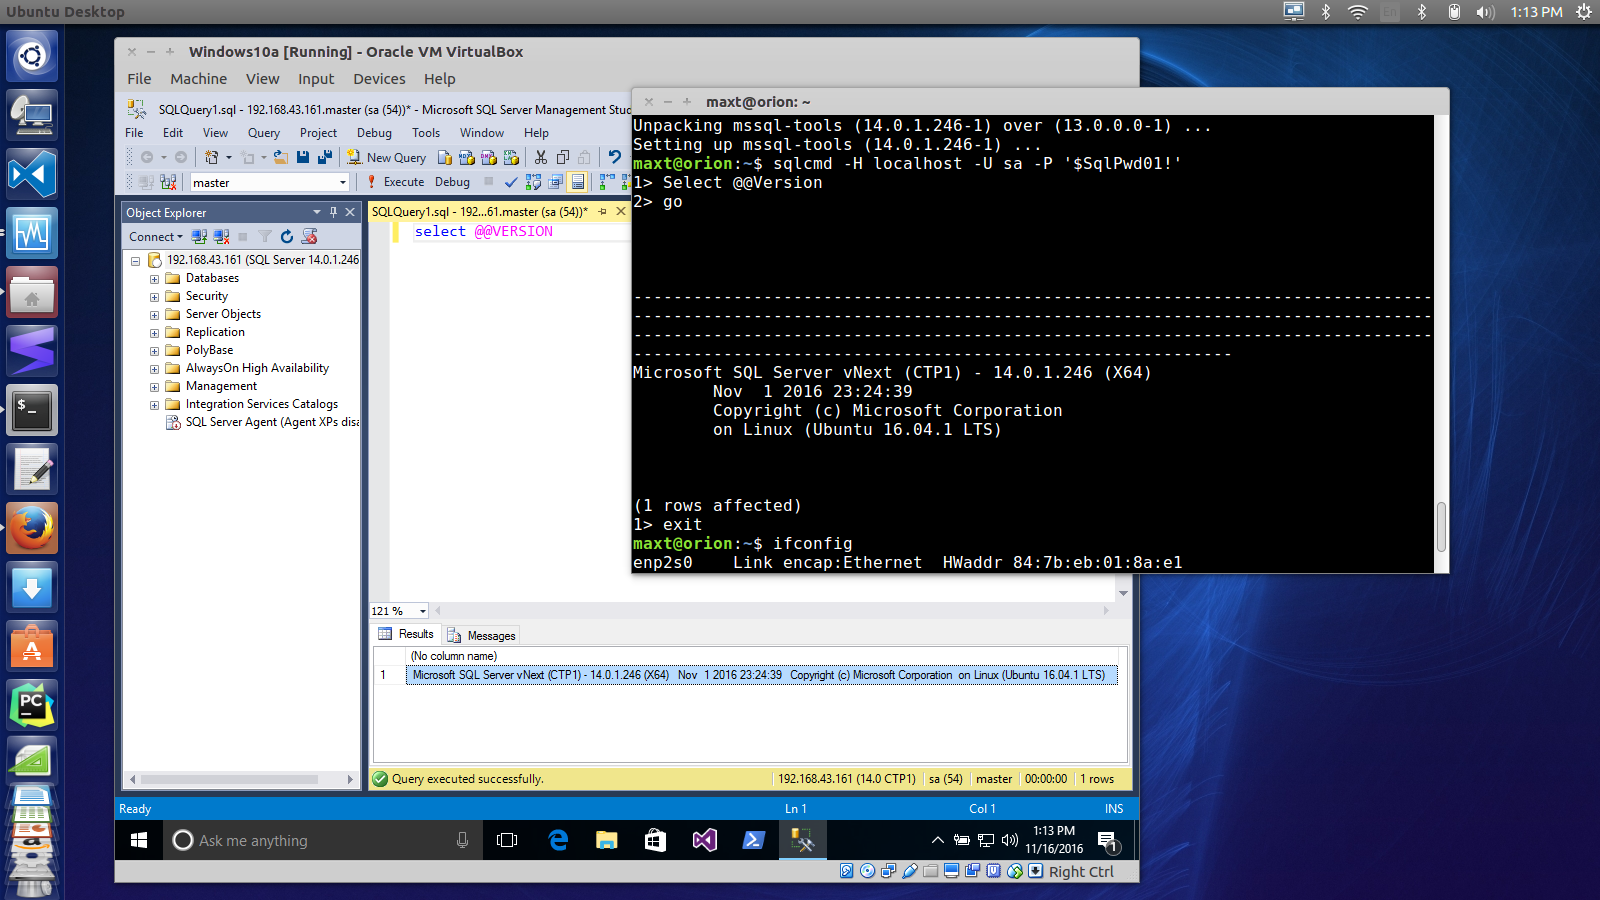
Yes! The doors are finally open for all interested in trying SQL Server for Linux. This is the first preview version and there are more to come. This was announced at the Microsoft Connect() event today.

sqlservervnext_2016-11-16_12-38-22

Go to this Link which is very well documented and download SQL Server for you Linux Disto:

https://www.microsoft.com/en-us/sql-server/sql-server-vnext-including-Linux#resources

You can start connecting to your Linux version using the latest SSMS and even use PowerShell from your Windows desktop.

screenshot-from-2016-11-16-13-13-56

Go and Get It!

SAPIEN PowerShell Studio Deploying Your Application

sapienstudio_00_2016-11-11_14-44-34

In our previous blog we build a GUI application and created the executable file using either the “Build” or “Build & Run” option under the “Deploy | Packager” section.

sapiendgsimply_04_2016-11-14_14-14-52

Although, this is optional, we could have created an MSI installer which will produce all the necessary steps to deploy the GUI application.

The flow to build your MSI installer would be:

1. “Deploy | Installer” – “Settings” – To enter all the information needed about this GUI application.

sapien_deploy_07_2016-11-15_13-18-25

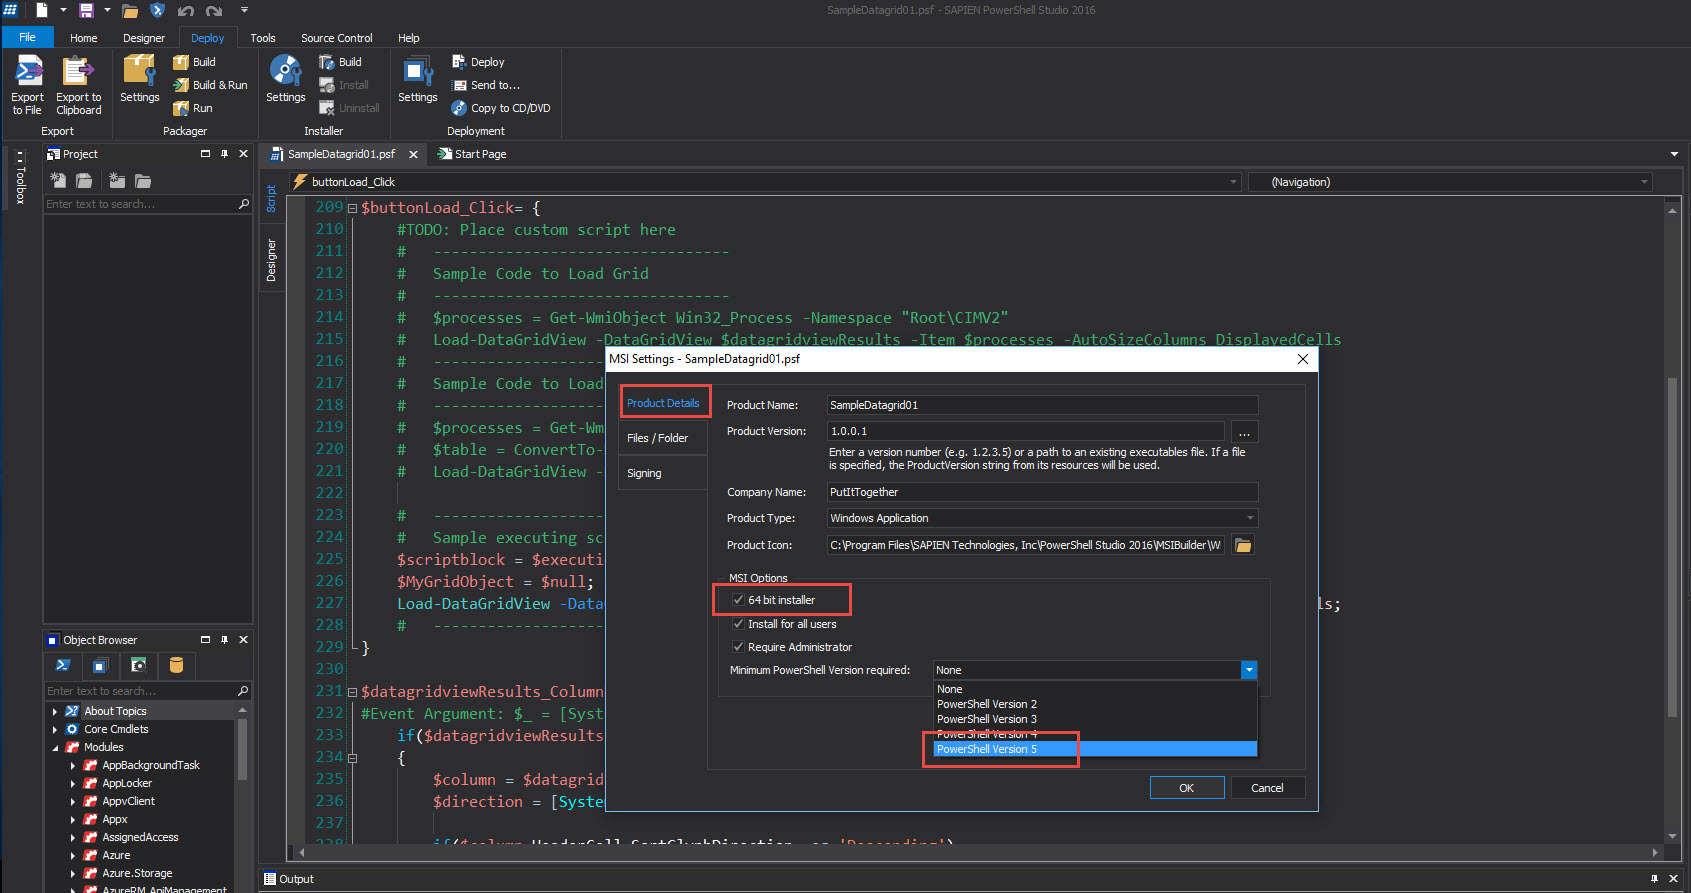
2. Under “Product Details” – Describes your application in details. Notice you can chose any PowerShell version available.

sapien_deploy_01_2016-11-15_13-18-25

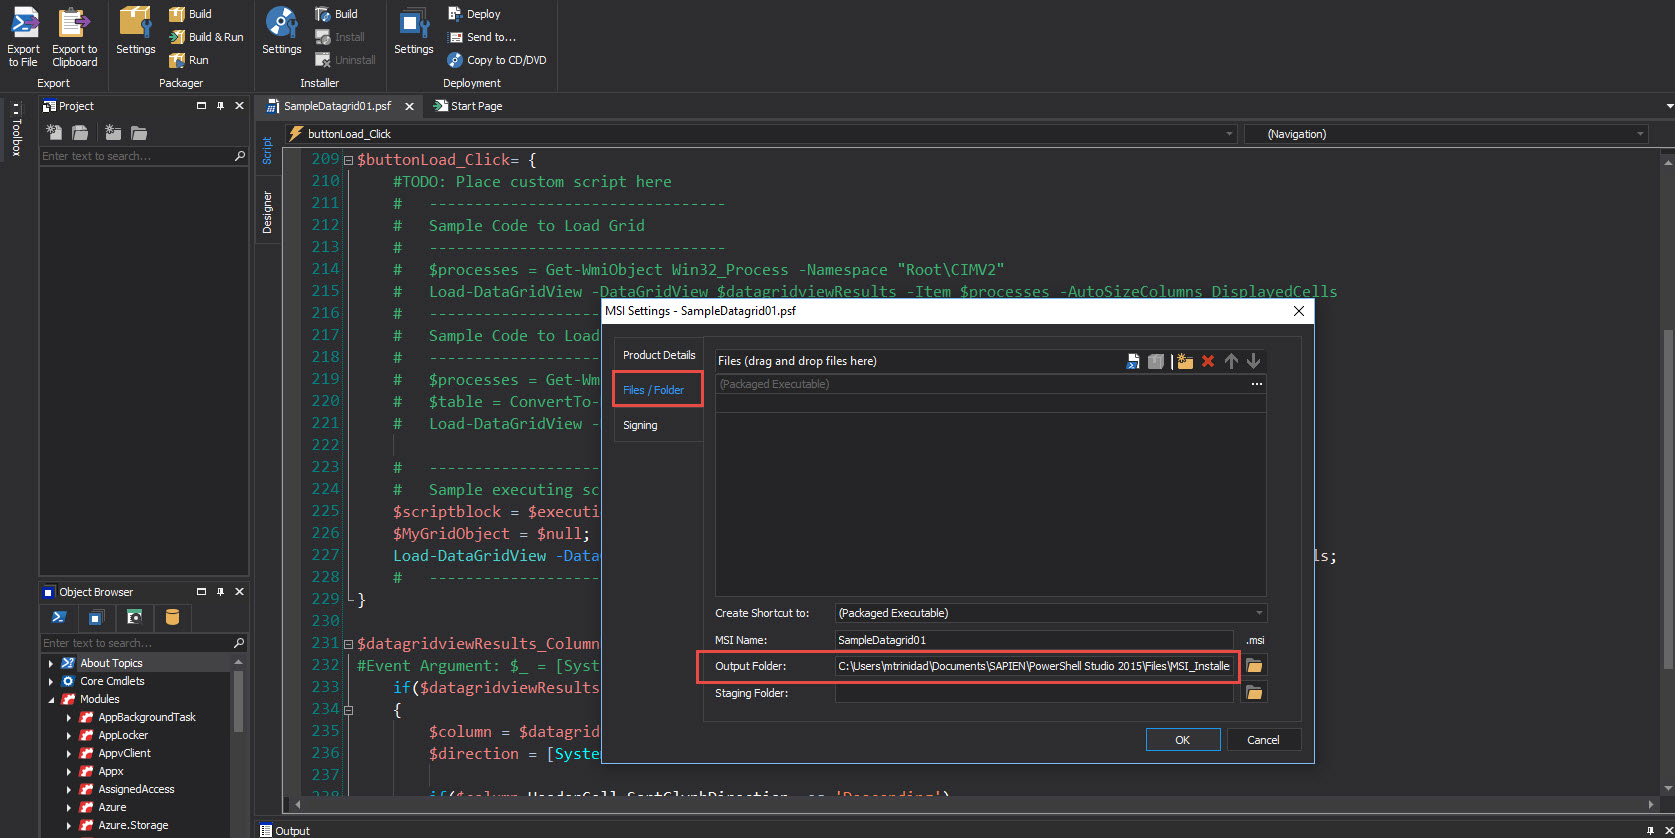
3. “Files/ Folder” – This section will set where your MSI files will be stored. You can add more resource file with it.

sapien_deploy_02_2016-11-15_13-18-25

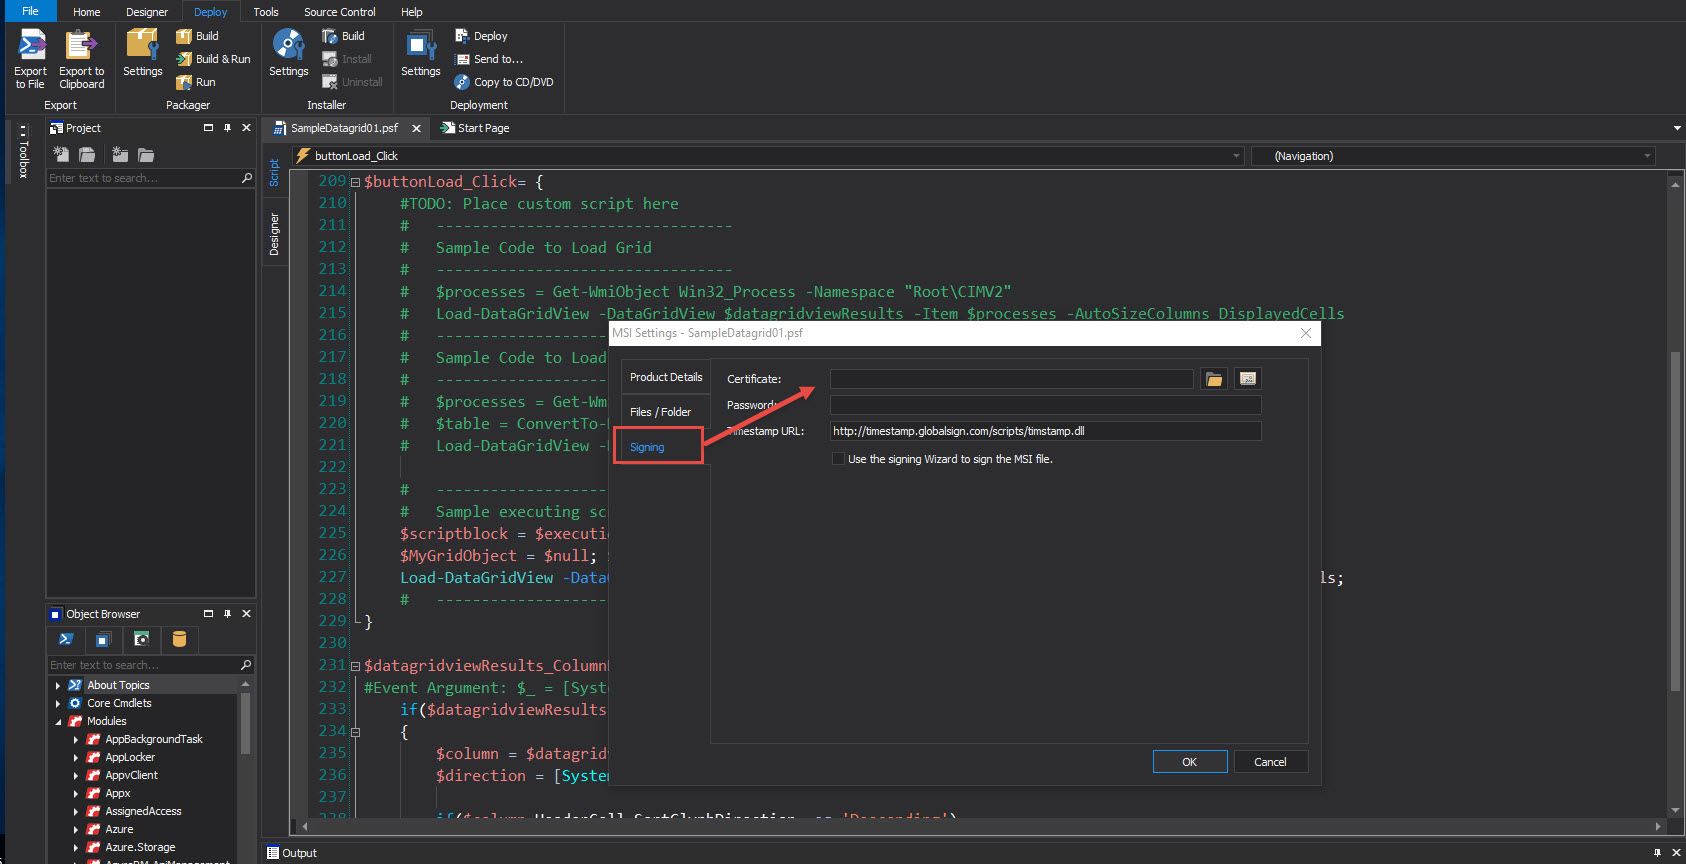
4. “Signing” – (optional) Only if you want to sign your application solution with your signed certificate.

sapien_deploy_03_2016-11-15_13-18-25

After everything under setting has been configured, proceed to “Build” the installer.

sapien_deploy_04_2016-11-15_13-18-25

Now, we have created the GUI application MSI installer which can be distributed to other machines.

What about application “Deployment“?

sapien_deploy_08_2016-11-15_13-18-25

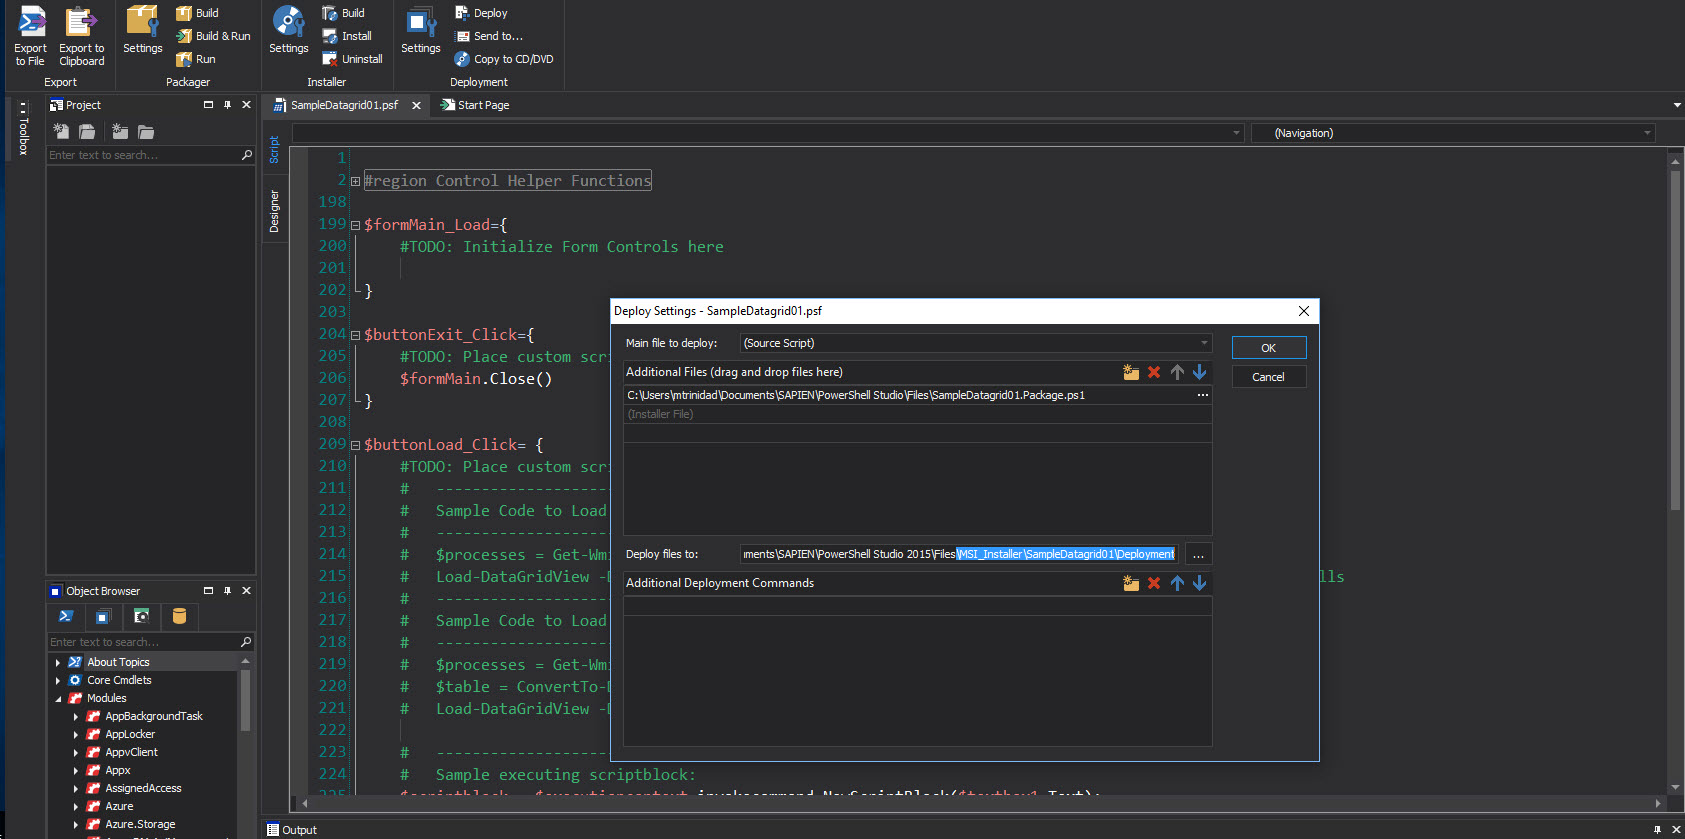
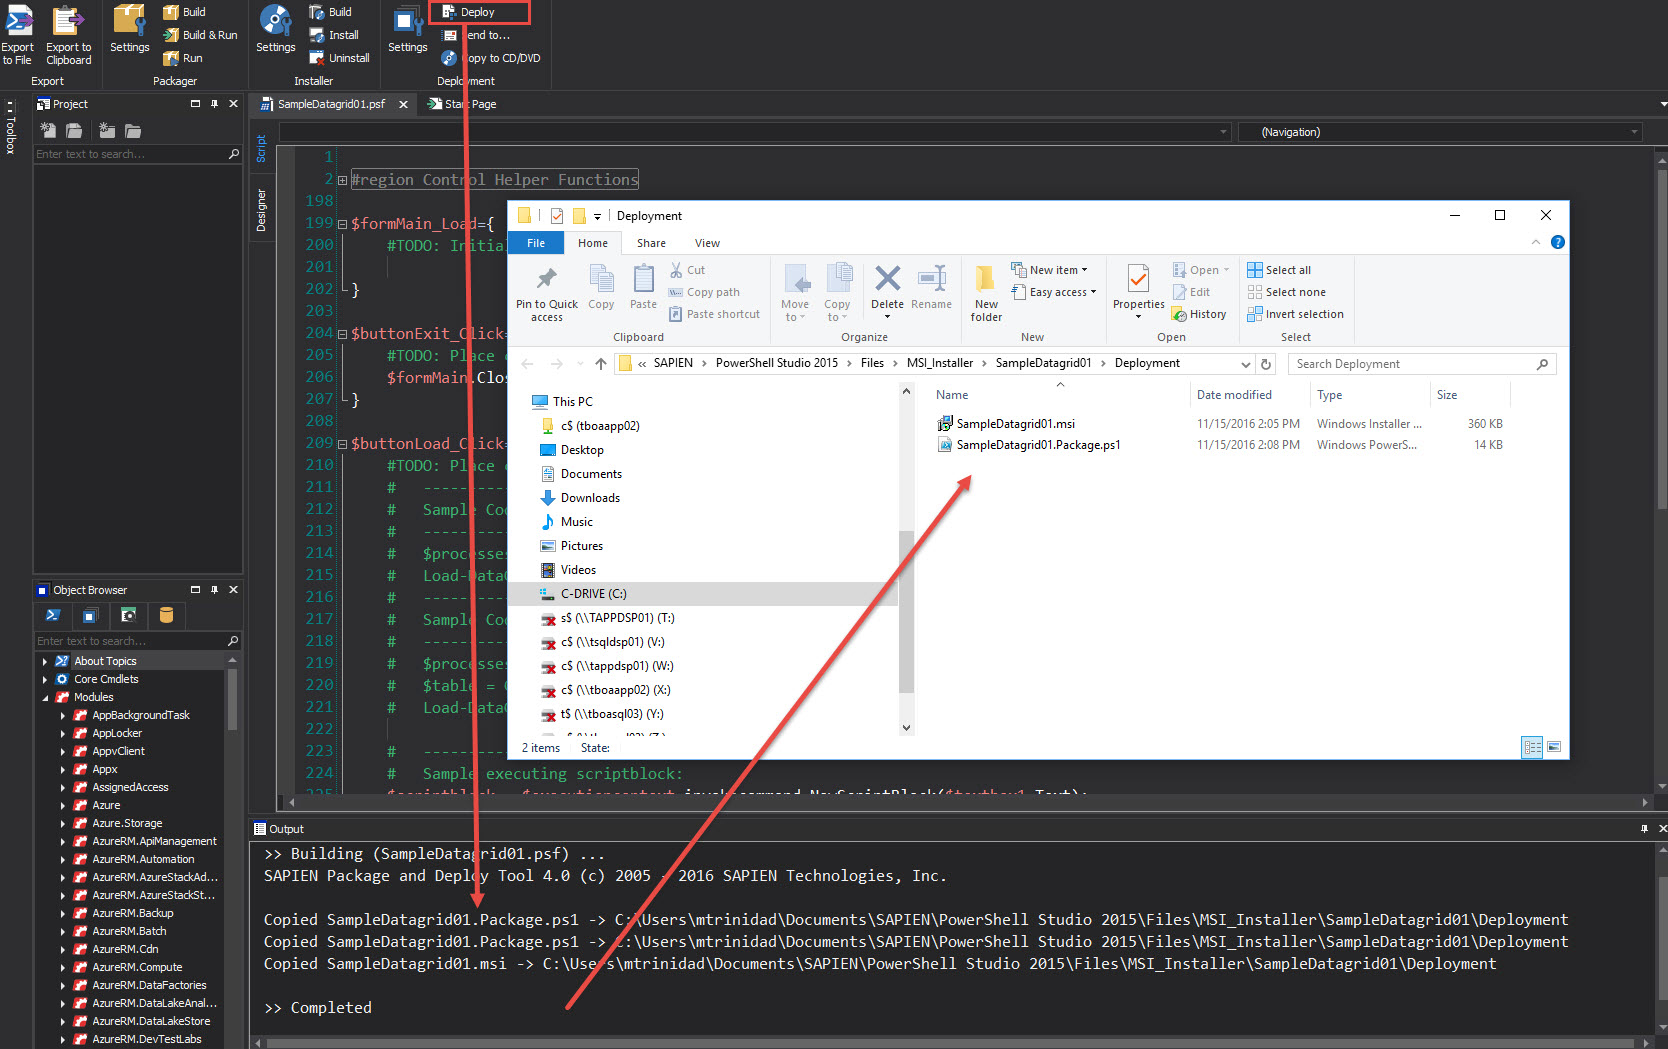
Under the “Deployment” section, basically we can use it to collect all the script files and store documentation to be deploy somewhere on the network or media device.

sapien_deploy_05_2016-11-15_13-18-25

sapien_deploy_06_2016-11-15_13-18-25

PowerShell Studio is a RAD full developer solution for PowerShell development:

Download the product for a evaluation:
https://www.sapien.com/software/powershell_studio

More information about PowerShell Studio:
https://www.sapien.com/assets/pdf/PowerShell_STUDIO.pdf

SAPIEN PowerShell Studio GUI Simplicity

In my last blog I show how easy it is to use a template to build a simple GUI application with a datagrid. Then, we enabled one of the sample code with the Script section of the “Load” button in order the process and display the results. And, this was just a start!

sapienstudio_00_2016-11-11_14-44-34

Simplicity

Now, how about making the GUI more functional so you can type any PowerShell command and the provide the results in the datagrid pane.
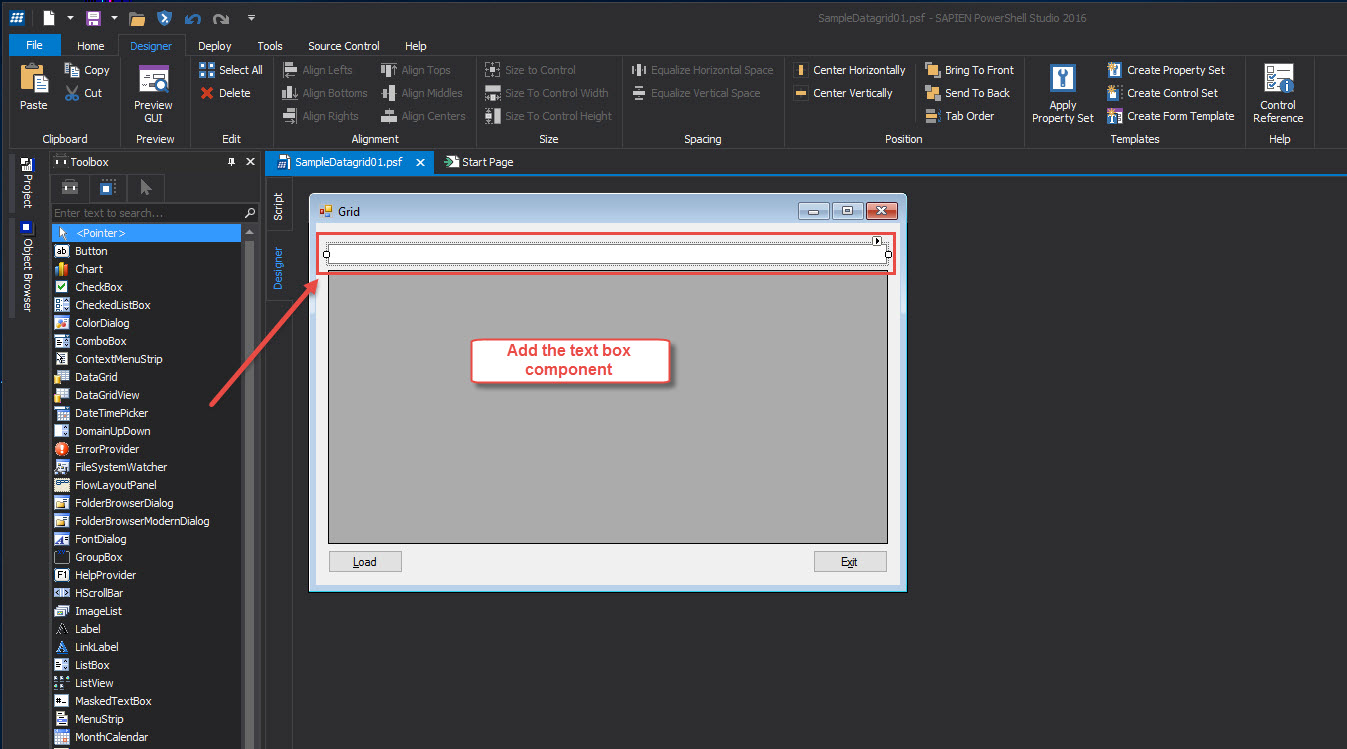
We can use the same GUI application we build and add a text box to be use to type our command.

sapiendgsimply_01_2016-11-14_14-14-52

Then, we need to add the following snippet code in the “Load” button script section:

[sourcecode language=”powershell”]
$scriptblock = $executioncontext.invokecommand.NewScriptBlock($textbox1.Text);
$MyGridObject = $null; $MyGridObject = Invoke-Command -Scriptblock $scriptblock;
Load-DataGridView -DataGridView $datagridviewResults -Item $MyGridObject -AutoSizeColumns DisplayedCells;
[/sourcecode]

sapiendgsimply_02_2016-11-14_14-14-52

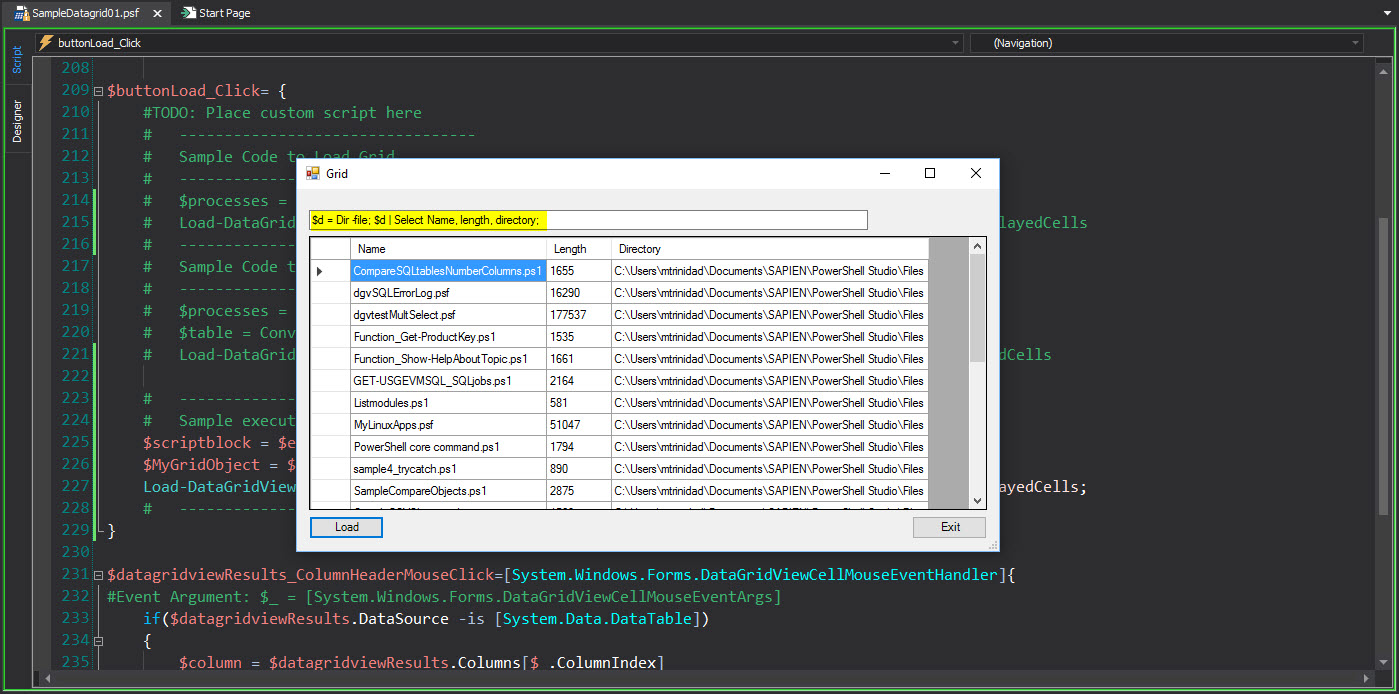
So, after adding both the Text box and the PowerShell code, we got ourselves a function GUI that can run your PowerShell script and display the results on the datagridview. By typing the following one-liner then press the “Load” button:

[sourcecode language=”powershell”]
$d = Dir -file; $d | Select Name, length, directory;
[/sourcecode]

sapiendgsimply_03_2016-11-14_14-14-52

And, this is just out of the box UX with little customization.

Next Step

Now, you won’t be able to run the PowerShell GUI application outside of PowerShell Studio. The next step will be to create an executable GUI application with the following steps from the menu:

1. Go to the Deploy menu, and click on “Settings“.

sapiendgsimply_04_2016-11-14_14-14-52

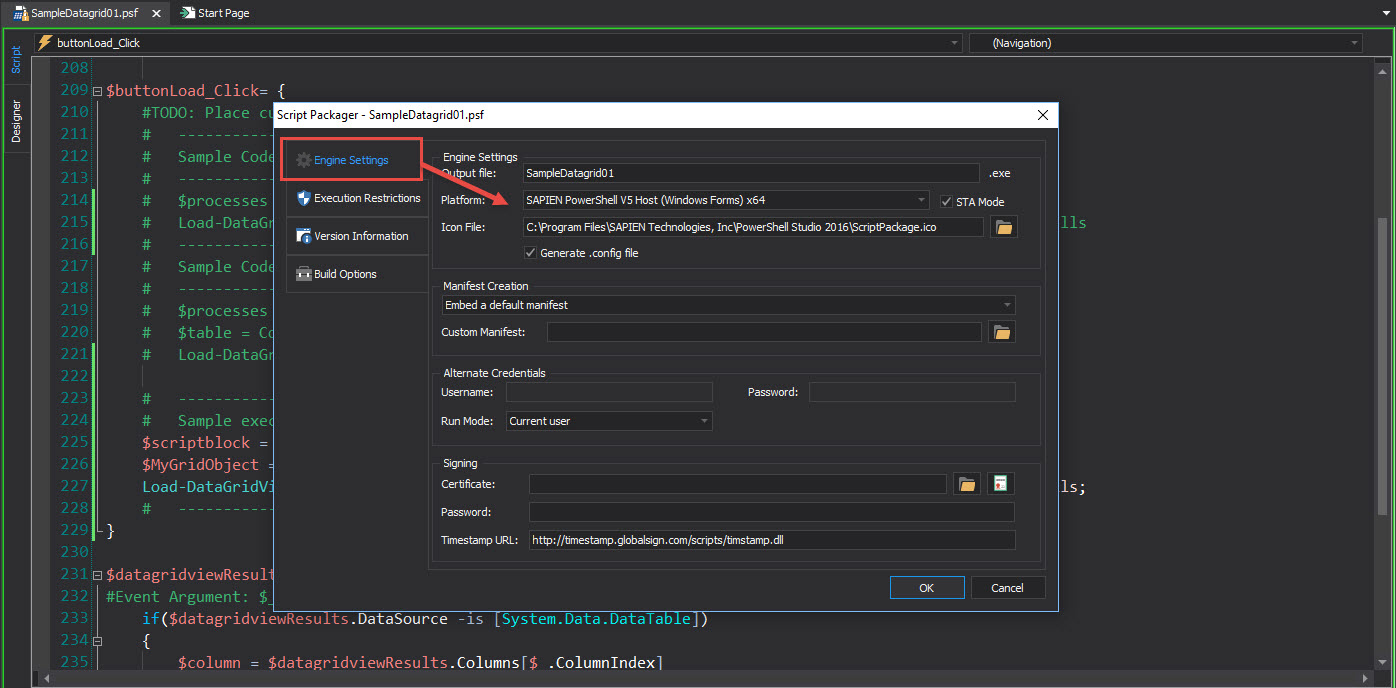
2. In the “Engine Settings” , you make necessary changes to the application information.

sapiendgsimply_05_2016-11-14_14-14-52

3. Under “Execution Restrictions“, you can identify which environments can execute this application.

sapiendgsimply_06_2016-11-14_14-14-52

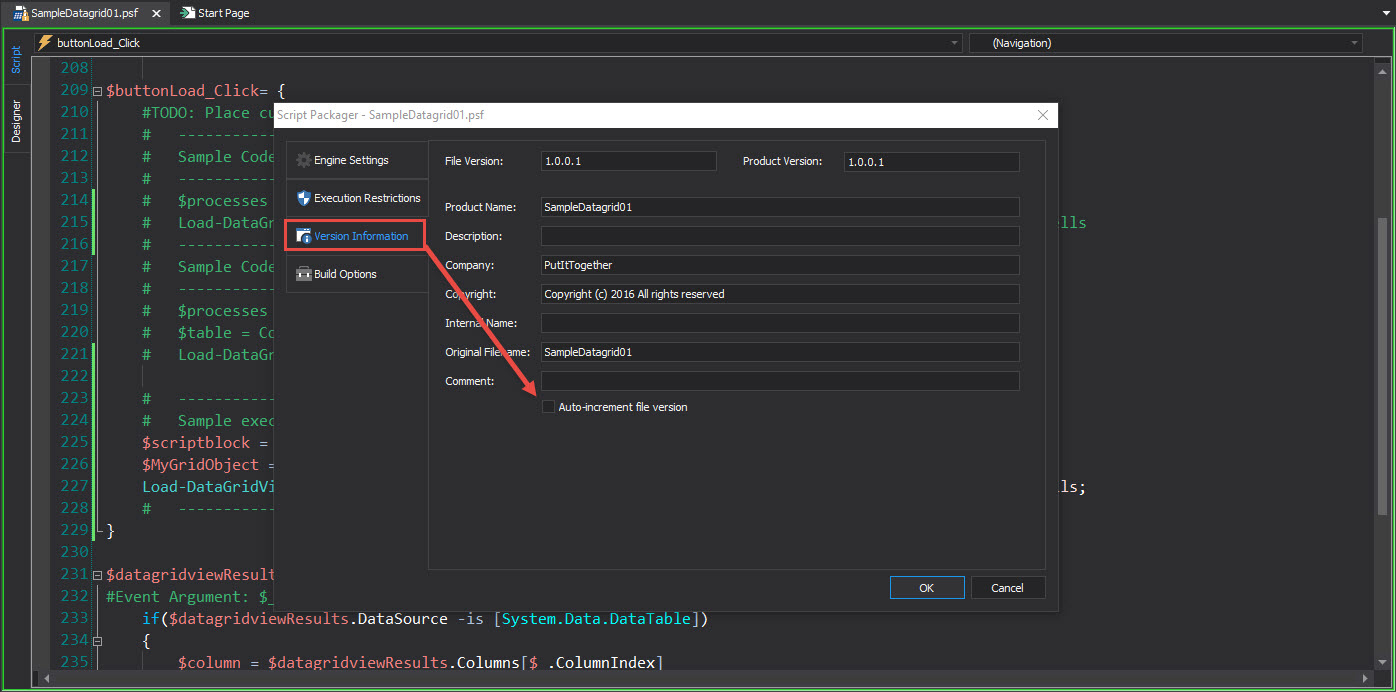
4. In “Version Information“, you can provide useful information for source control.

sapiendgsimply_07_2016-11-14_14-14-52

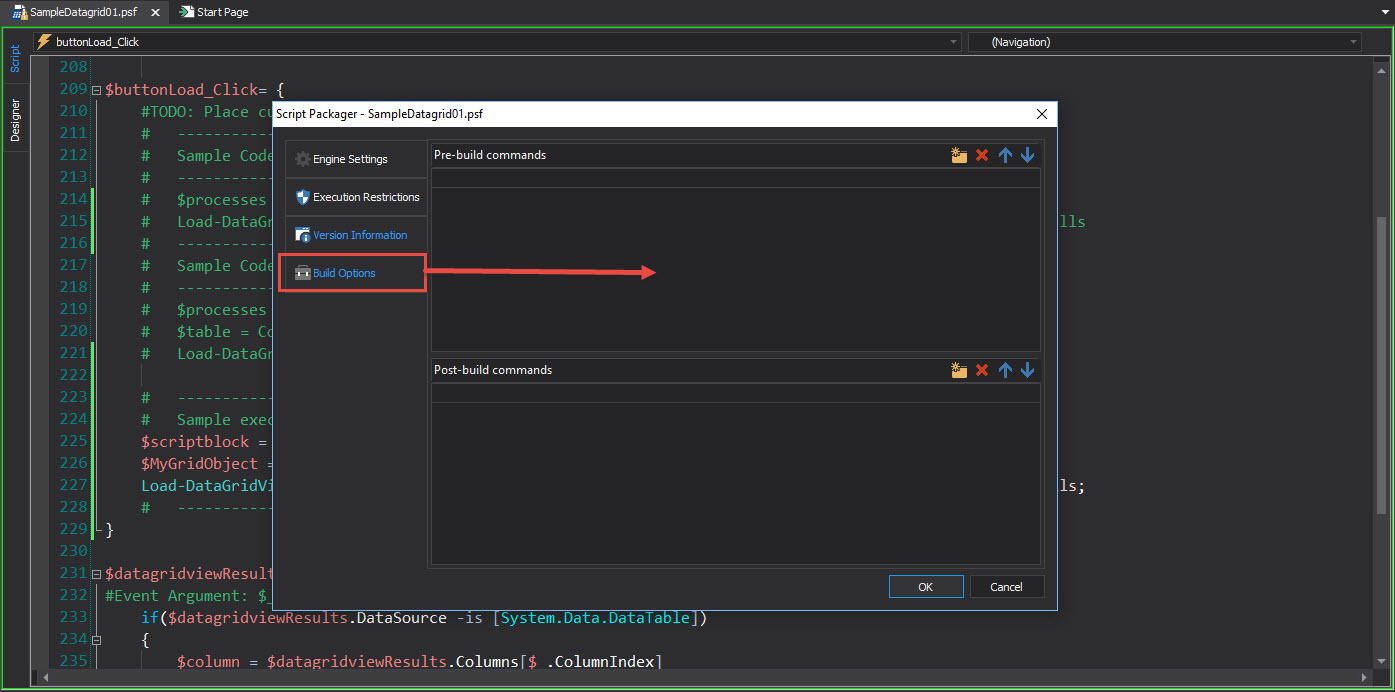
5. Finally, “Build Options“, in case you need some provide either Pre or Post commands during the build on this application.

sapiendgsimply_08_2016-11-14_14-14-52

6. *Now you can click either execute “Build” or “Build & Run” to create the executable.

sapiendgsimply_10_2016-11-14_14-14-52

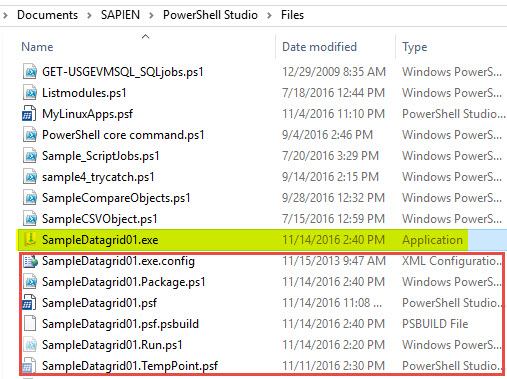
*Note: The executable will be stored on the same folder you had created the application.

sapiendgsimply_09_2016-11-14_14-14-52

For more information

Download the product for a evaluation:
https://www.sapien.com/software/powershell_studio

More information about PowerShell Studio:
https://www.sapien.com/assets/pdf/PowerShell_STUDIO.pdf

This how simple it is to create a PowerShell executable GUI (also non-GUI) application in PowerShell Studio.

Next blog I’ll be covering buidling the MSI installer for this application.