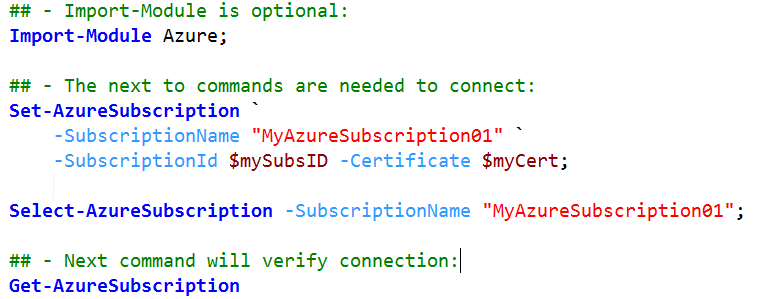
As I work on my second blog piece for the “Getting Ready with Windows Azure SQL Database Server PowerShell and SMO Part – 2/2“, I came up with a way to trap the current IP Address with PowerShell scripting. When using the Portal for creating your SQL Database Server, it will ask you if you want to create the Firewall rule for you. But you may want to automate this step using PowerShell and there’s no cmdlet to identify the “current” IP Address of your Windows Azure connection.
Here’s an example of how the Portal message when is asking for the current IP Address to be added to the Firewall rules:
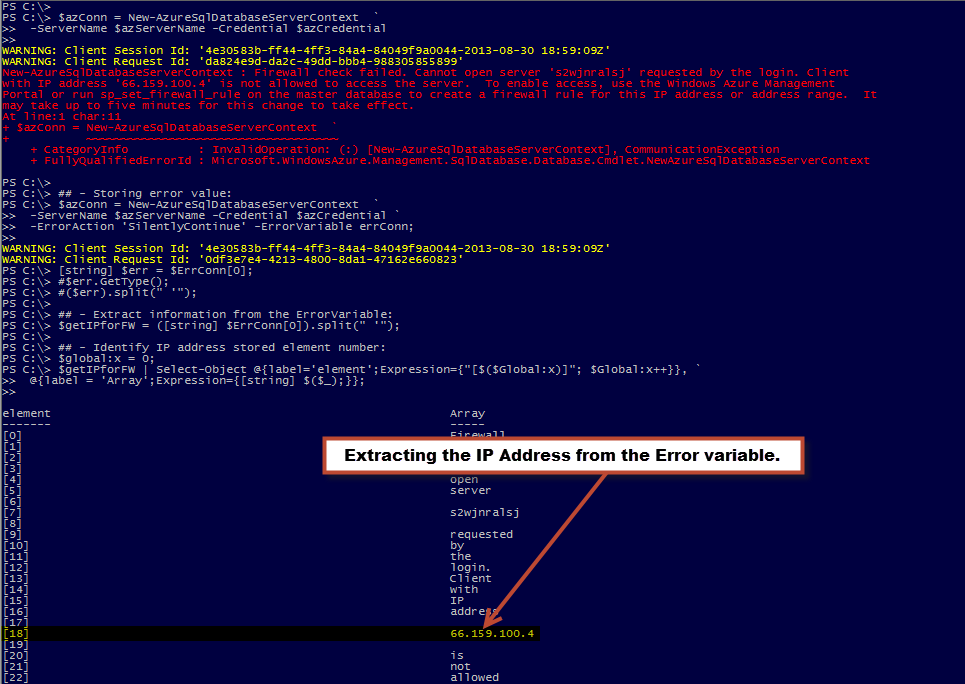
I’m going right to the point with this small blog piece. Basically, I’m trapping the error message from the “New-AzureSqlDatabaseServerContext” which will fail to connect to your Azure SQL Database. Then, I’m dissecting the string to get the IP Address in error. This is my way of trapping the IP address. I know there might be a better way but for now it works.
I’m assuming the connection to Windows Azure has already been established and you are trying to use the “New-AzureSqlDatabaseServerContext” for connecting to the database. If you haven’t created the rule then it won’t connect.
Note: Again, stay tuned for the next “Windows Azure SQL Database Server with PowerShell and SMO” blog part 2/2.
In the “New-AzureSqlDatabaseServerContext” I’m including the following two parameters: -ErrorAction ‘SilentlyContinue’ and -ErrorVariable errConn. The “ErrorAction” results in not displaying the message. The “ErrorVariable” define the PowerShell variable you will be storing the error message. Notice the “ErrorVariable” name doesn’t include a “$” but its needed to view it (ie. $errConn).
[sourcecode language=”powershell”]
## – Storing error value:
$azConn = New-AzureSqlDatabaseServerContext `
-ServerName $azServerName -Credential $azCredential `
-ErrorAction ‘SilentlyContinue’ -ErrorVariable errConn;
[/sourcecode]
The additional script code shown next will dissect the error message string from $errConn variable. It will take the string to create an array which will help identify the element position where the IP Address is stored. In this case I’m assuming the error message will not change so the IP Address will always be located in the same place (Right!). So the first time this code execute, it will find the IP Address in element #18.
Note: Please run first the code to identify the element position in case the “Culture” settings might change the location of the IP Address.
[sourcecode language=”powershell”]
## – Extract information from the ErrorVariable:
$getIPforFW = ([string] $ErrConn[0]).split(" ‘");
## – Display all variable stored in the array and identify where the IP address is stored:
$global:x = 0;
$getIPforFW | Select-Object @{label=’element’;Expression={"[$($Global:x)]"; $Global:x++}}, `
@{label = ‘Array’;Expression={[string] $($_);}};
## – Run once to confirm IP value is stored in element #18:
$getIPforFW[18].Trim();
[/sourcecode]
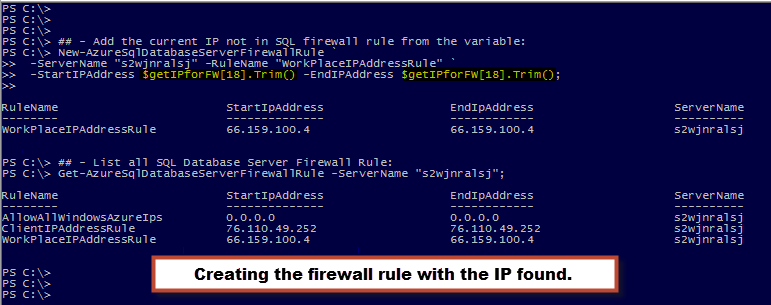
The rest is easy. After extracting the IP value then you can use the “New-AzureSqlDatabaseServerFirewallRule” to create the firewall rule to include the current IP Address.
[sourcecode language=”powershell”]
## – Get current IP and added it to the SQL Database Firewall Rule:
New-AzureSqlDatabaseServerFirewallRule `
-ServerName "YourServerName" -RuleName "YourClientIPAddressRule" `
-StartIPAddress $getIPforFW[18].Trim() -EndIPAddress $getIPforFW[18].Trim();
[/sourcecode]
You can refine this script code to suit your need. Just make sure to test a few times and verify you are getting the results you need.
Here’s a few more commands you could use to work with these rules. The “Remove-AzureSqlDatabaseServerFirewallRule” to remove any existing rule(s) and the “Get-AzureSqlDatabaseServerFirewallRule” to list them all.
[sourcecode language=”powershell”]
## – List all your SQL Database Firewall Rules:
Get-AzureSqlDatabaseServerFirewallRule -ServerName "YourServerName";
## – Removing existing SQL Database Firewall Rule:
Remove-AzureSqlDatabaseServerFirewallRule `
-ServerName "YourServerName" -RuleName "YourClientIPAddressRule"";
[/sourcecode]
So, at the end, you will have the ability to automate the process without the need of using the Portal. Most can be done using PowerShell scripting.
Stay tuned for more Windows Azure SQL Database Server.
That’s it for now!
Maximo Trinidad
Mr. PowerShell
🙂


